
Short Rows in Tunisian Crochet
Short rows in Tunisian crochet are a fabulous way to introduce certain kinds of shaping. I’ve only seen them used by a few Tunisian crochet designers. Aoibhe-Ni was the first designer I came across who was using short rows. She used them to create wedge shapes within her shawls. Years ago, I chatted with Rachel Henri about centre short rows and we both agreed how useful they are. Rachel incorporated them into a couple of her designs with great success - I tested this one. Rachel created some fantastic resources for short rows on her blog which includes several methods for creating each kind. I still refer to them today. None of us really 'invented' these techniques but the designers I know who focus on Tunisian Crochet, like me, are finding some pretty innovative ways of using them.
Are you wondering why we're working with short rows? What's the point of them? Well, I'm not using them in shawls all that much, because if you've been following me for a while, I'm really into garments. I want to use short rows in garments for things like:
Raising the back of a yoke in the neckline
Creating curved bottoms on jumpers
Making a shoulder drop.
These applications for short rows will involve multiple centre short rows - using both forward pass and return pass short row techniques in the same row.
To understand centre short rows, it’s helpful to refresh yourself of the basic techniques for forward and return pass short rows. There are several ways of creating both kinds. I’m only going to show you one of the ways, being my favourite techniques to ensure there are no holes in the work. These are the techniques recommended to use in the patterns I’m creating.
Forward Pass Short Rows
Forward pass short rows are used to create a piece that has more rows on the starting edge of the work and less on the finishing edge. So, for a right-handed crocheter, more rows on the right than the left and for a left-handed crocheter, more rows on the left than the right.
The photos below step out the steps with a right and left handed view. The video demonstration is a right handed view only.
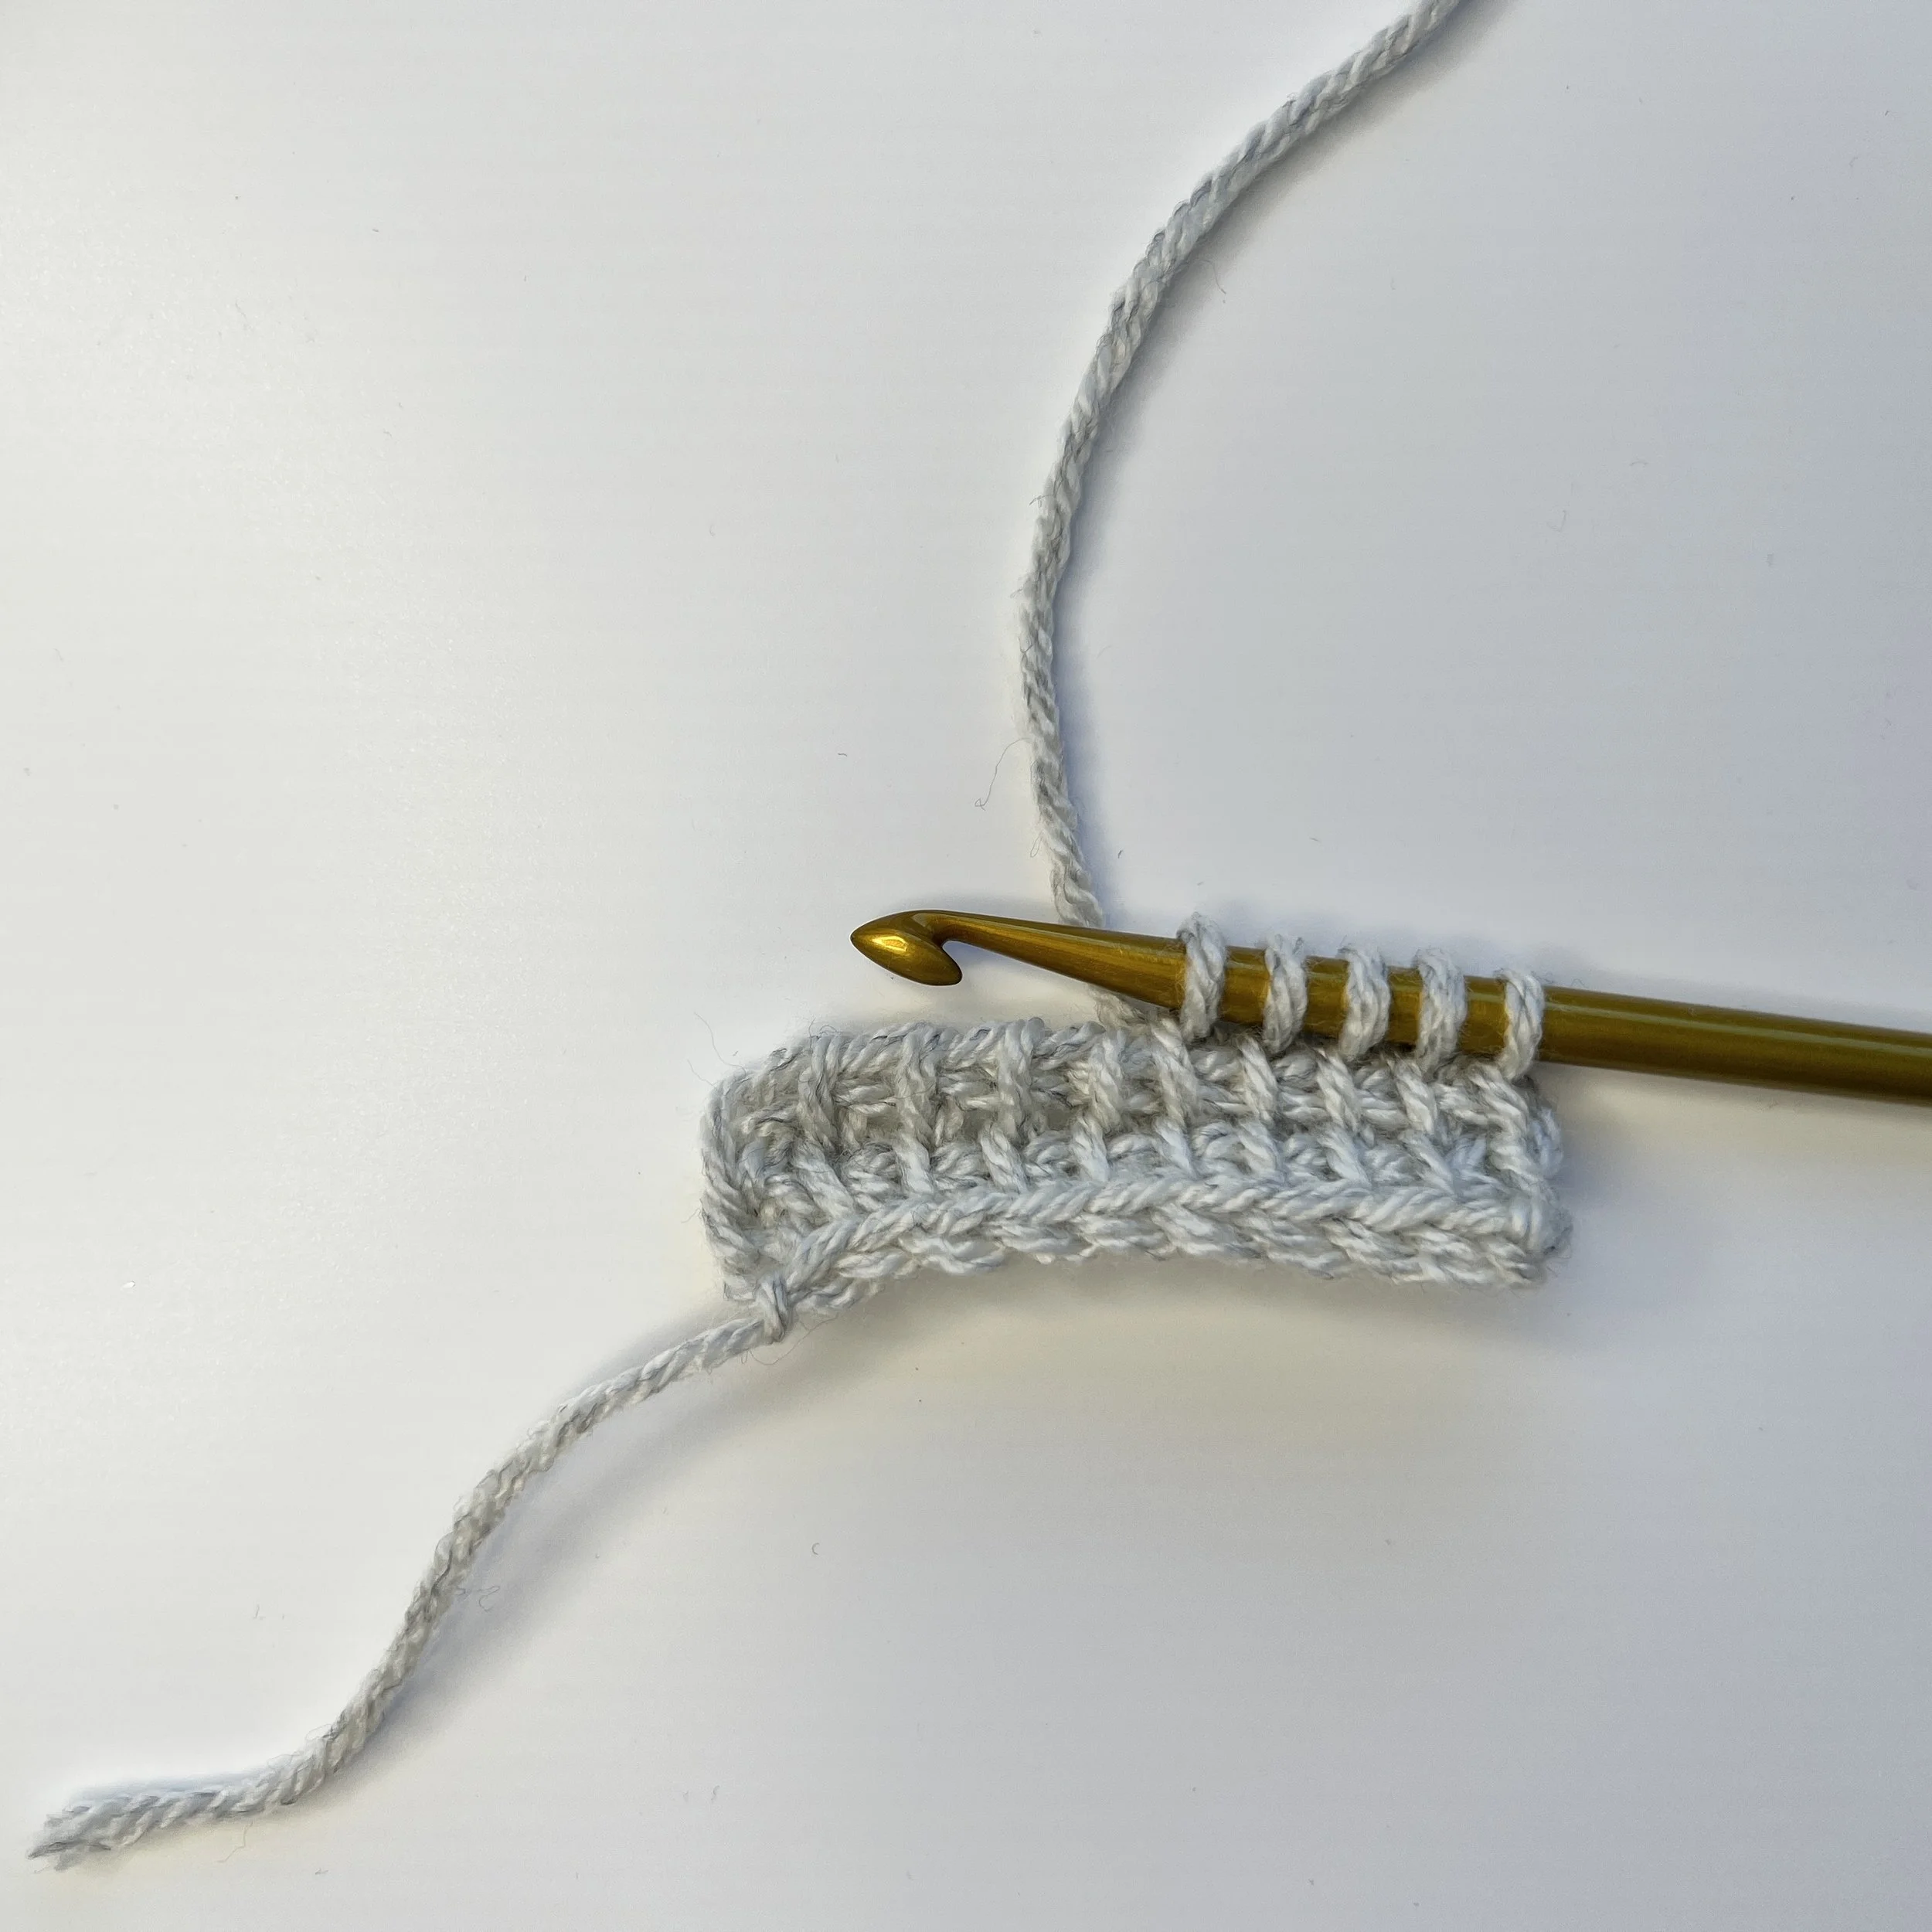
Start with a base of Tunisian simple stitches. My sample has 10 ch and 10 tss x 2 rows. Short Row FP: Pick up a number of sts that is less than the full row, eg pick up 4 tss – 5 loops on hook. Optional tip: Place one marker around the front and back loops of the last st on the hook.
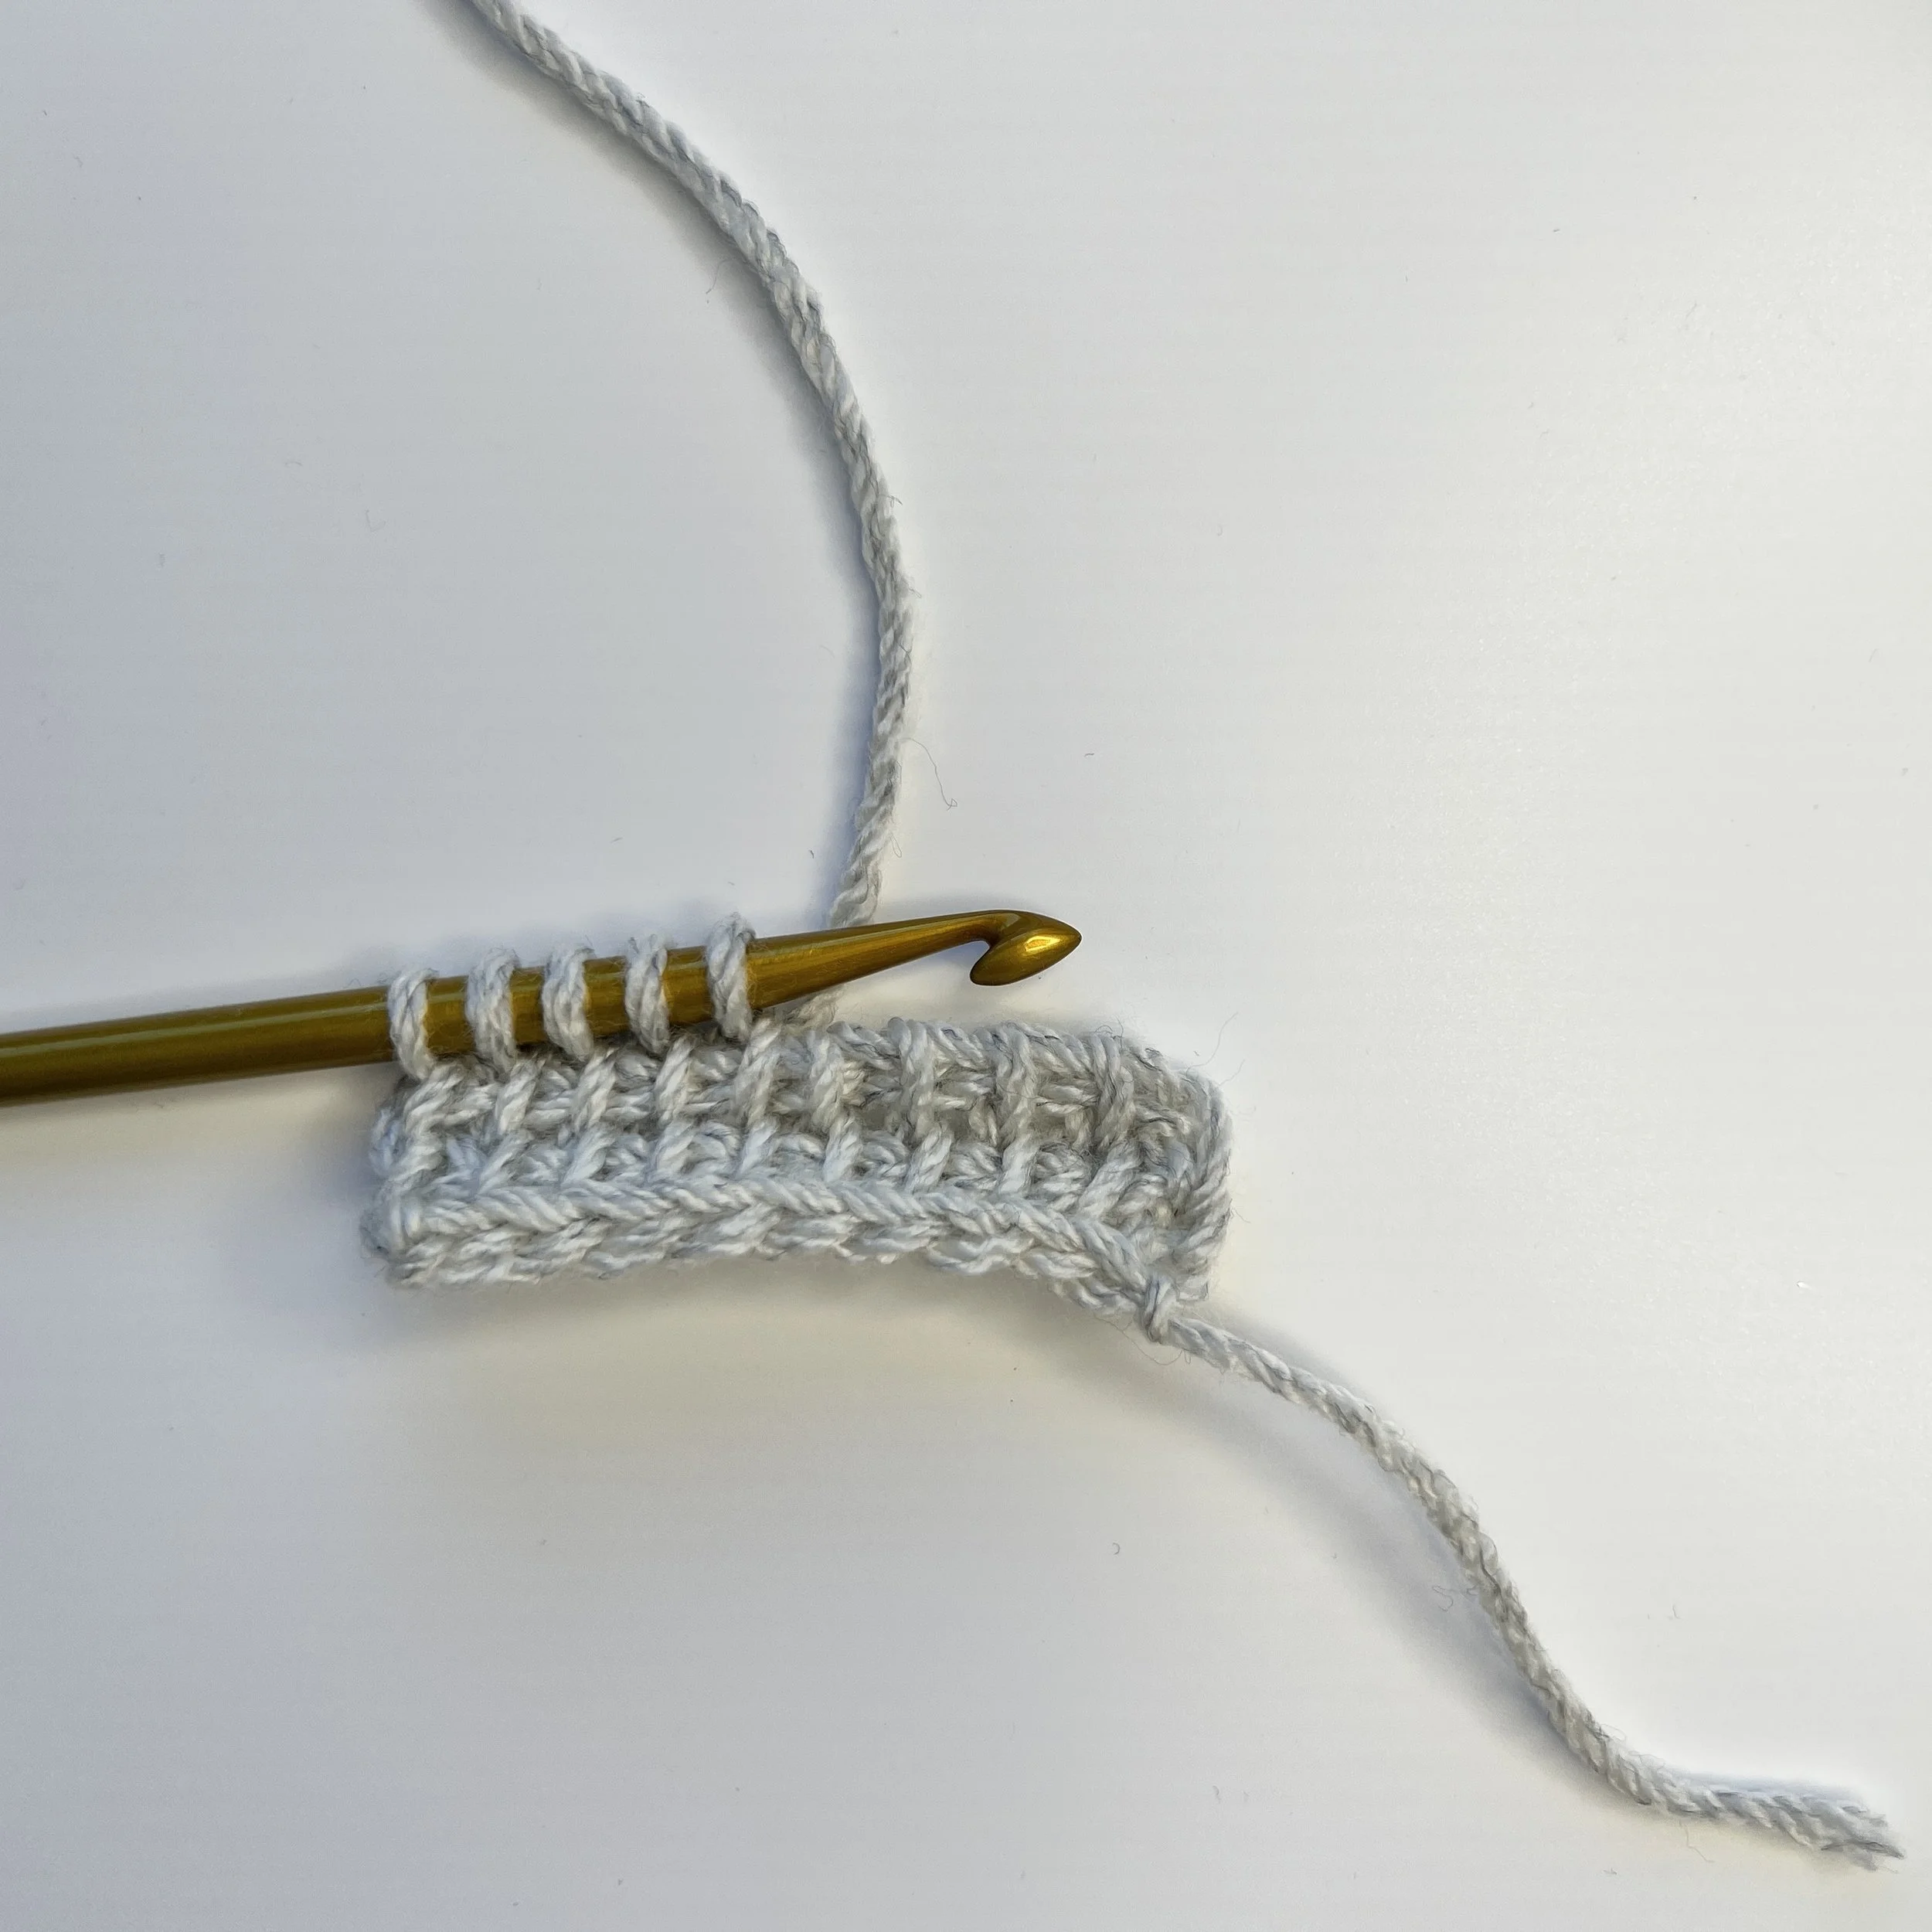
Left handed view
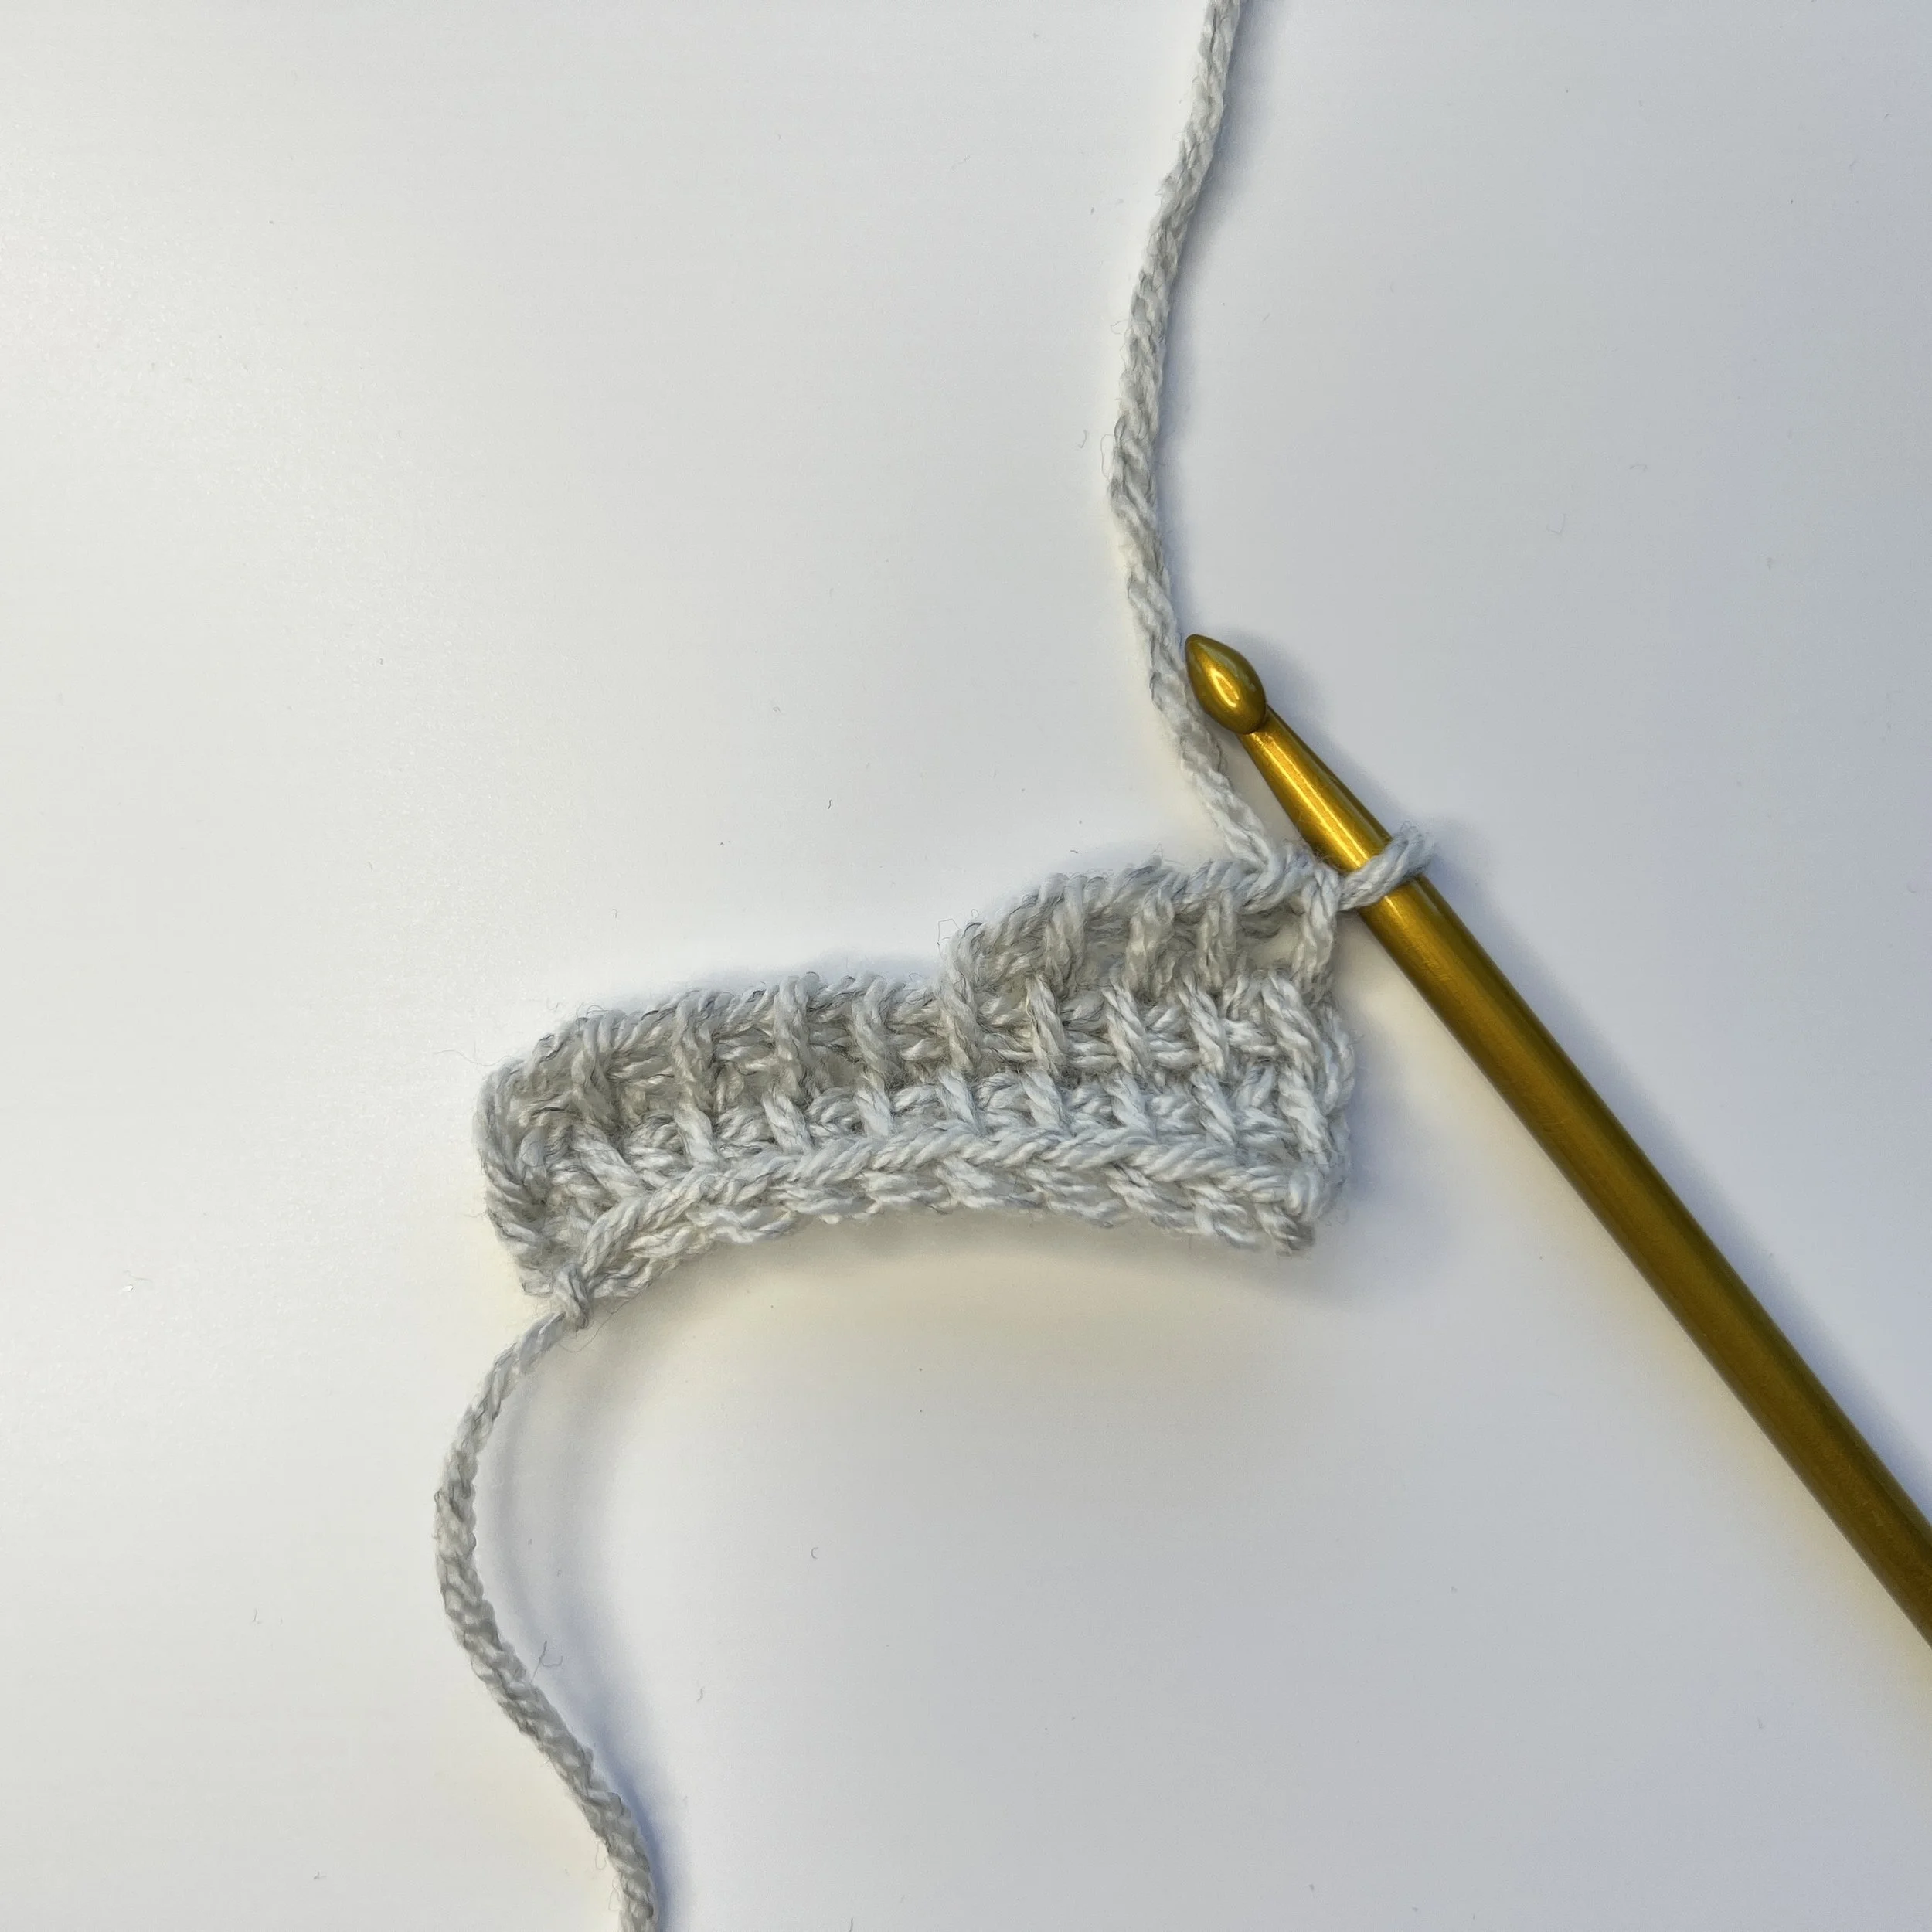
Short Row RP: *Yarn over, pull through 2 loops* until 1 loop remains on hook. Note that I have omitted the usual ‘ch 1’ at the start of this RP.
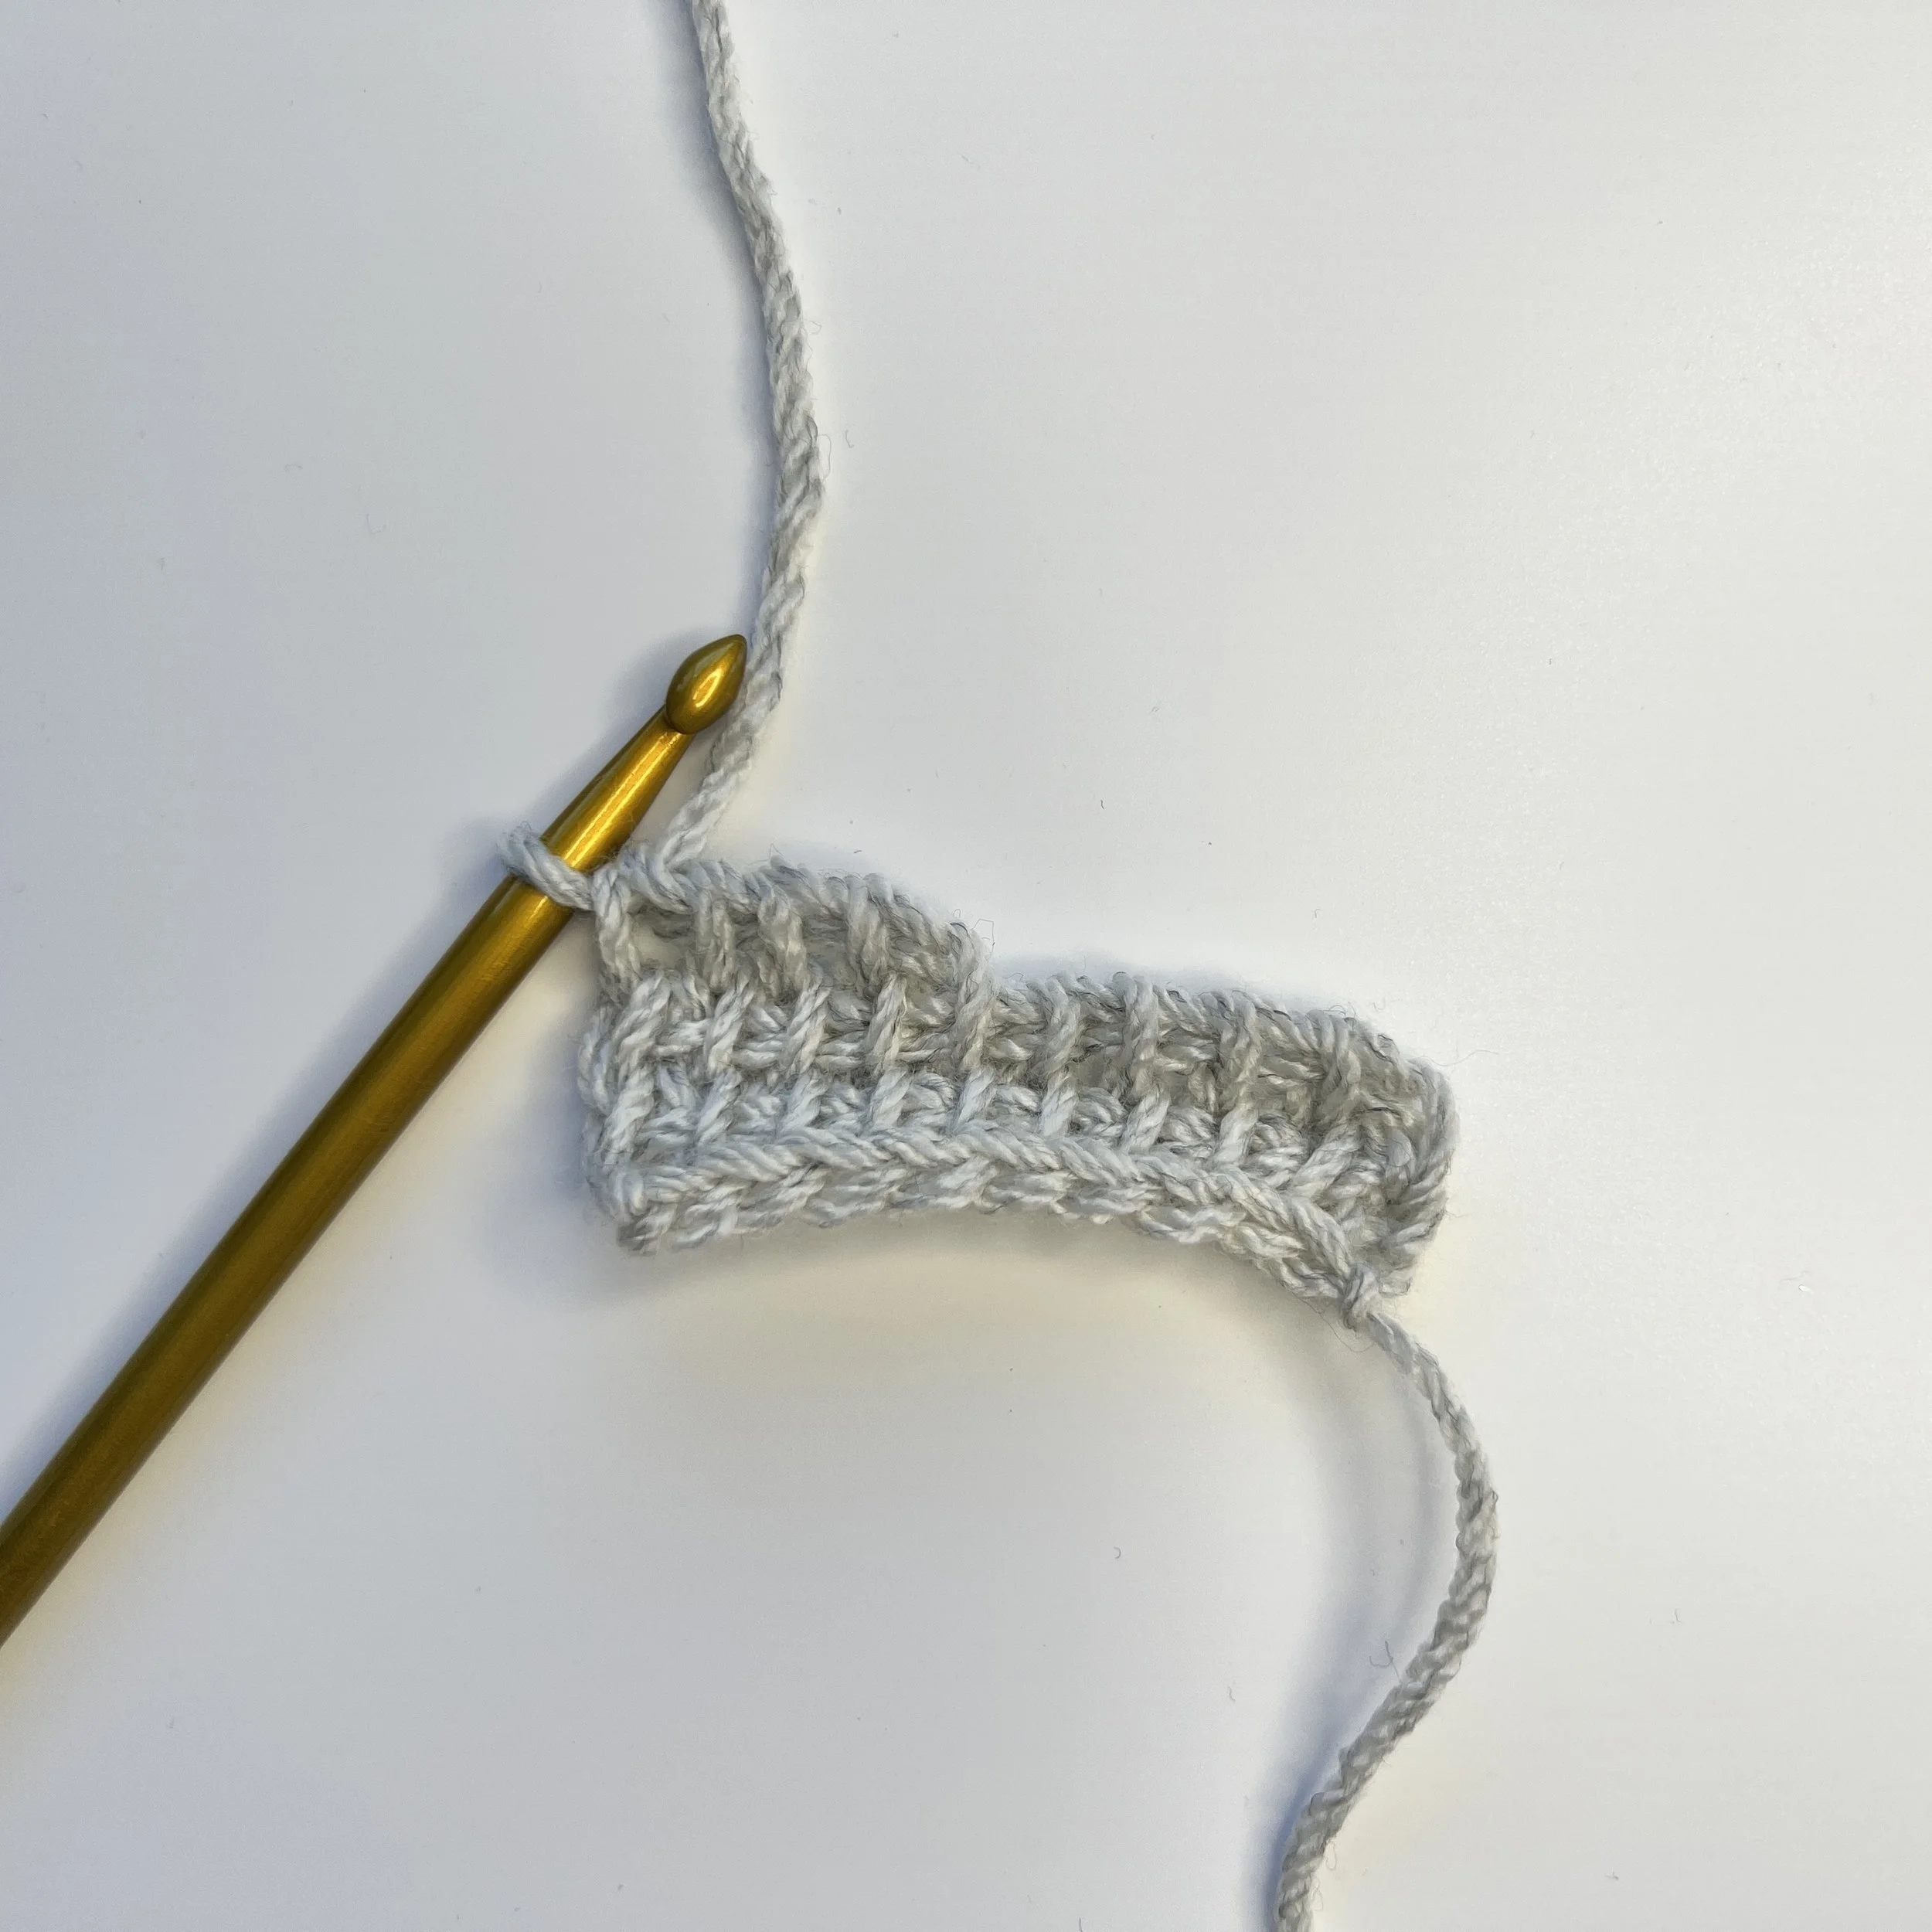
Left handed view
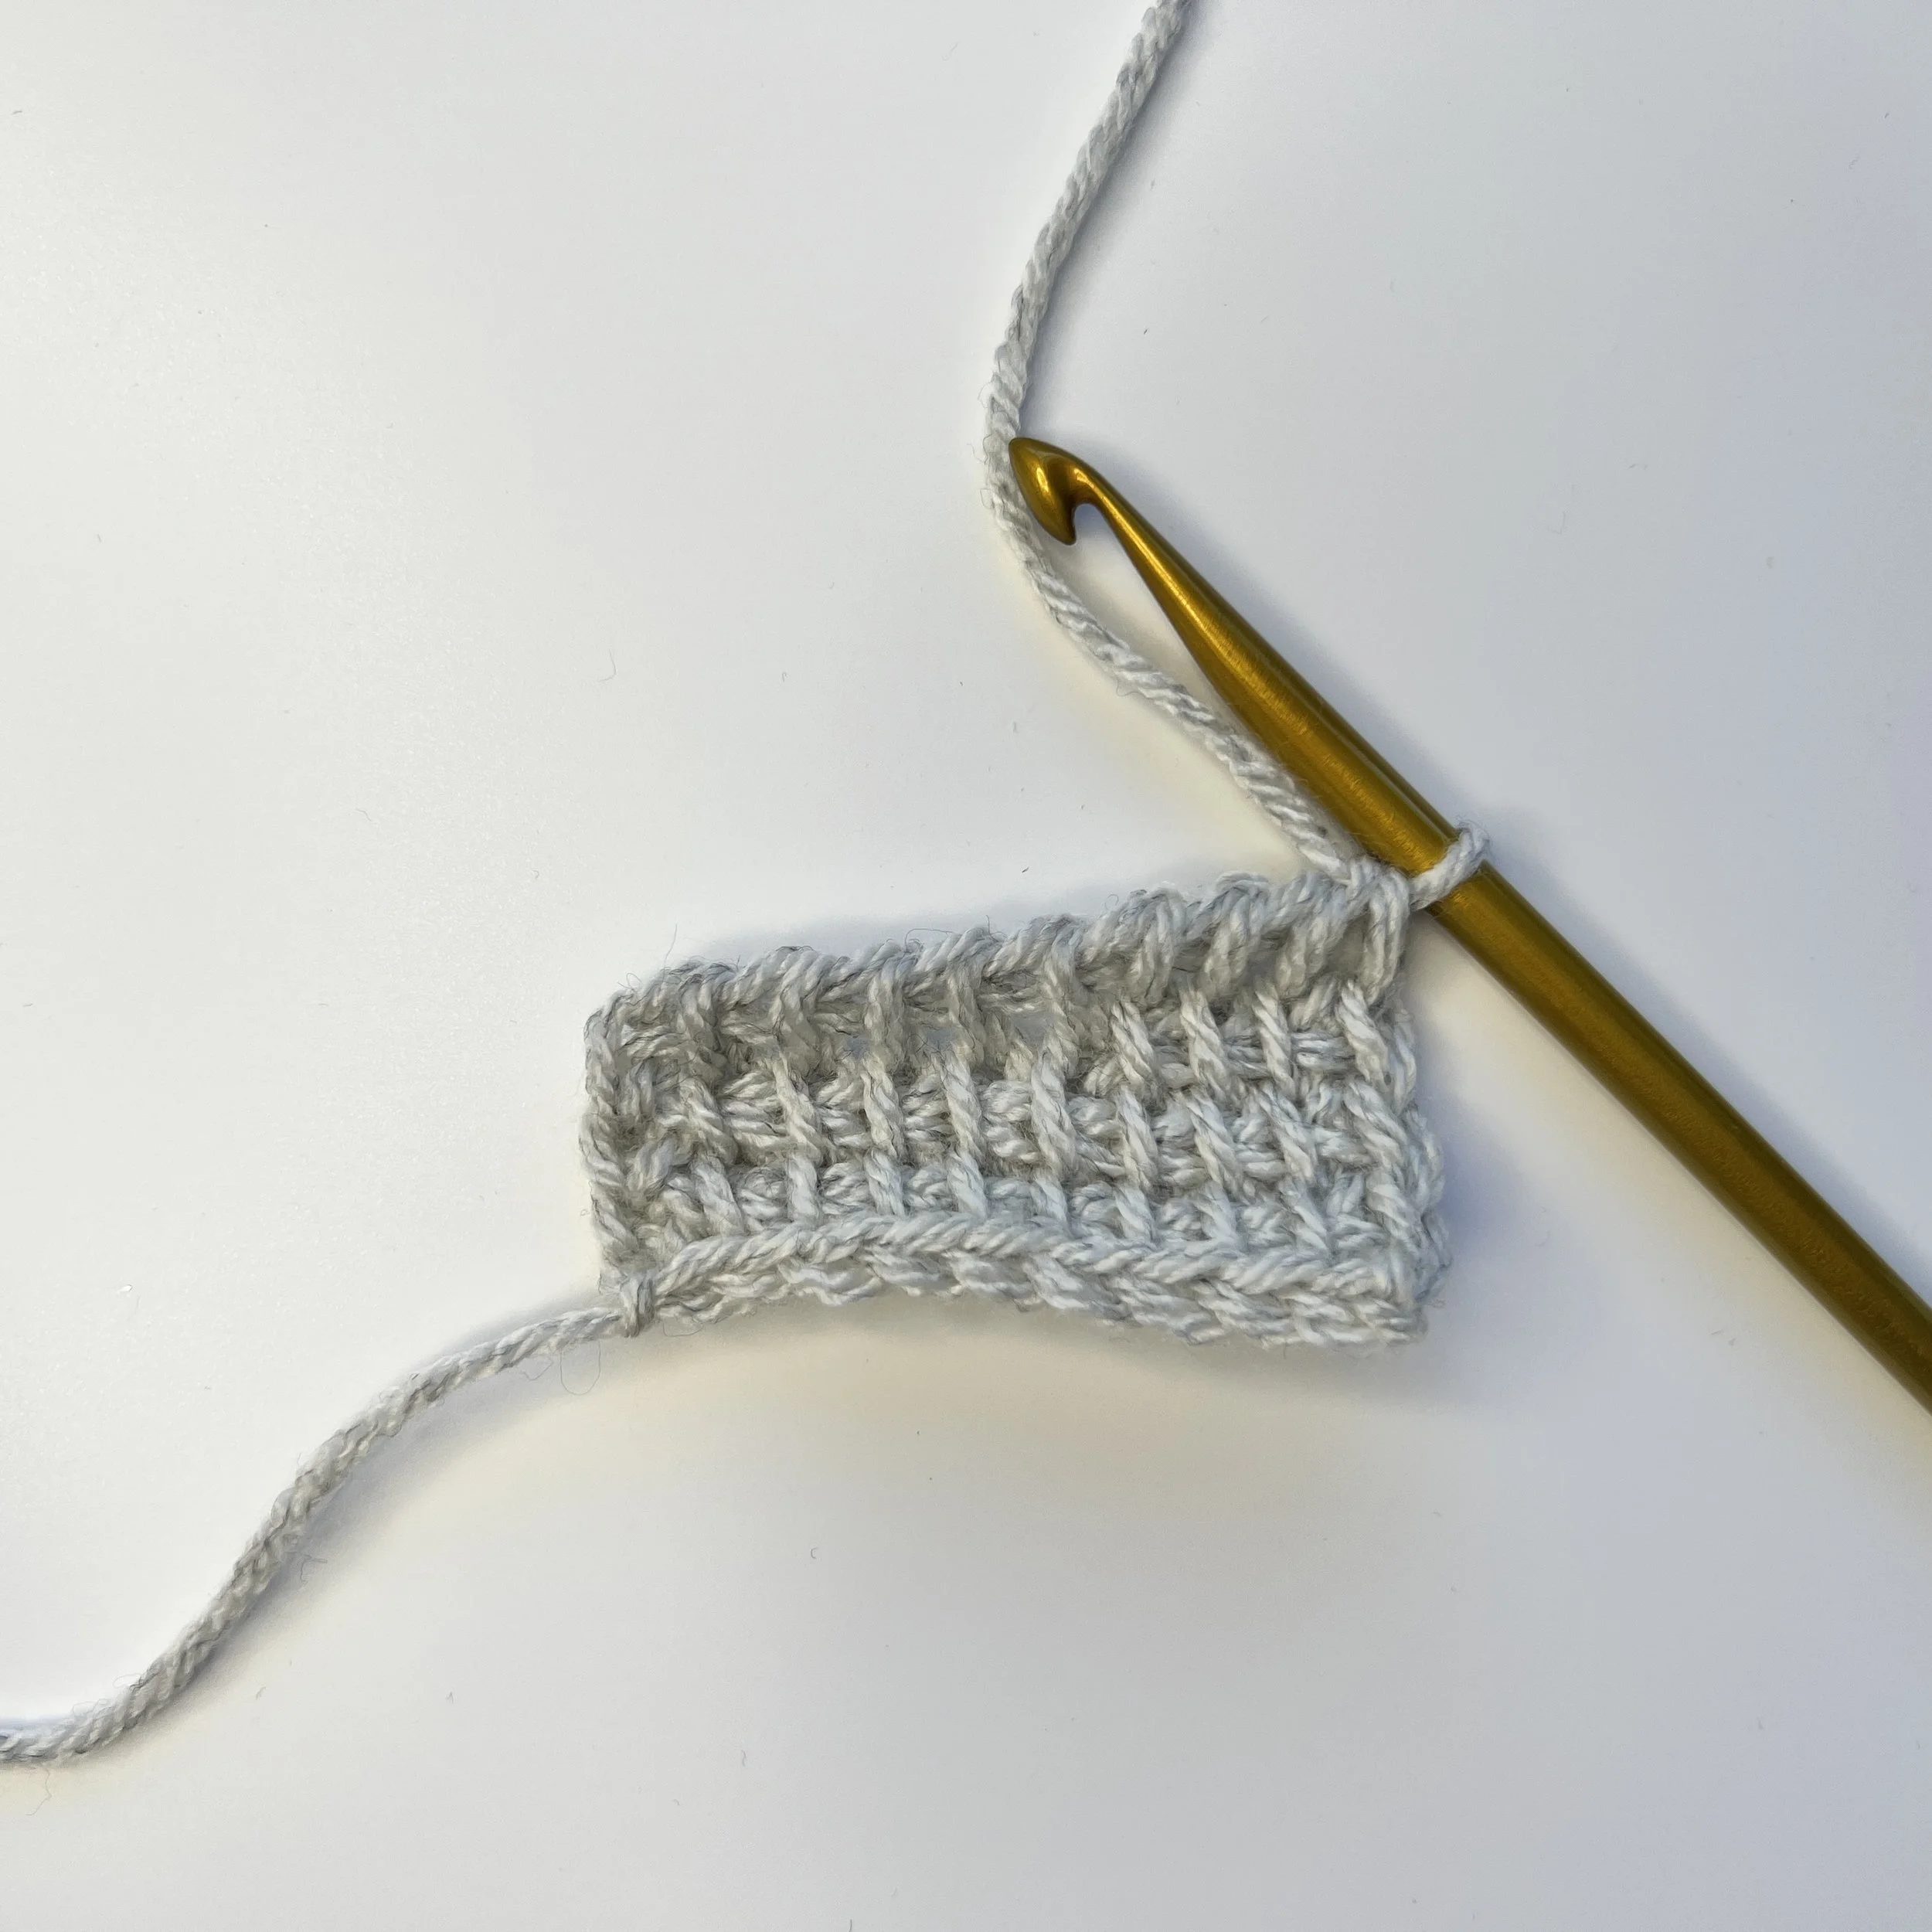
Row above the short row: Tss in each st until the marked st, pick up both the front and back loops of the marked st (the same as you would for an edge st at the end of a row), then continue the row like normal to the end – tss to end, pick up a loop in edge st – 10 loops on hook. RP: Ch 1, *yarn over, pull through 2 loops* until 1 loop remains on hook.
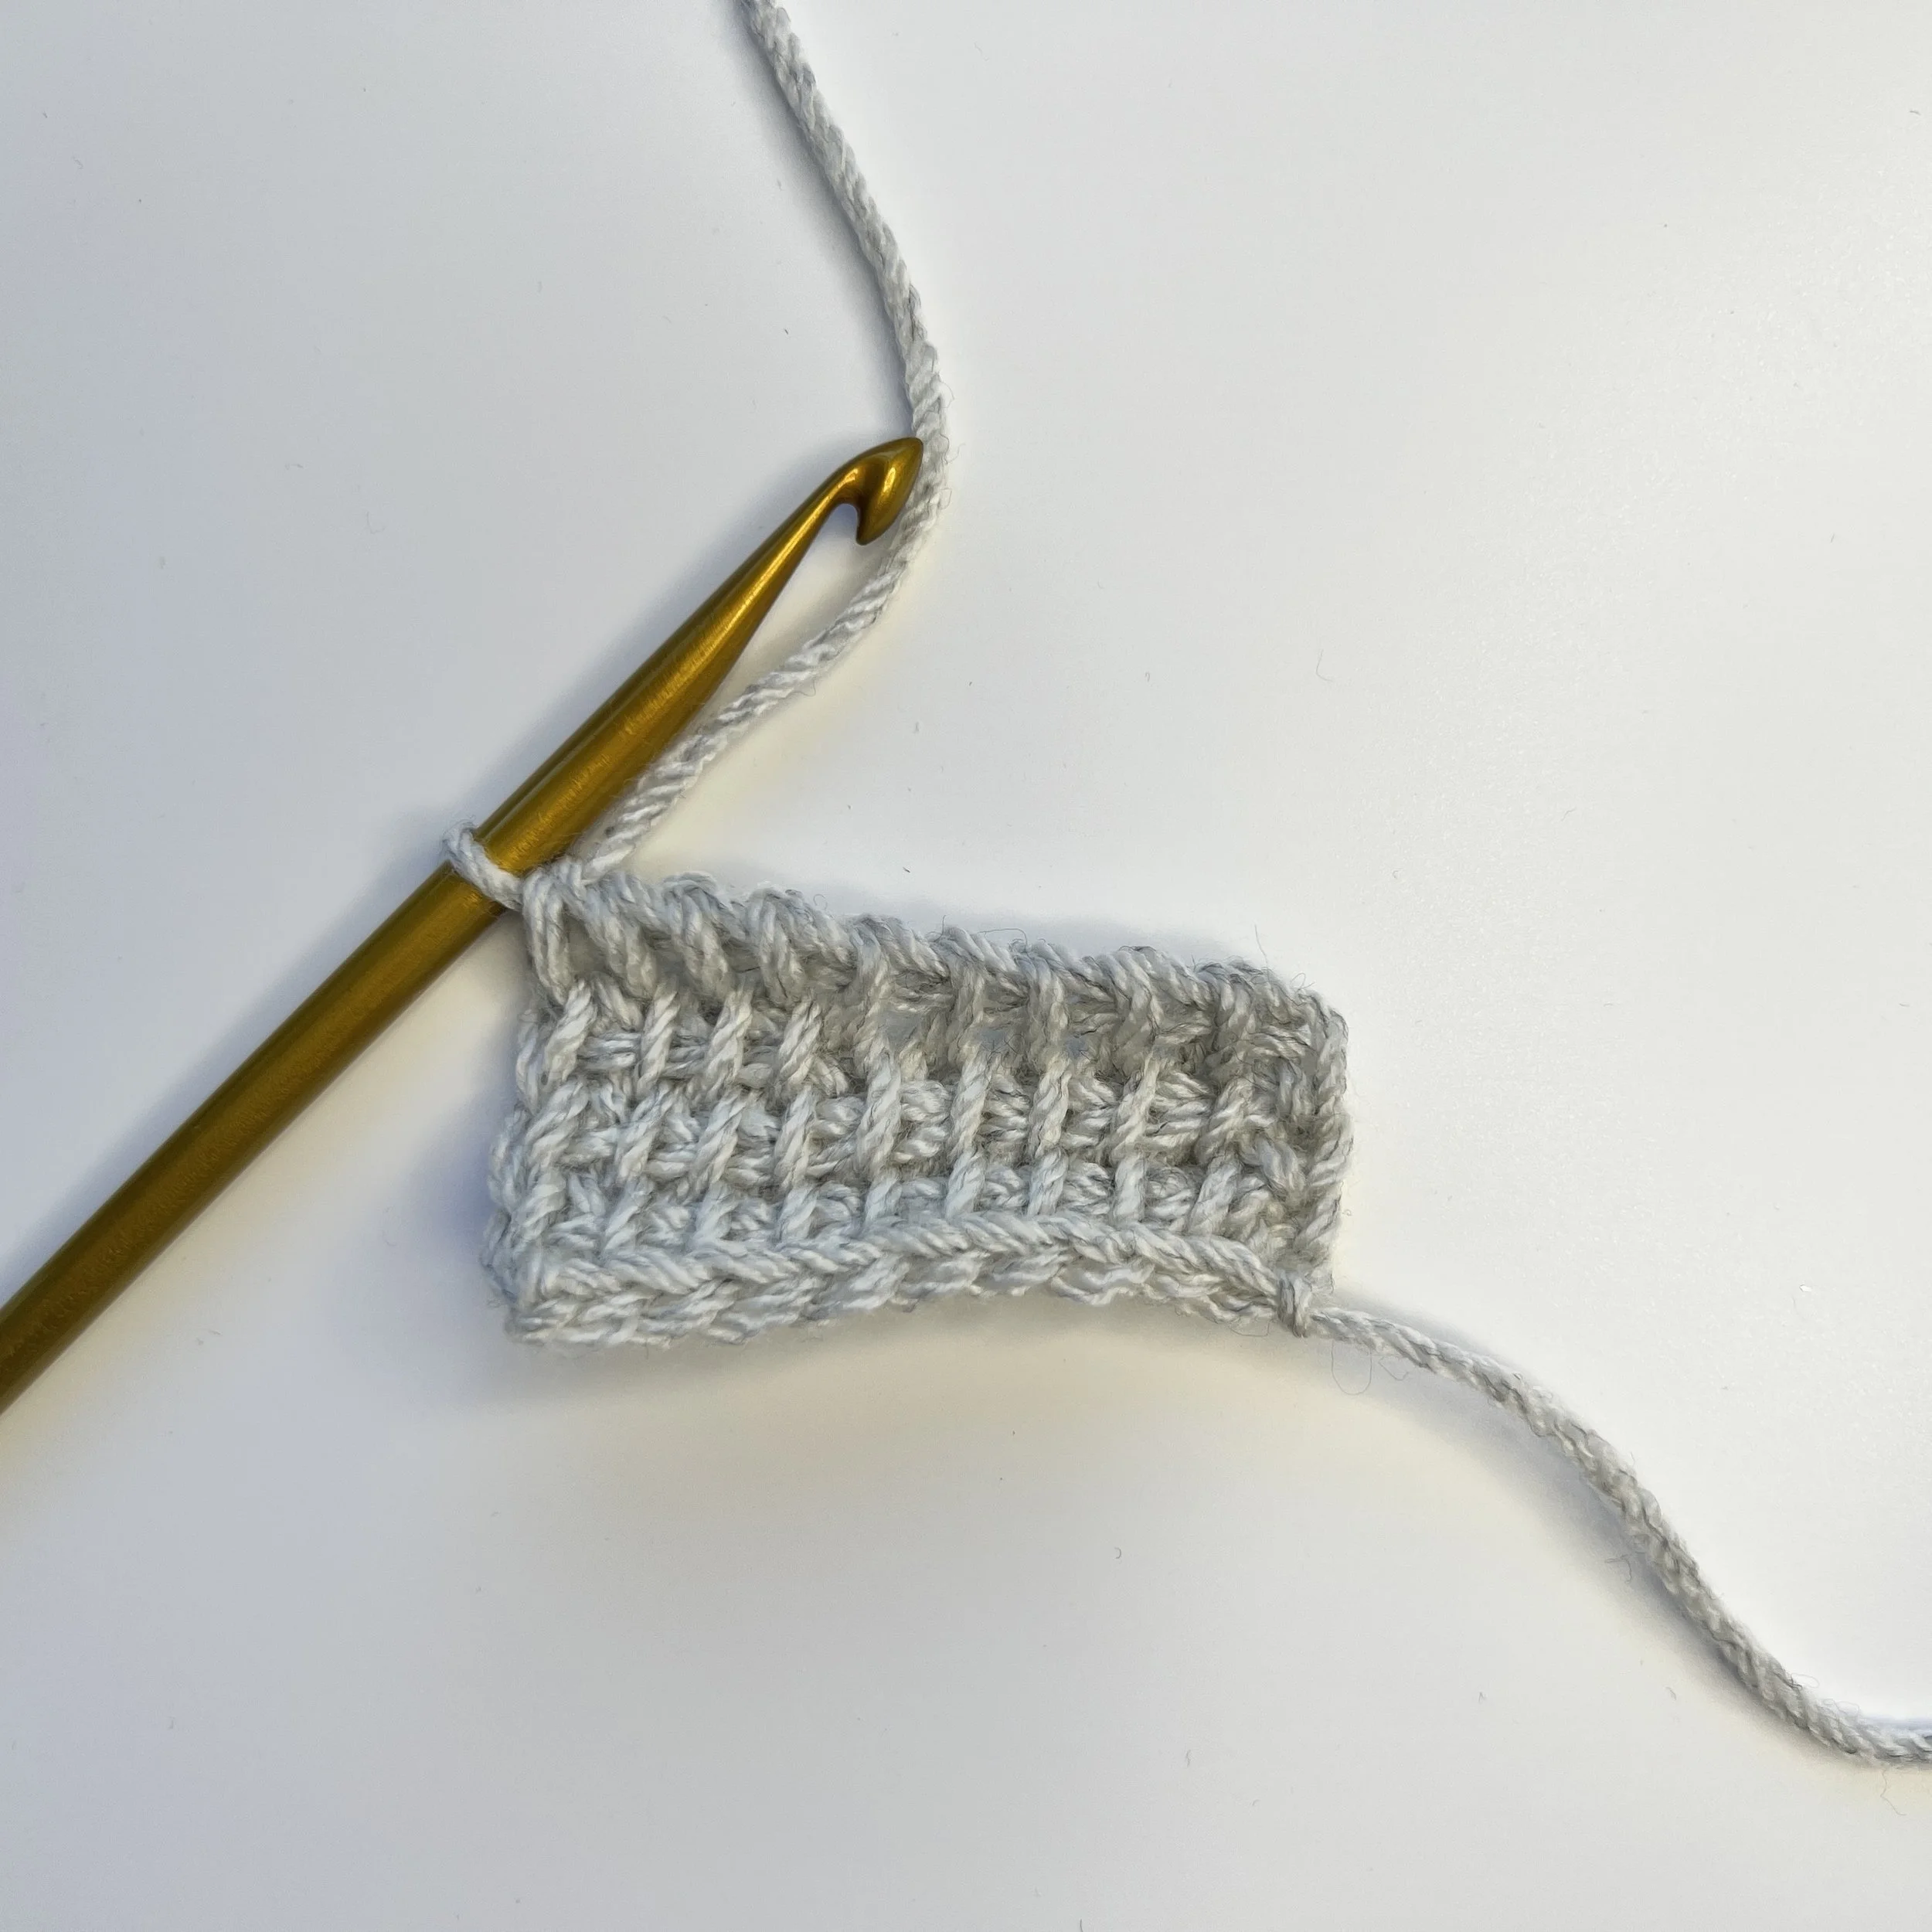
Left handed view
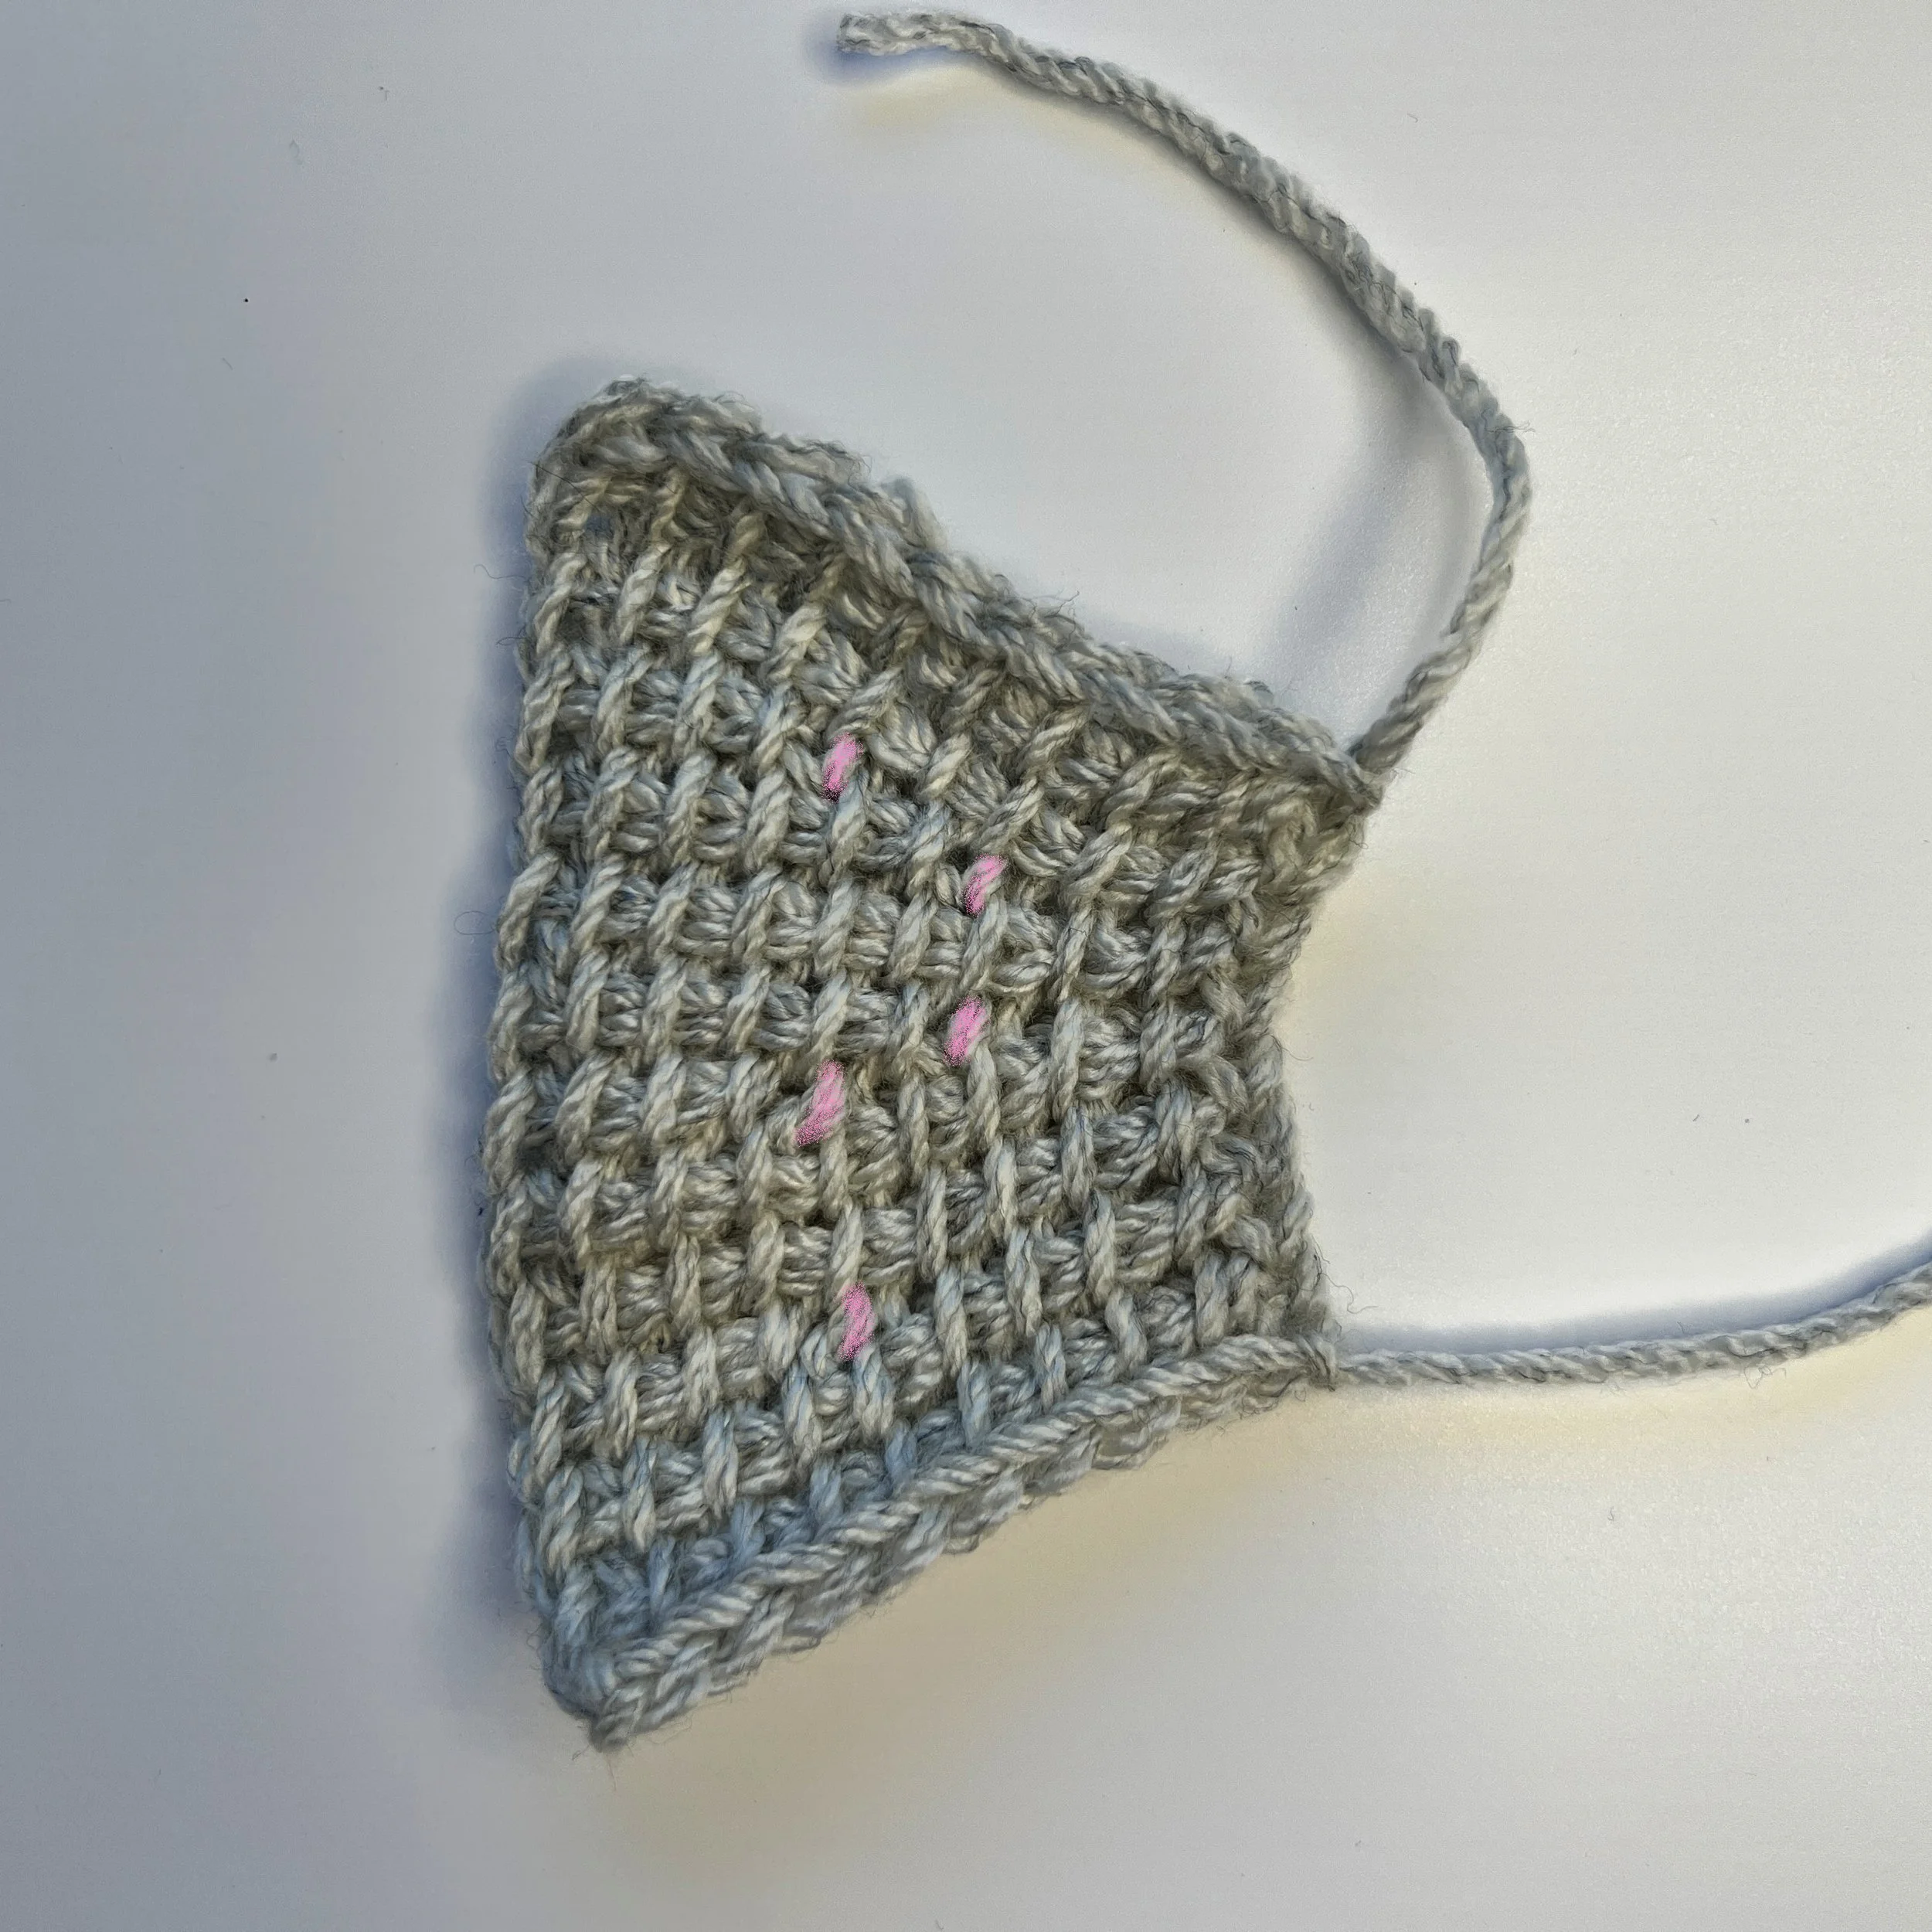
There is no limit to what you can do with short rows. You can make multiple short rows on top of each other but it’s best to stagger them – don’t make them all the same number of sts or you will get holes in the work! Here I've continued my swatch and changed up how I positioned the short rows. I've highlighted the last loop of the forward pass in pink so you can see where the rows differ.
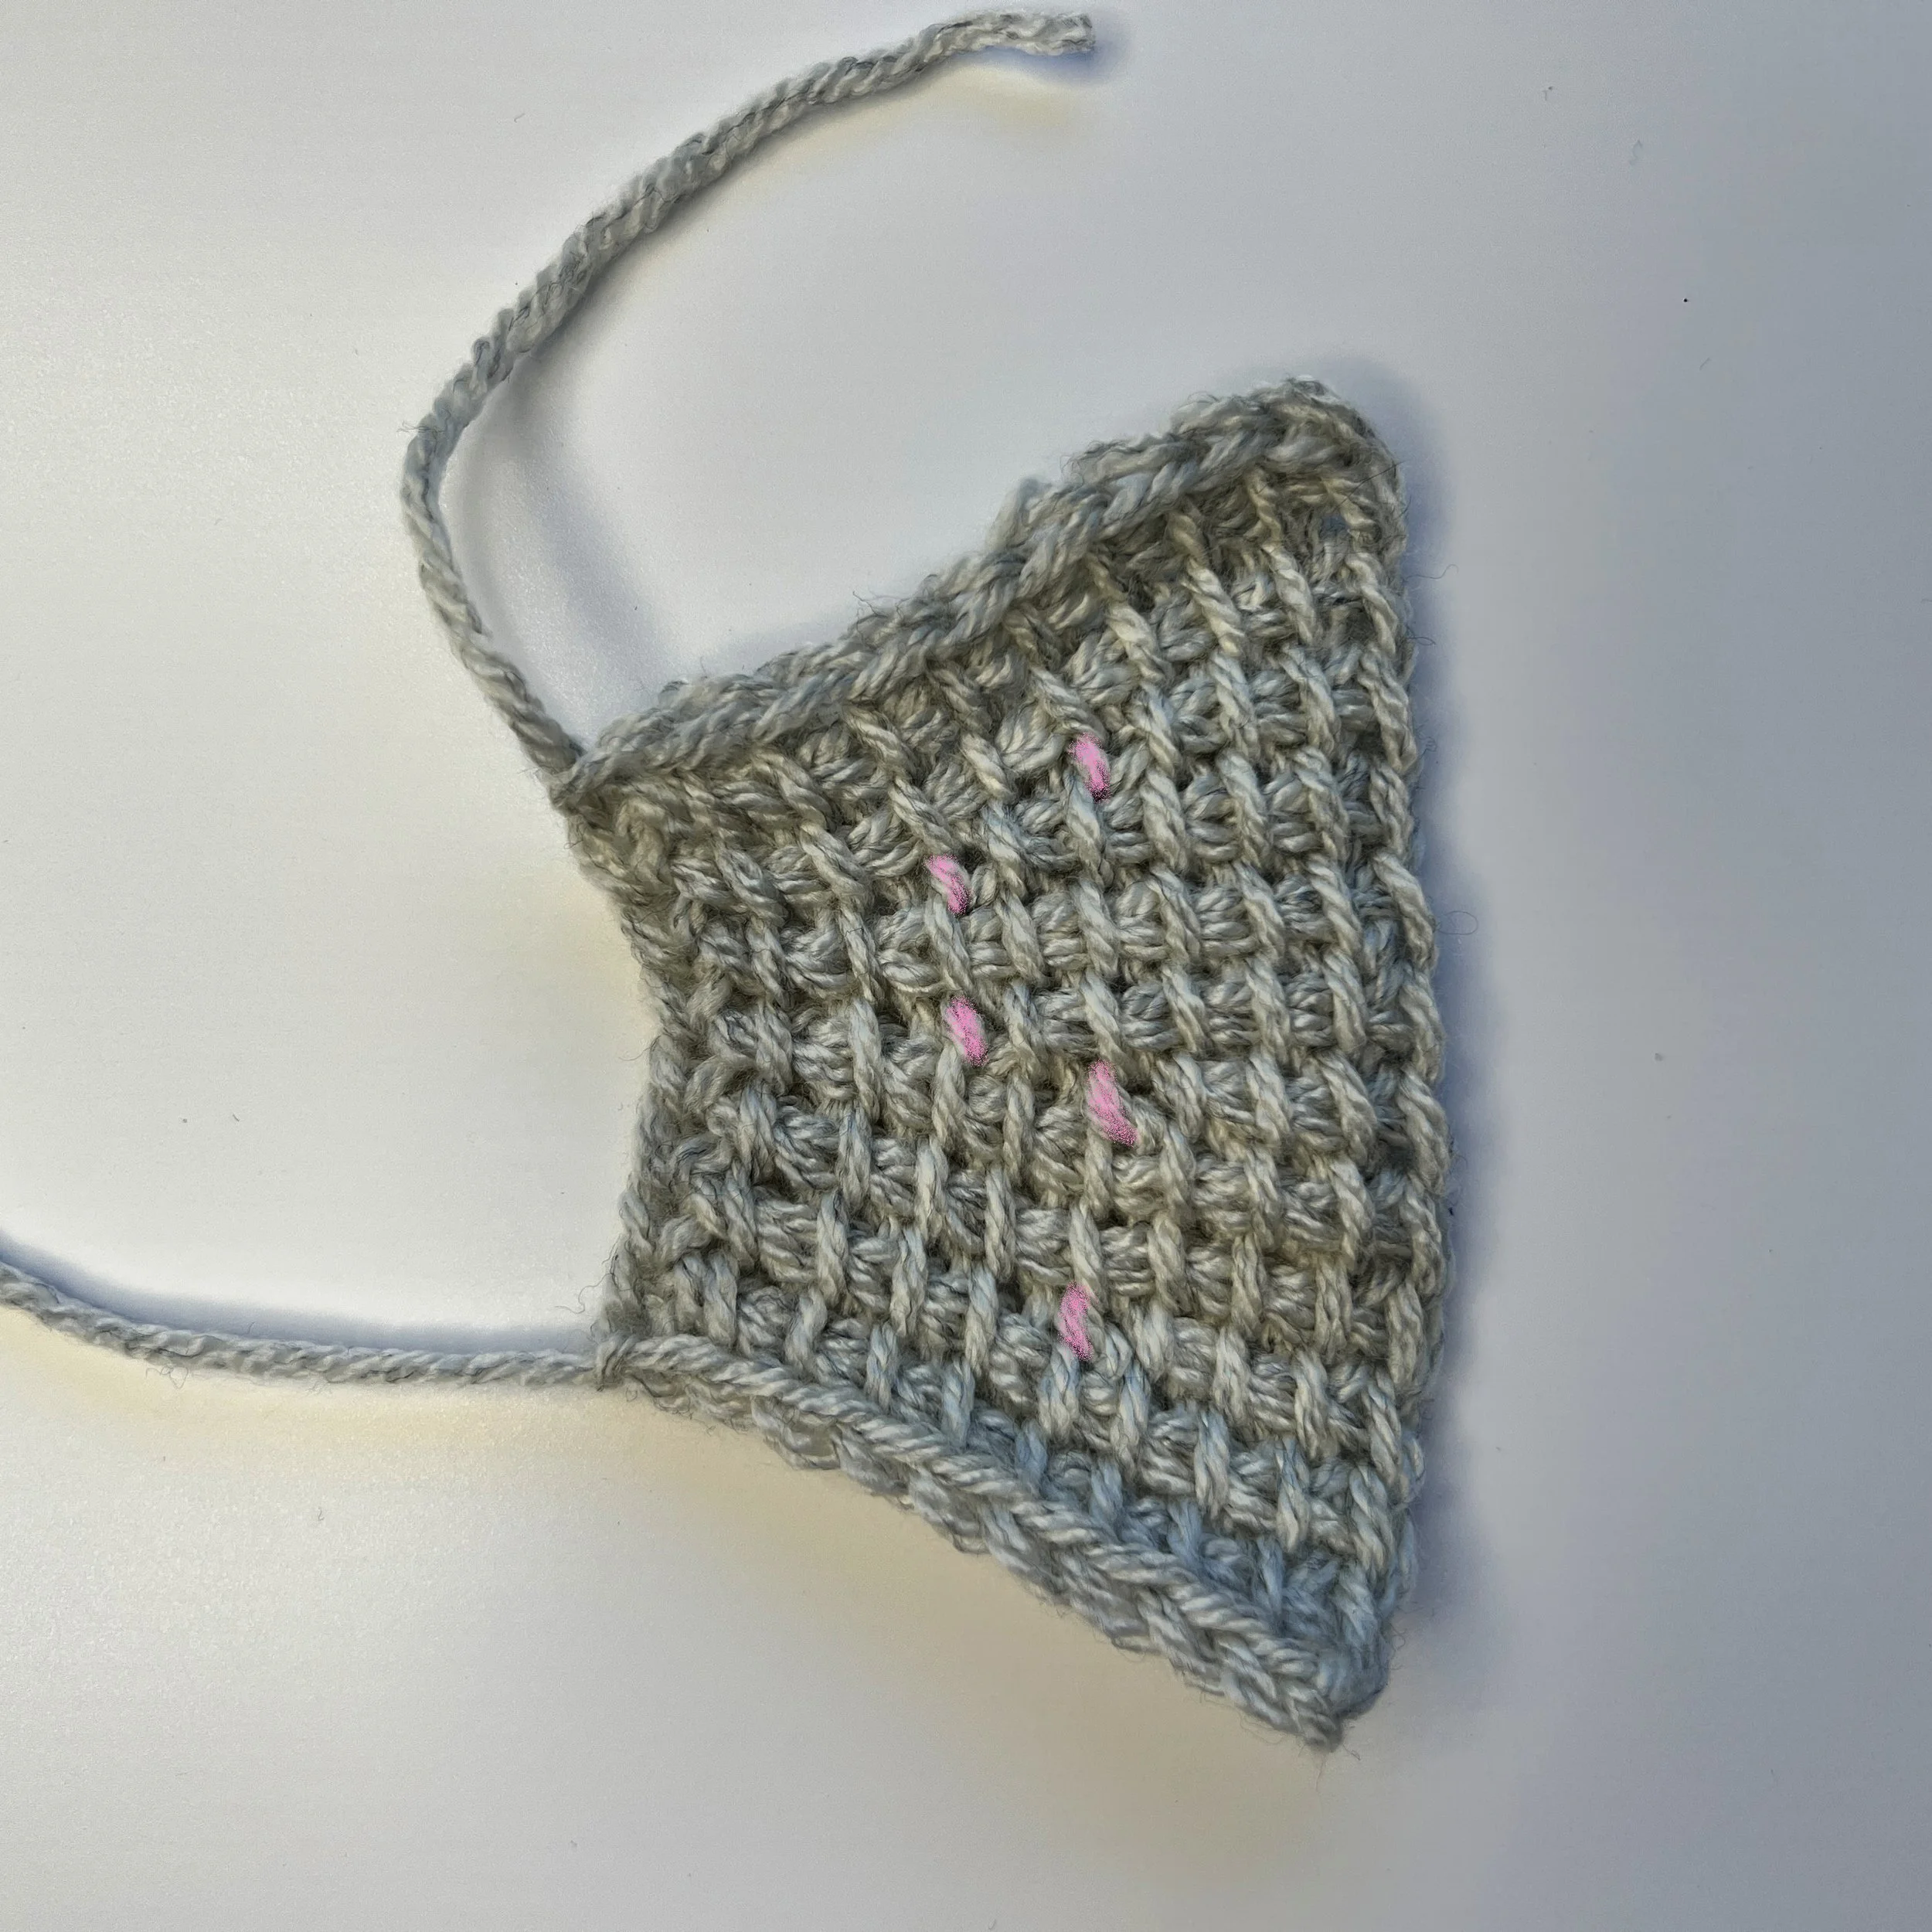
Left handed view
Return Pass Short Rows
Short rows on the return pass are used to create a piece that has more rows on the finishing edge of the work and less on the starting edge. So, for a right-handed crocheter, more rows on the left than the right and for a left-handed crocheter, more rows on the right than the left.
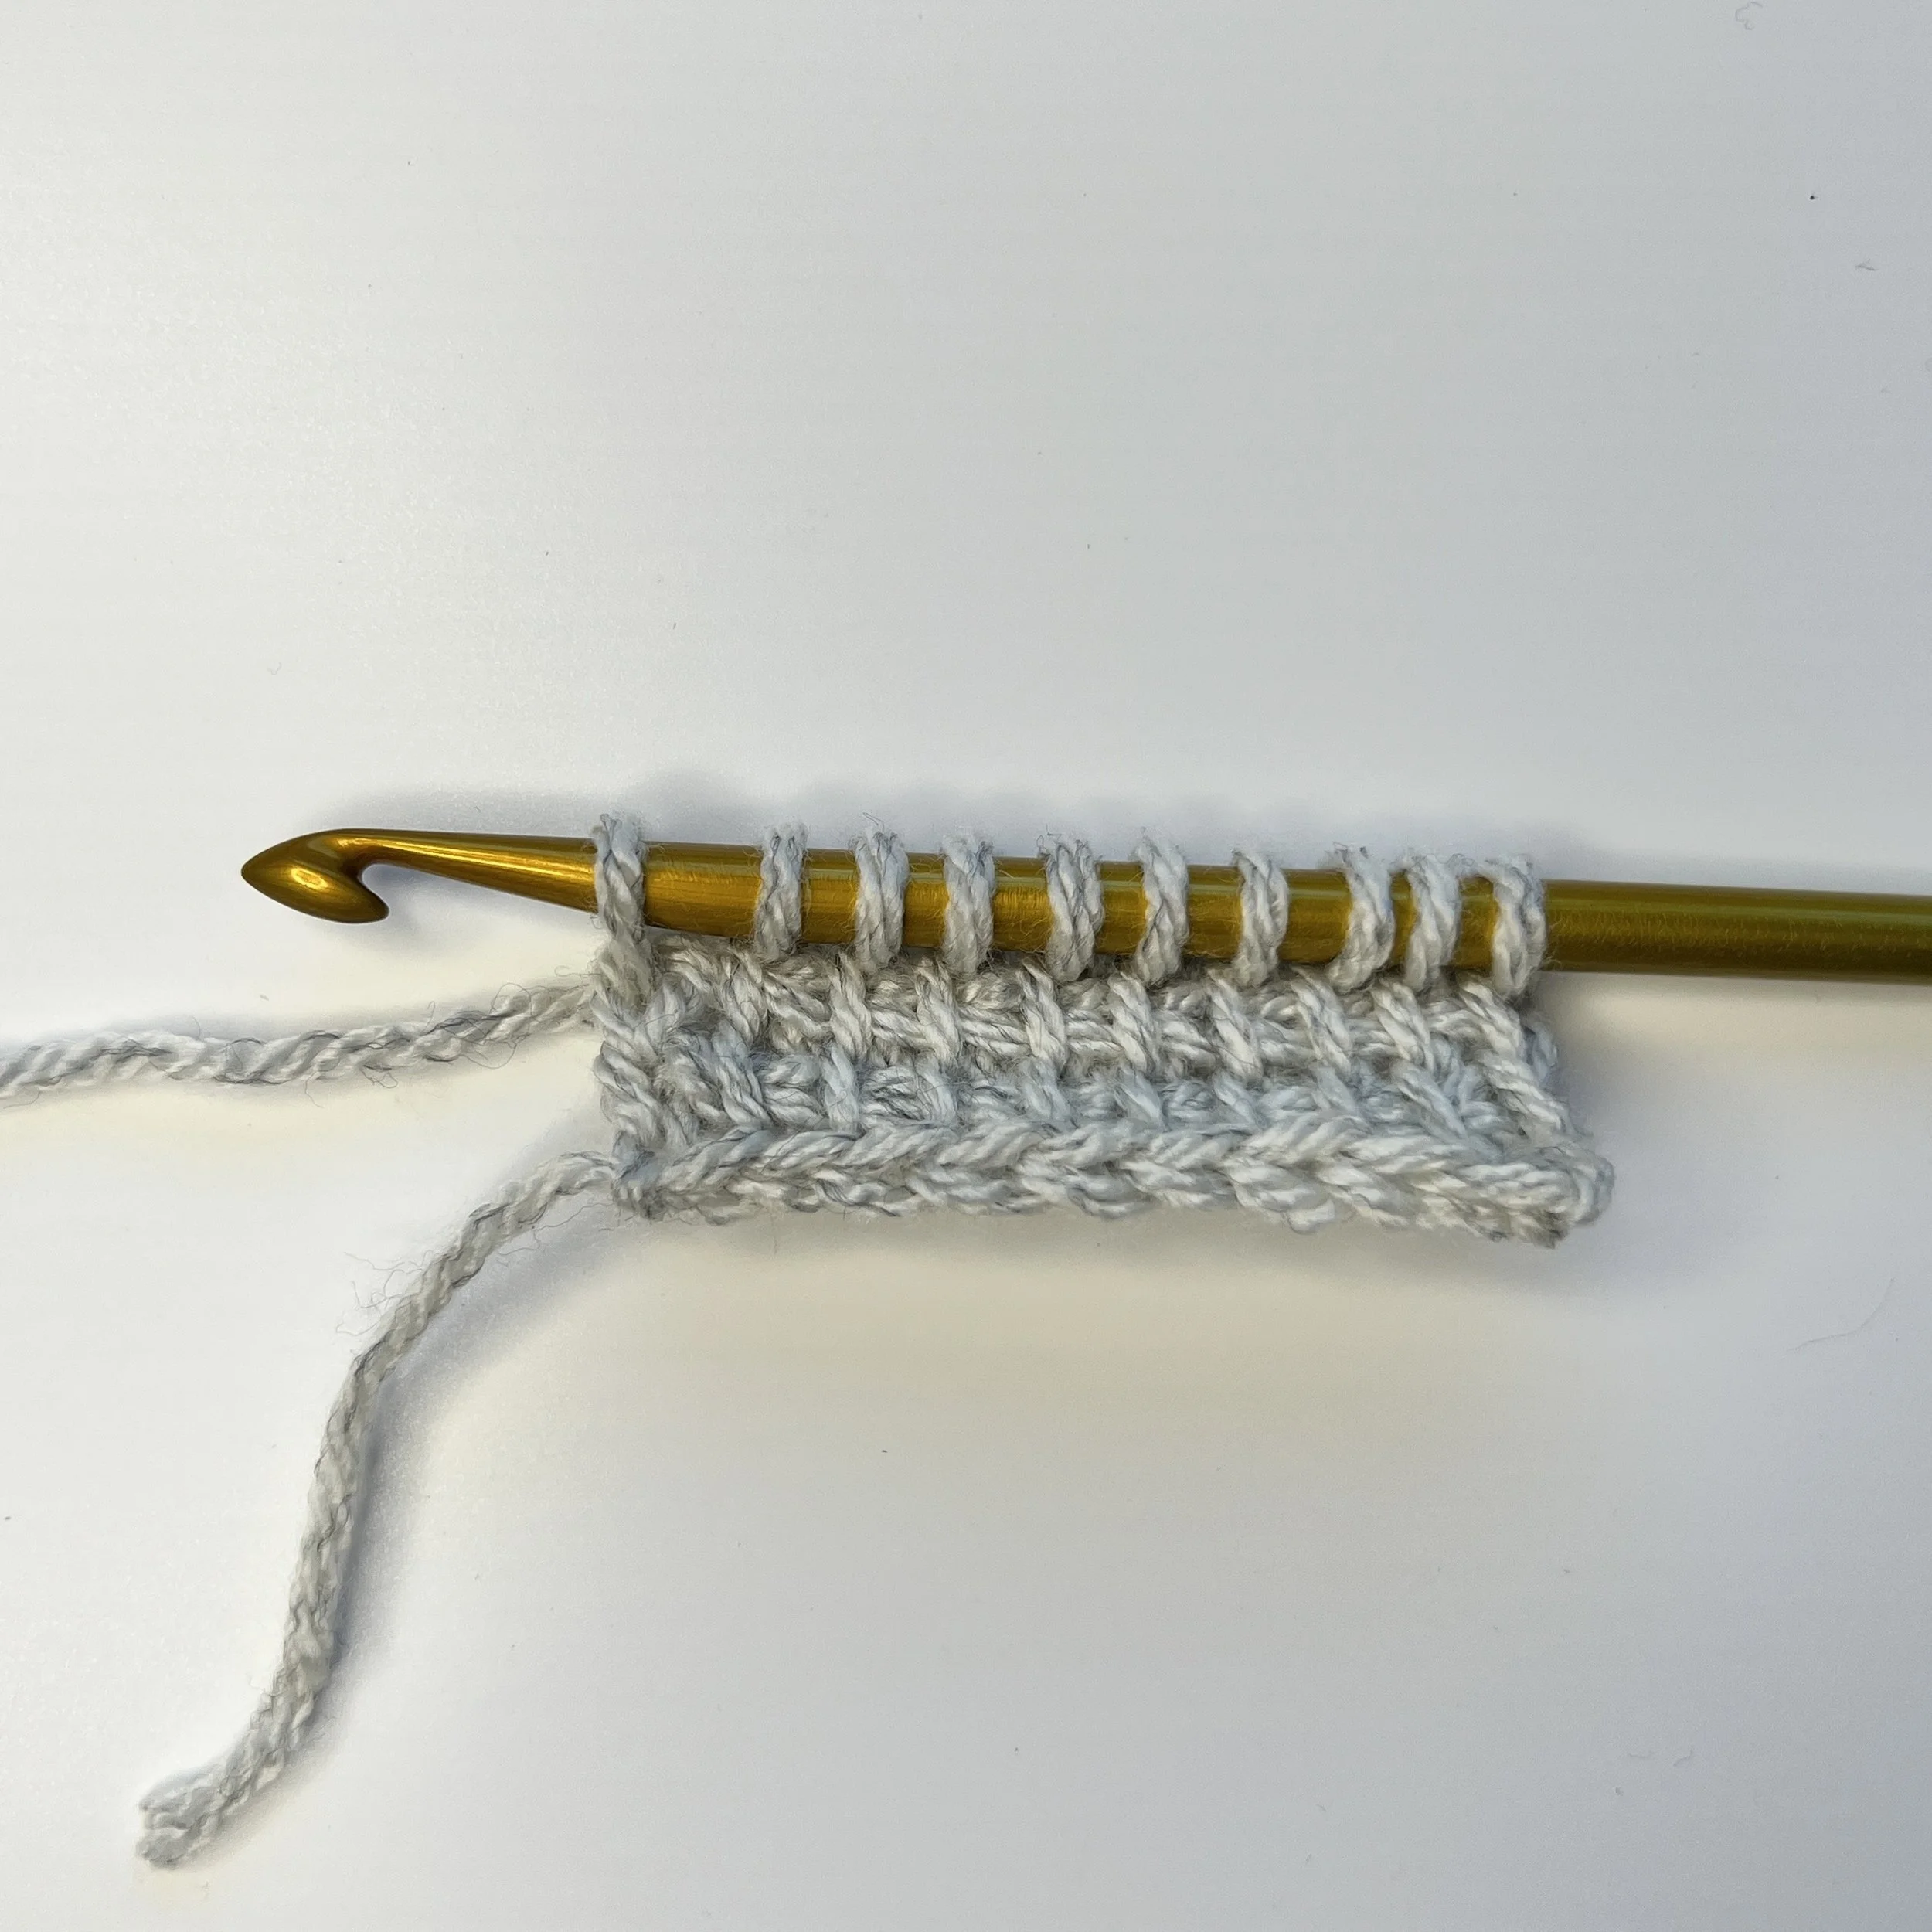
Start with a base of Tunisian simple stitches. My sample has 10 ch and 10 tss x 2 rows. Short Row FP: Worked as a normal tss row – Tss to end, pick up loop in edge st – 10 loops on hook.
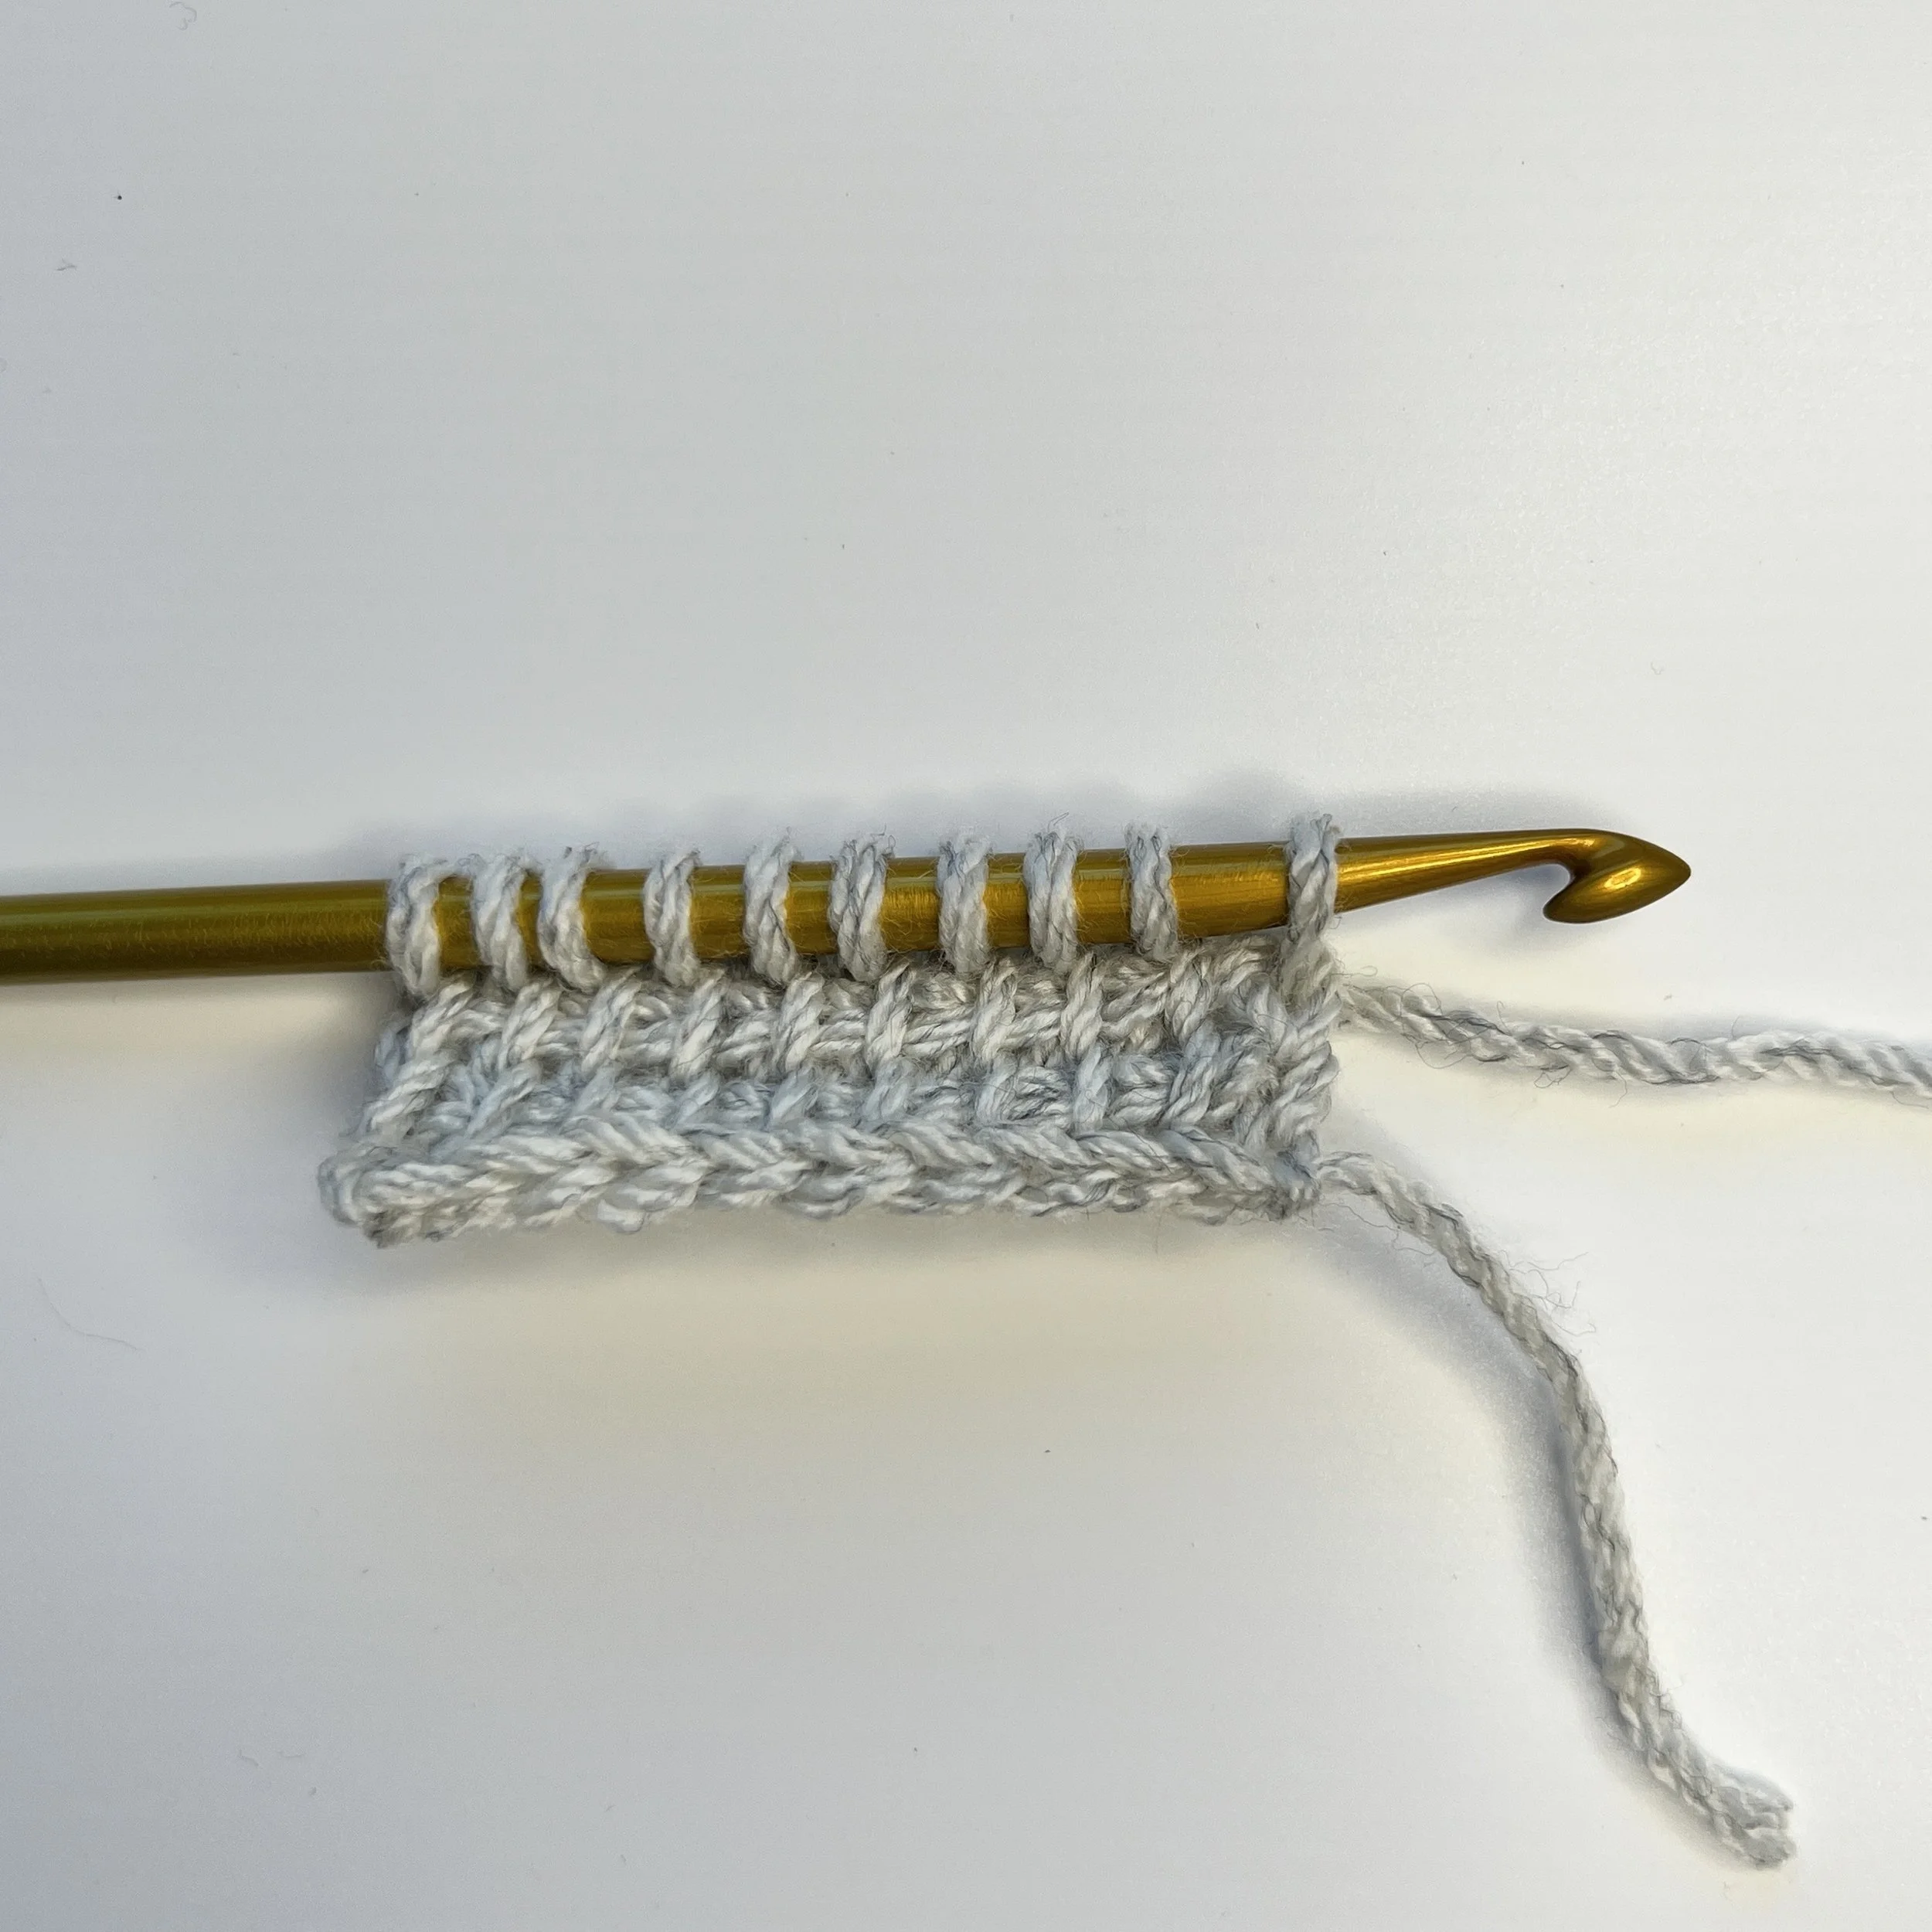
Left handed view.
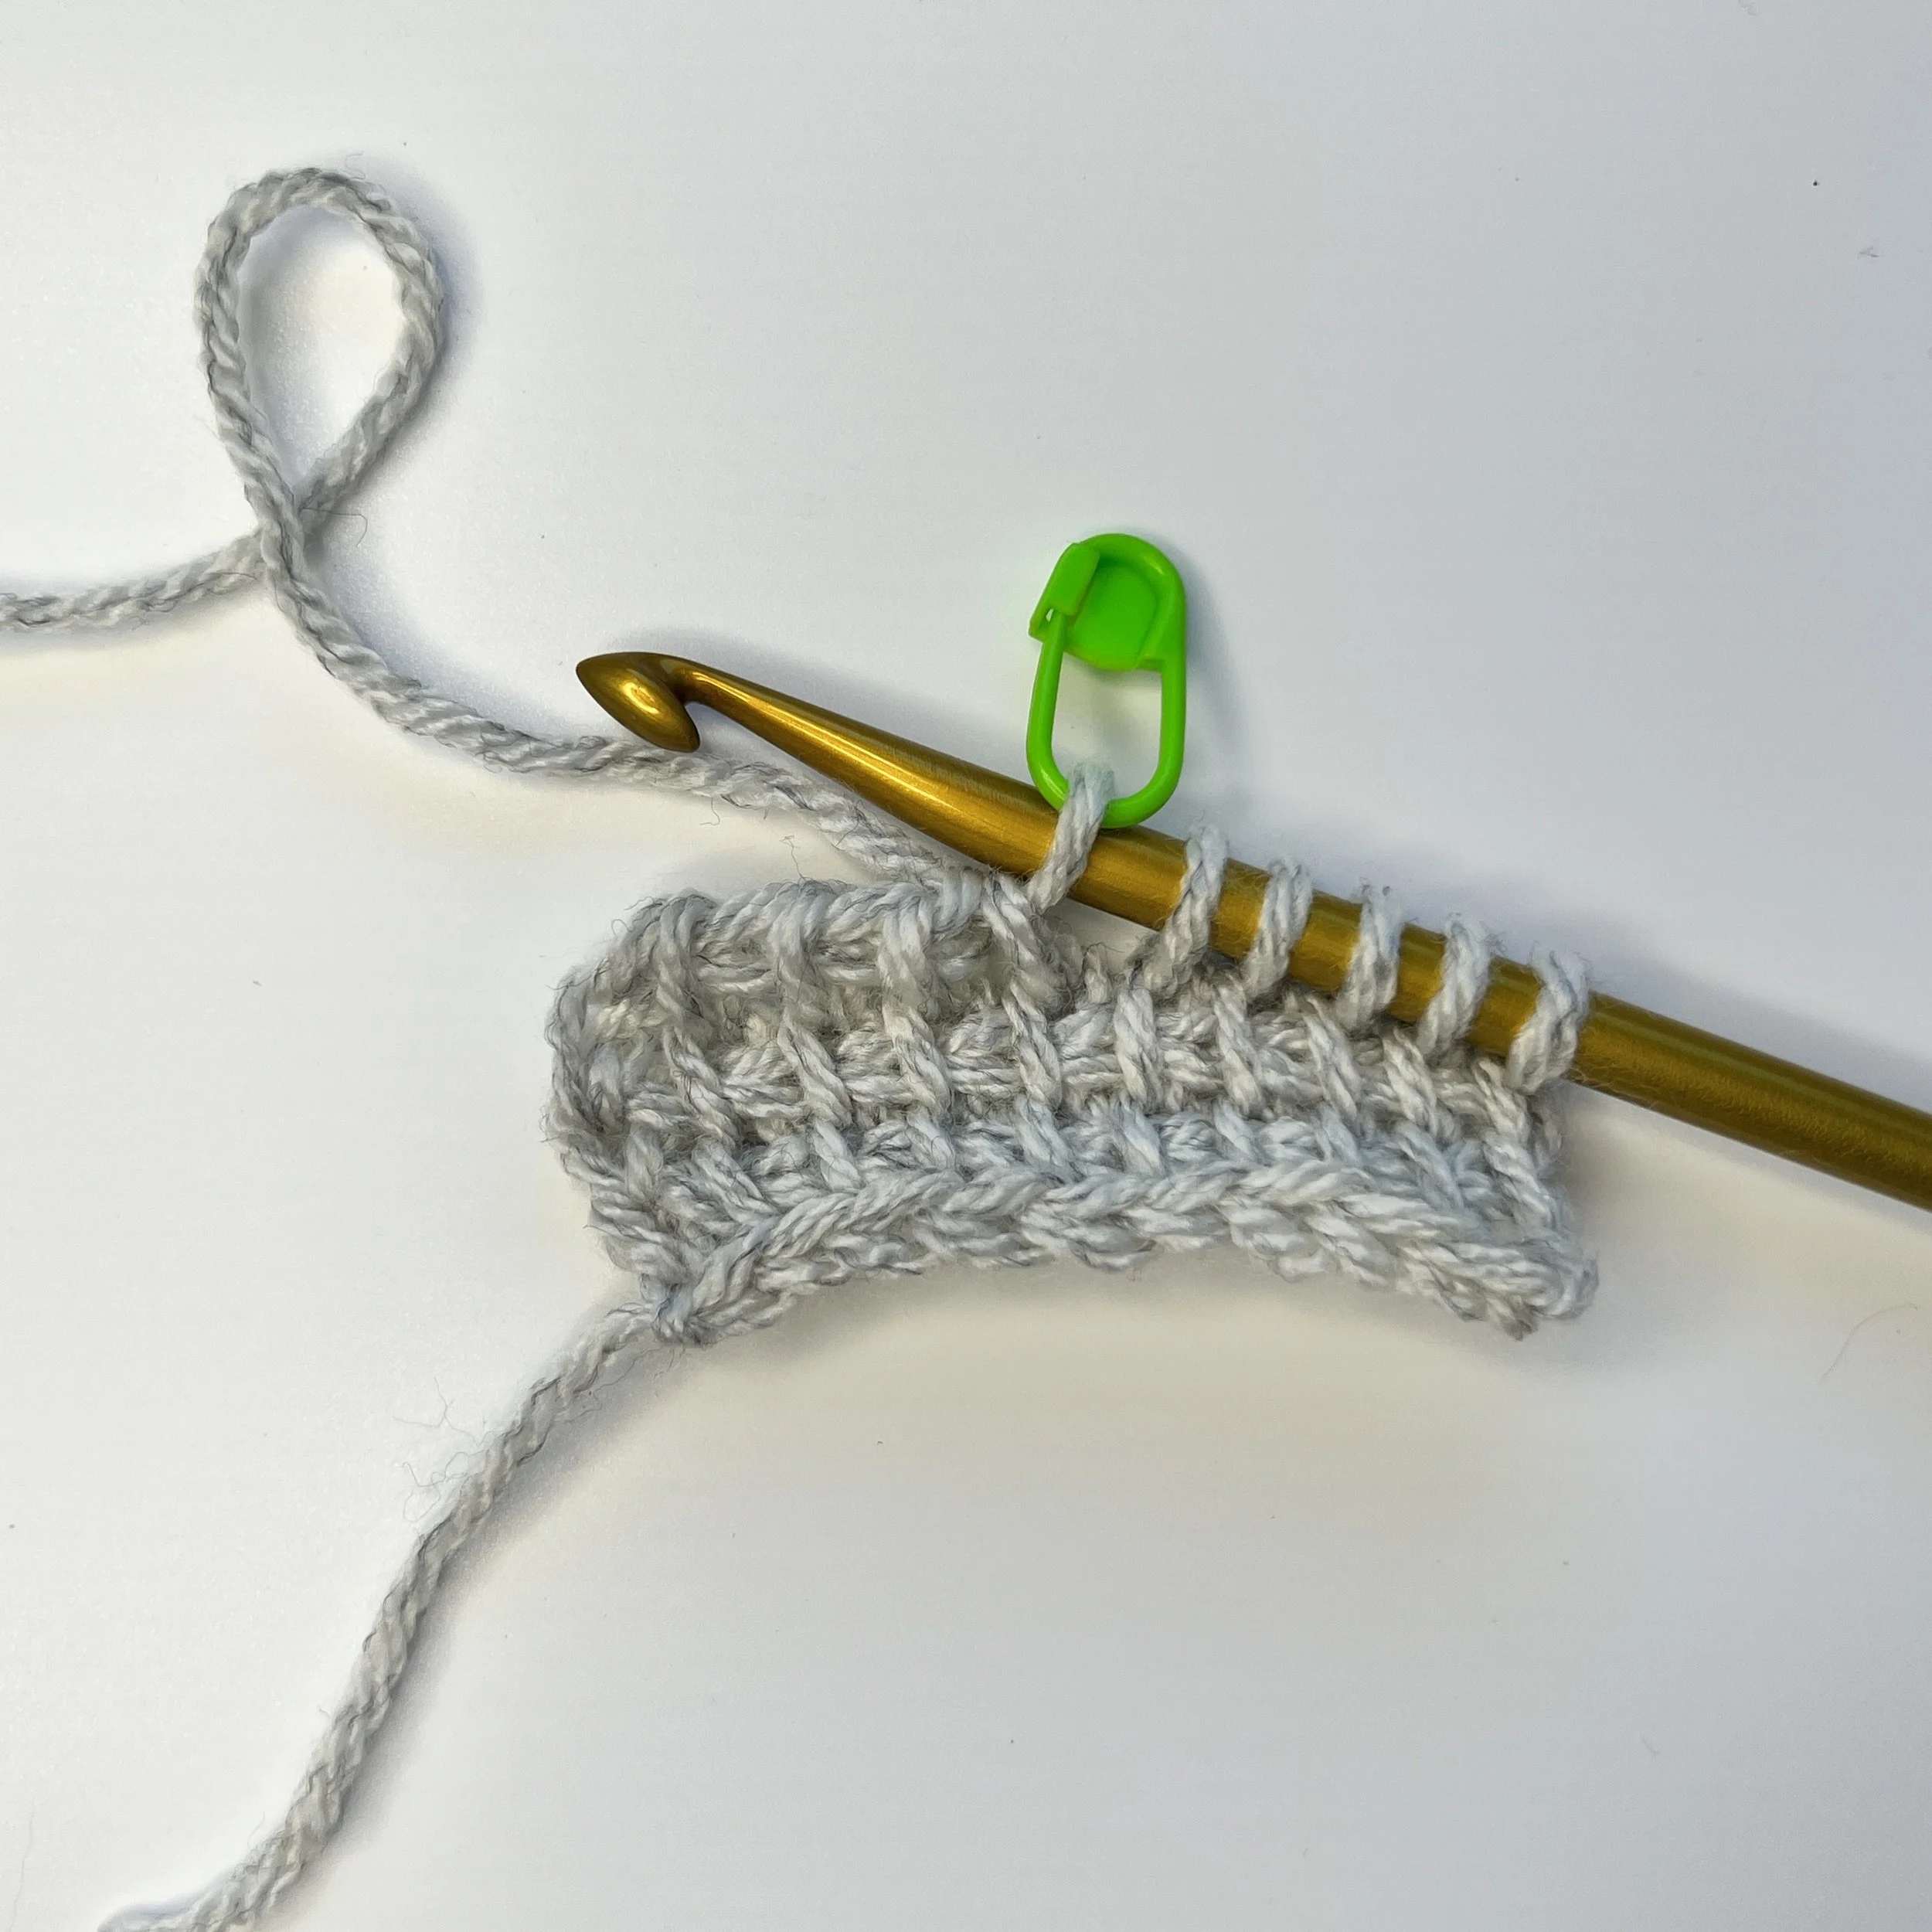
Short Row RP: Ch 1, *yarn over, pull through 2 loops* 4 times – 6 loops remain on hook. Place a marker in the 1st loop on the hook (closest to the hook). The stitch directly under the marked st is the first edge st of the short row.
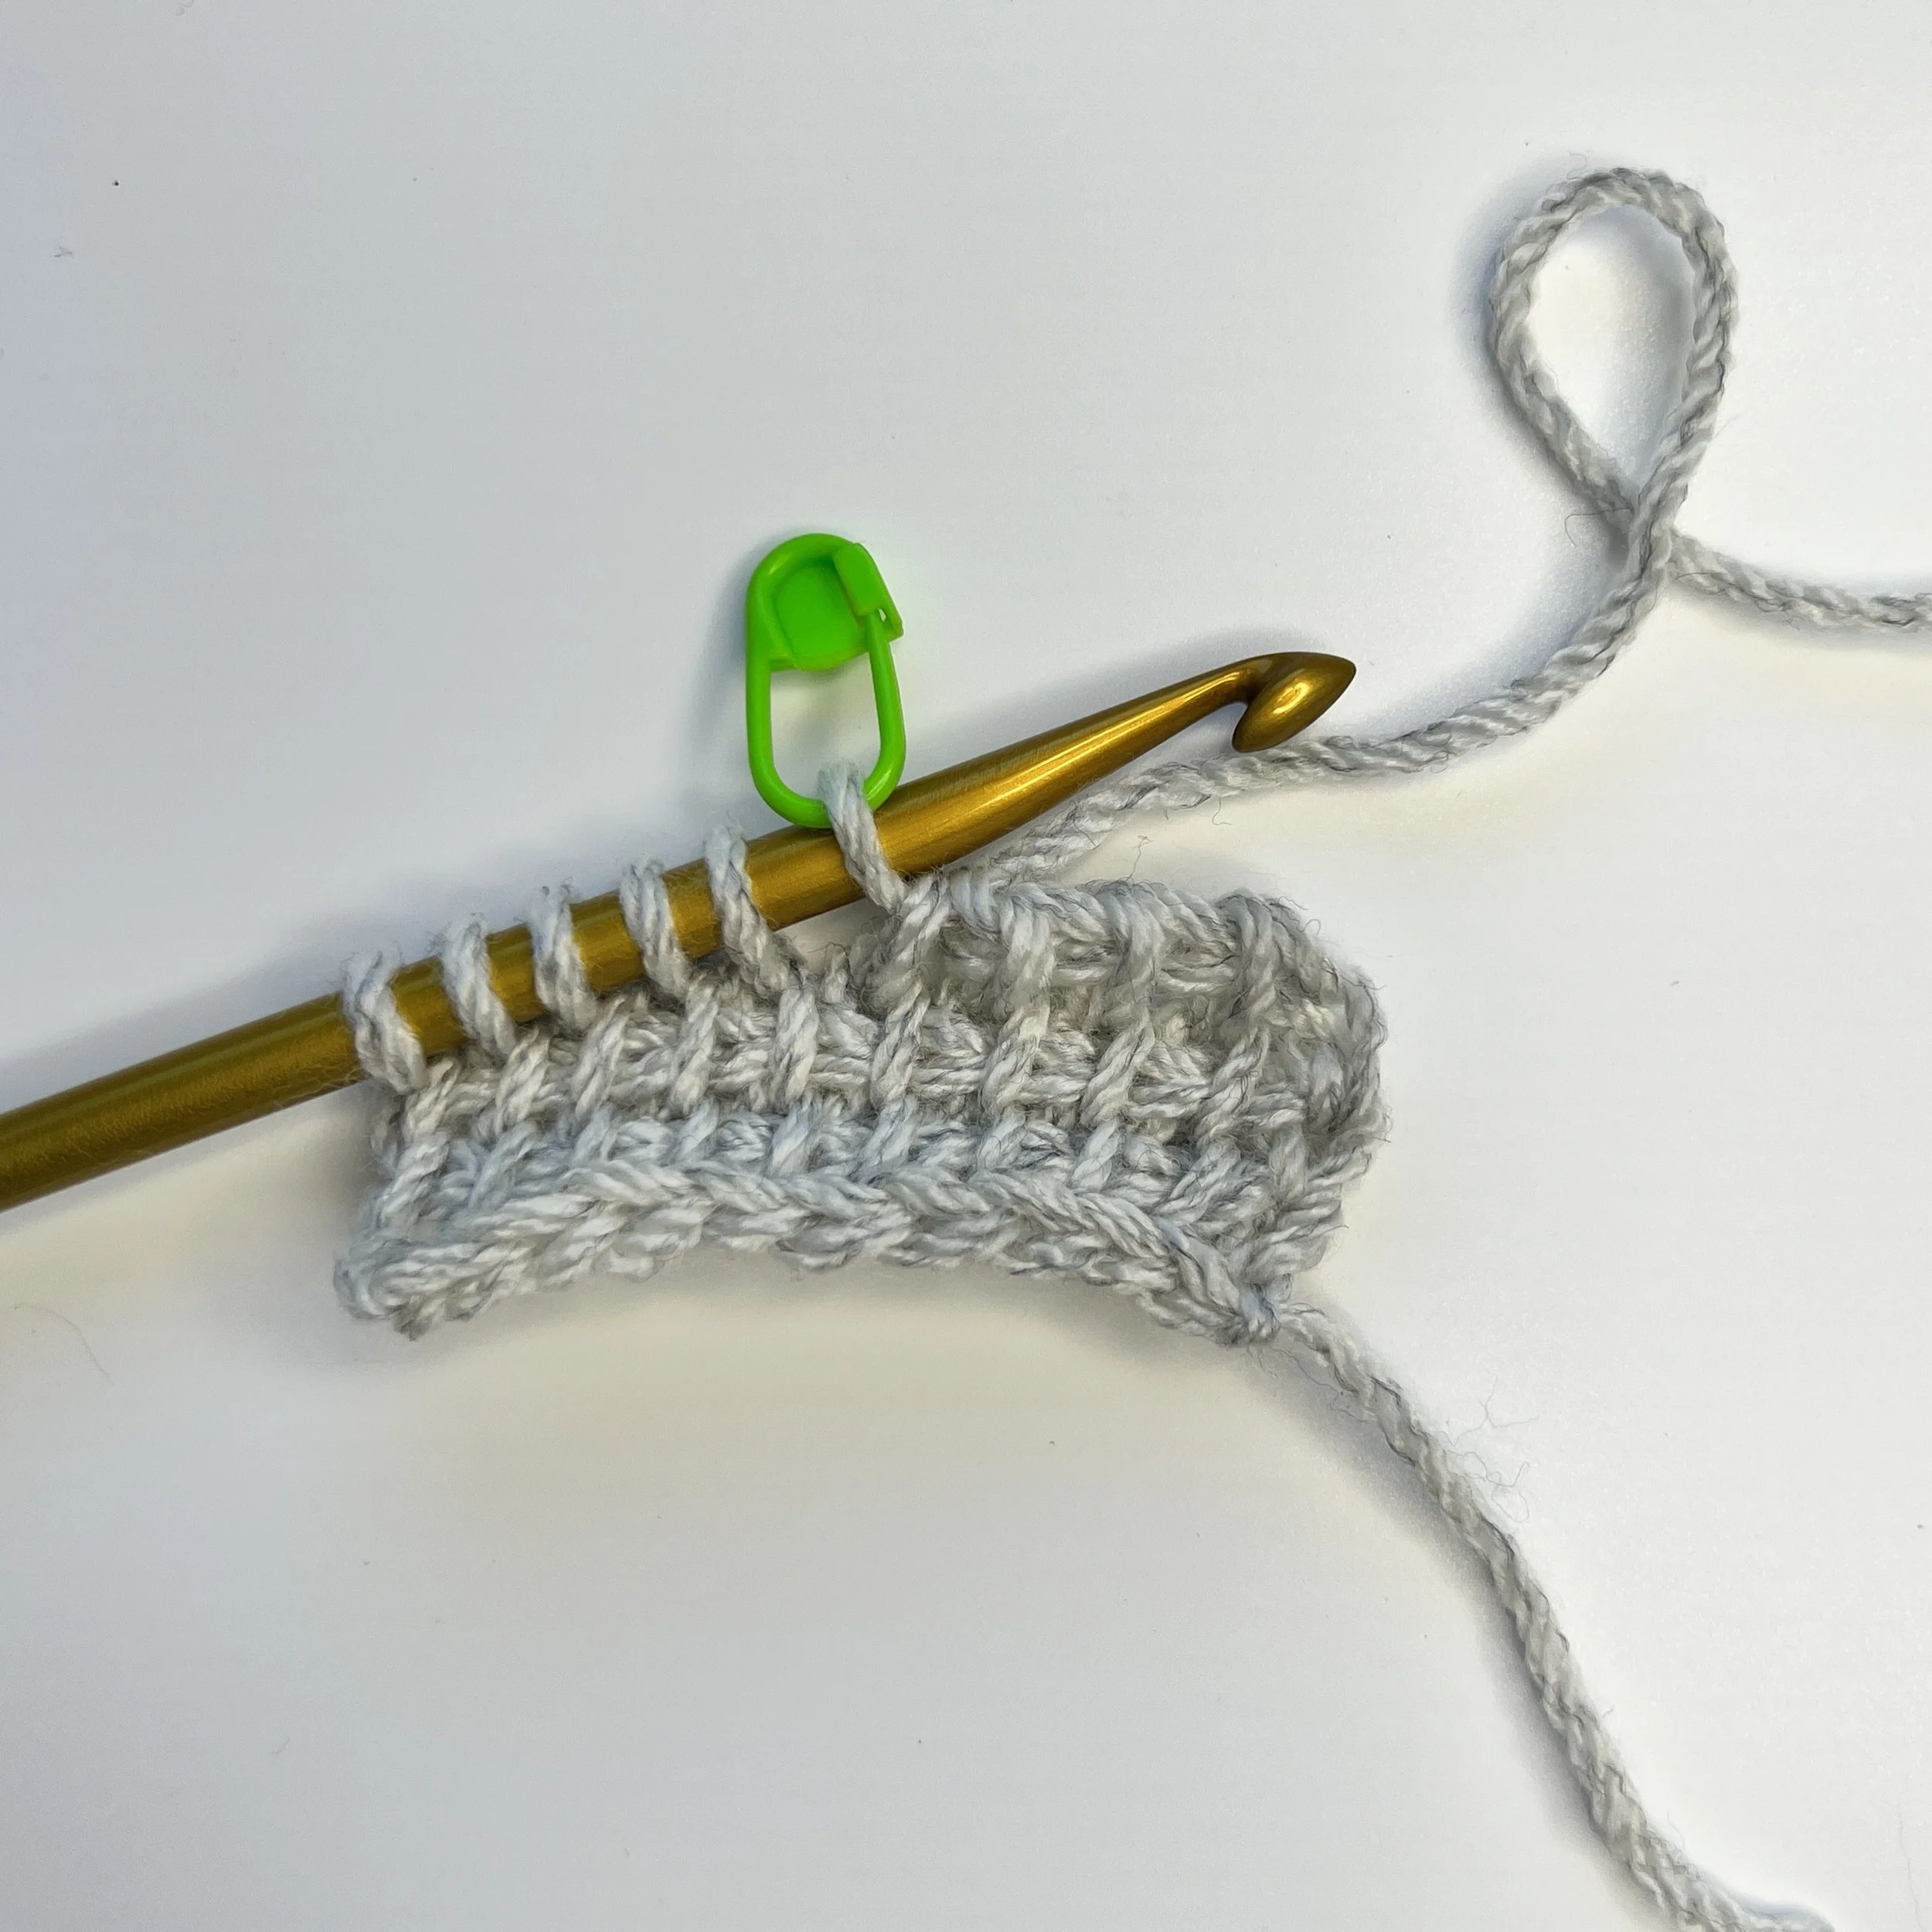
Left handed view.
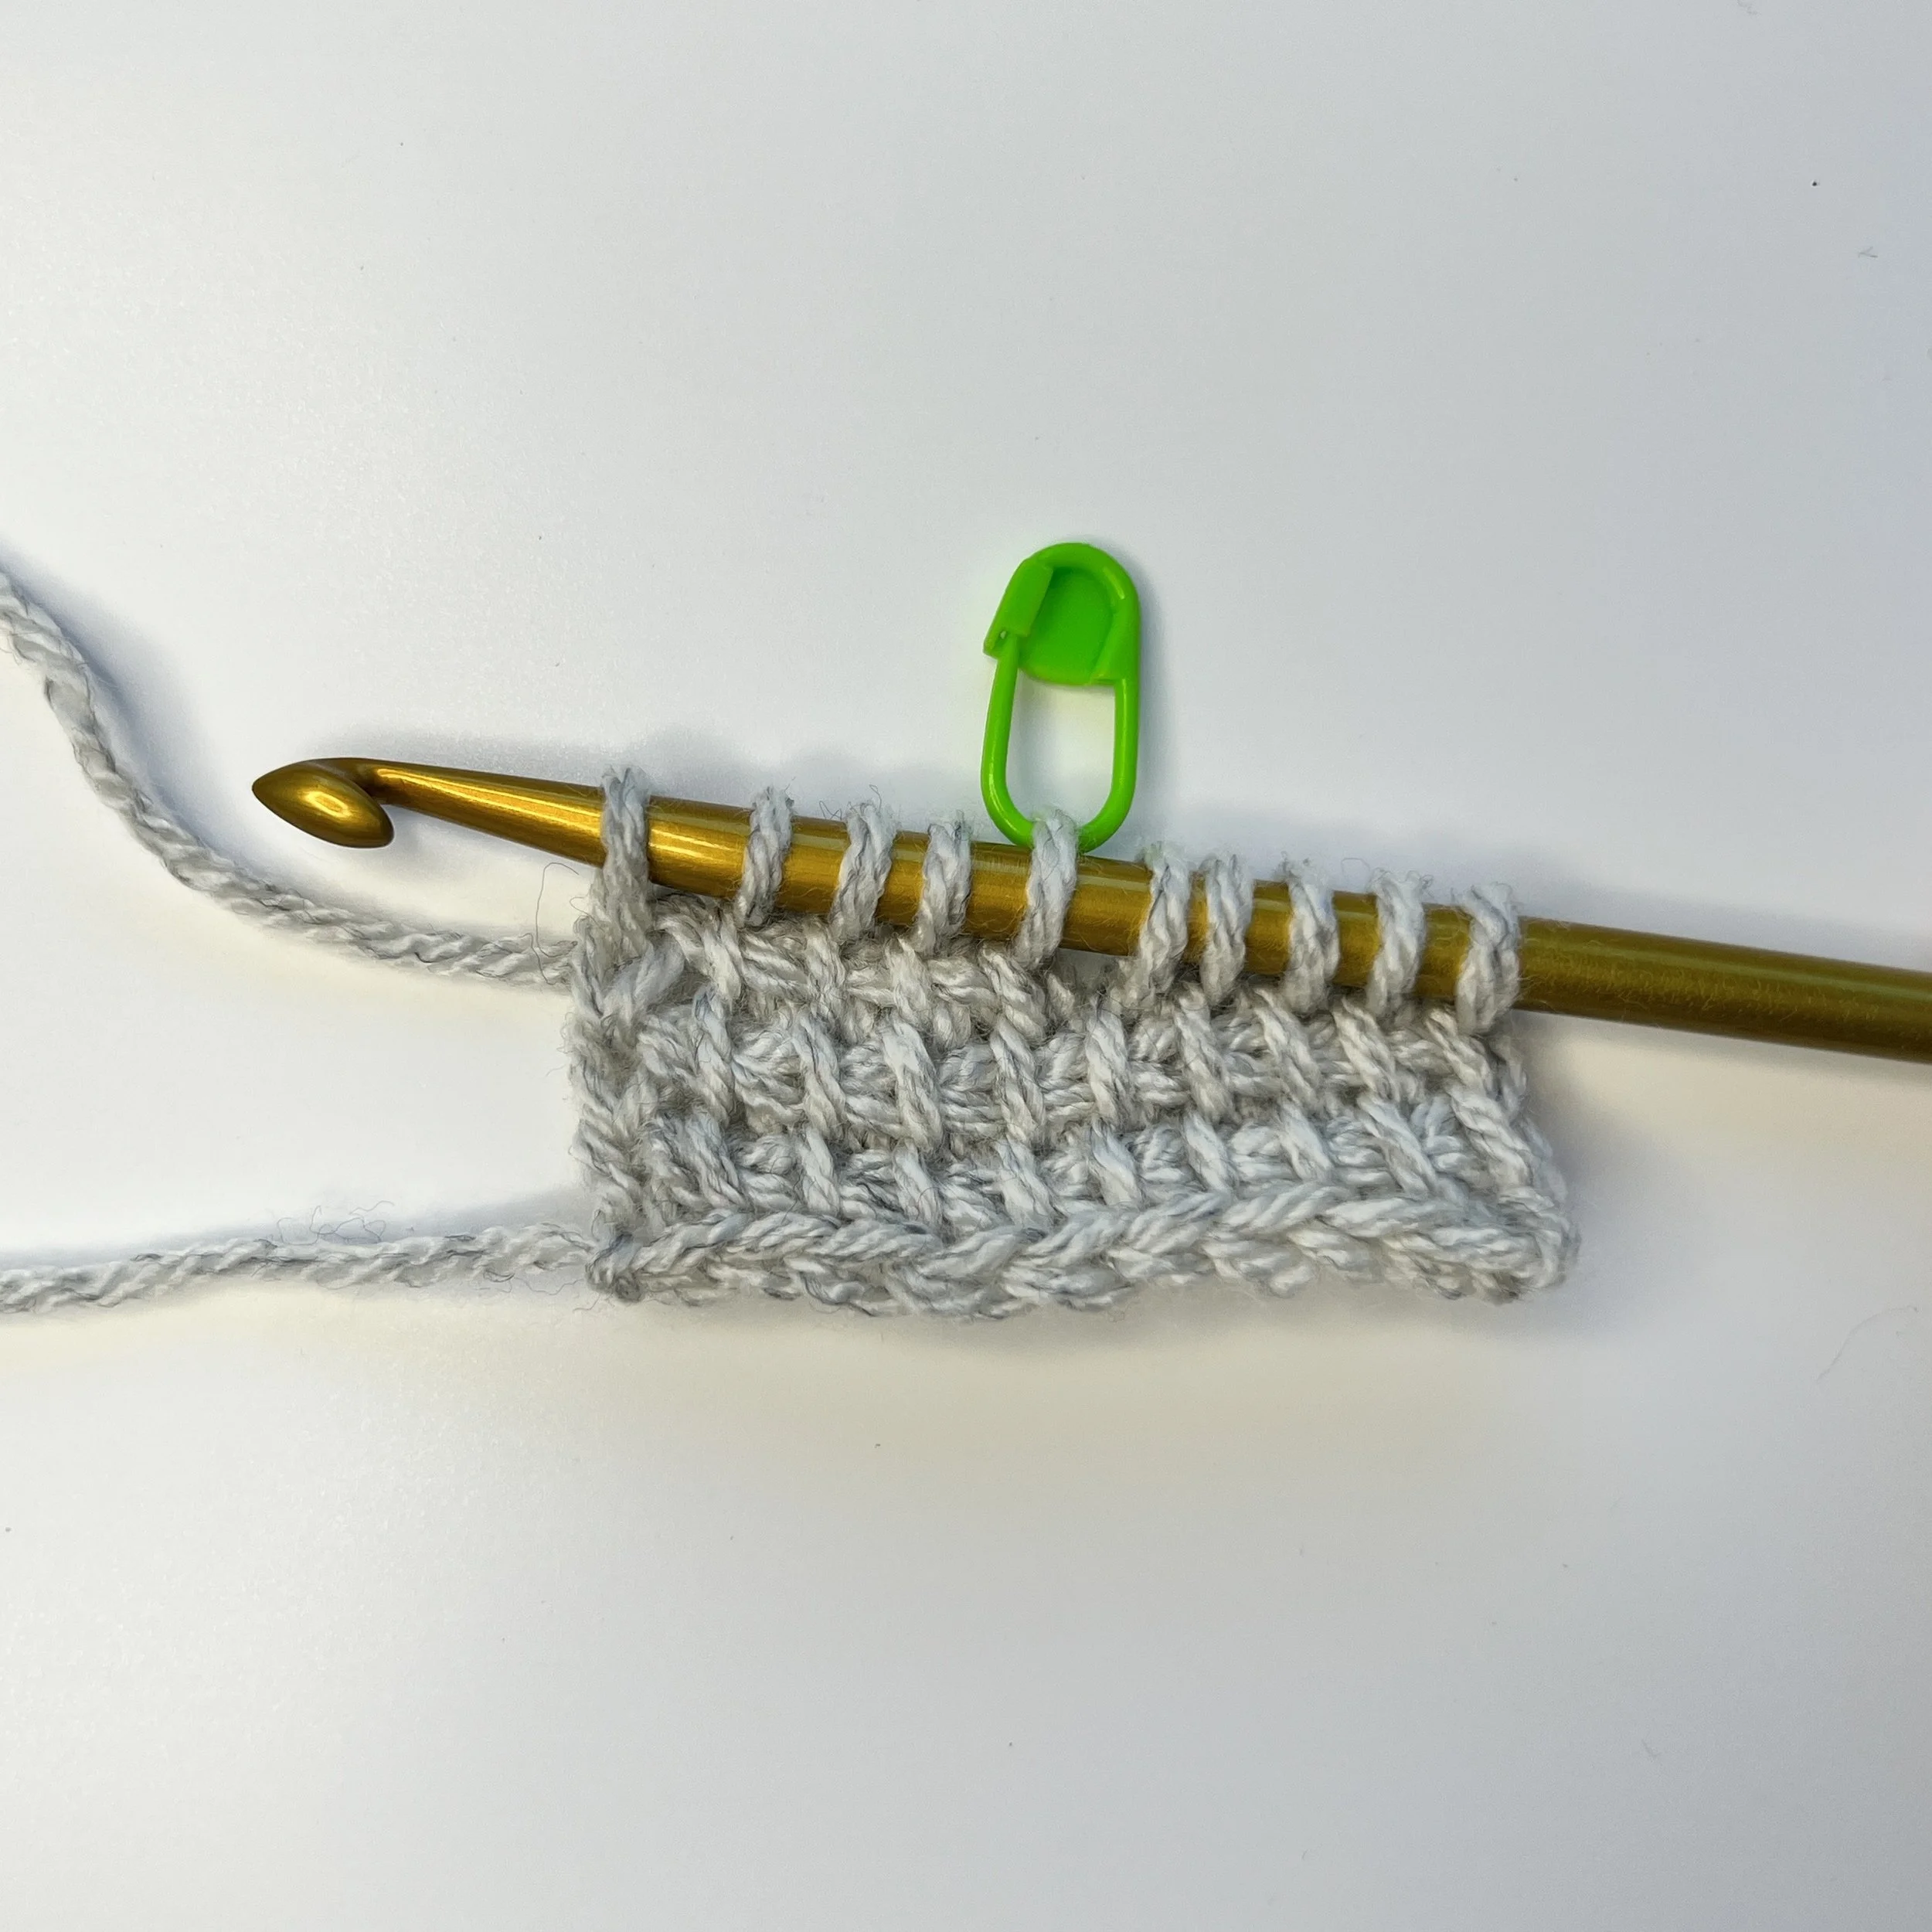
Row above the short row: FP: 3 tss, pick up a loop in edge st – 10 loops on hook.
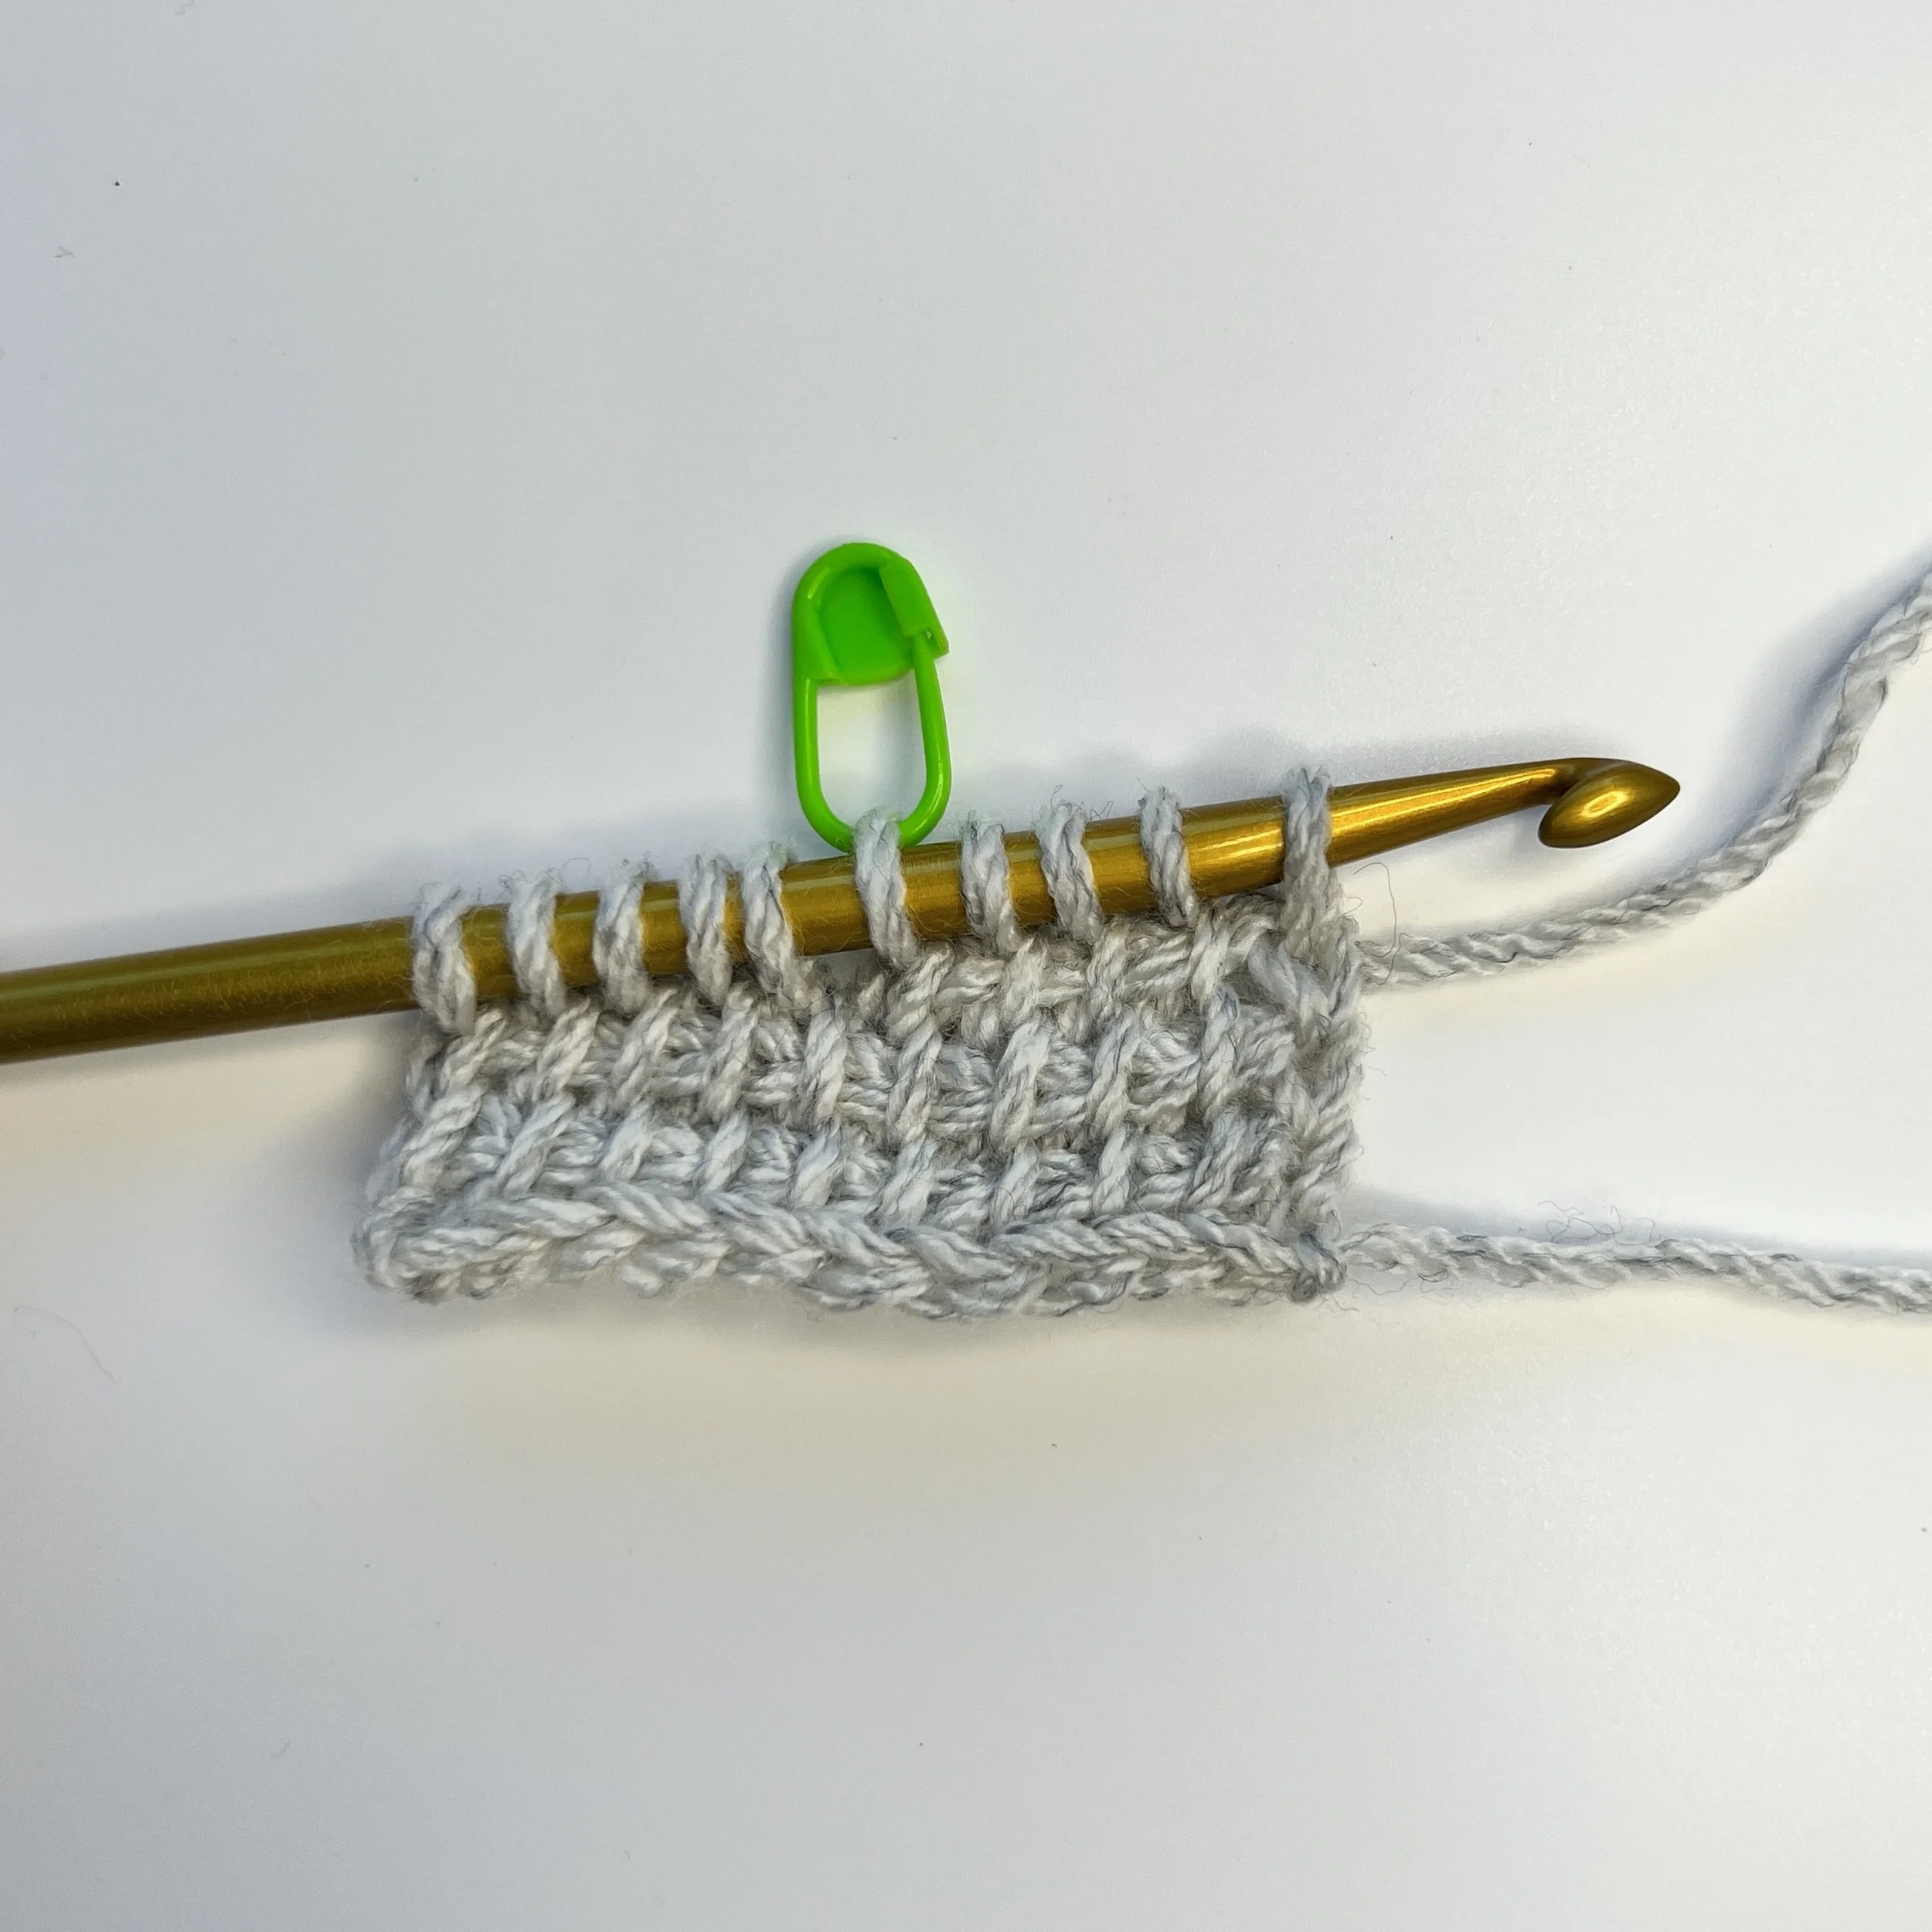
Left handed view.
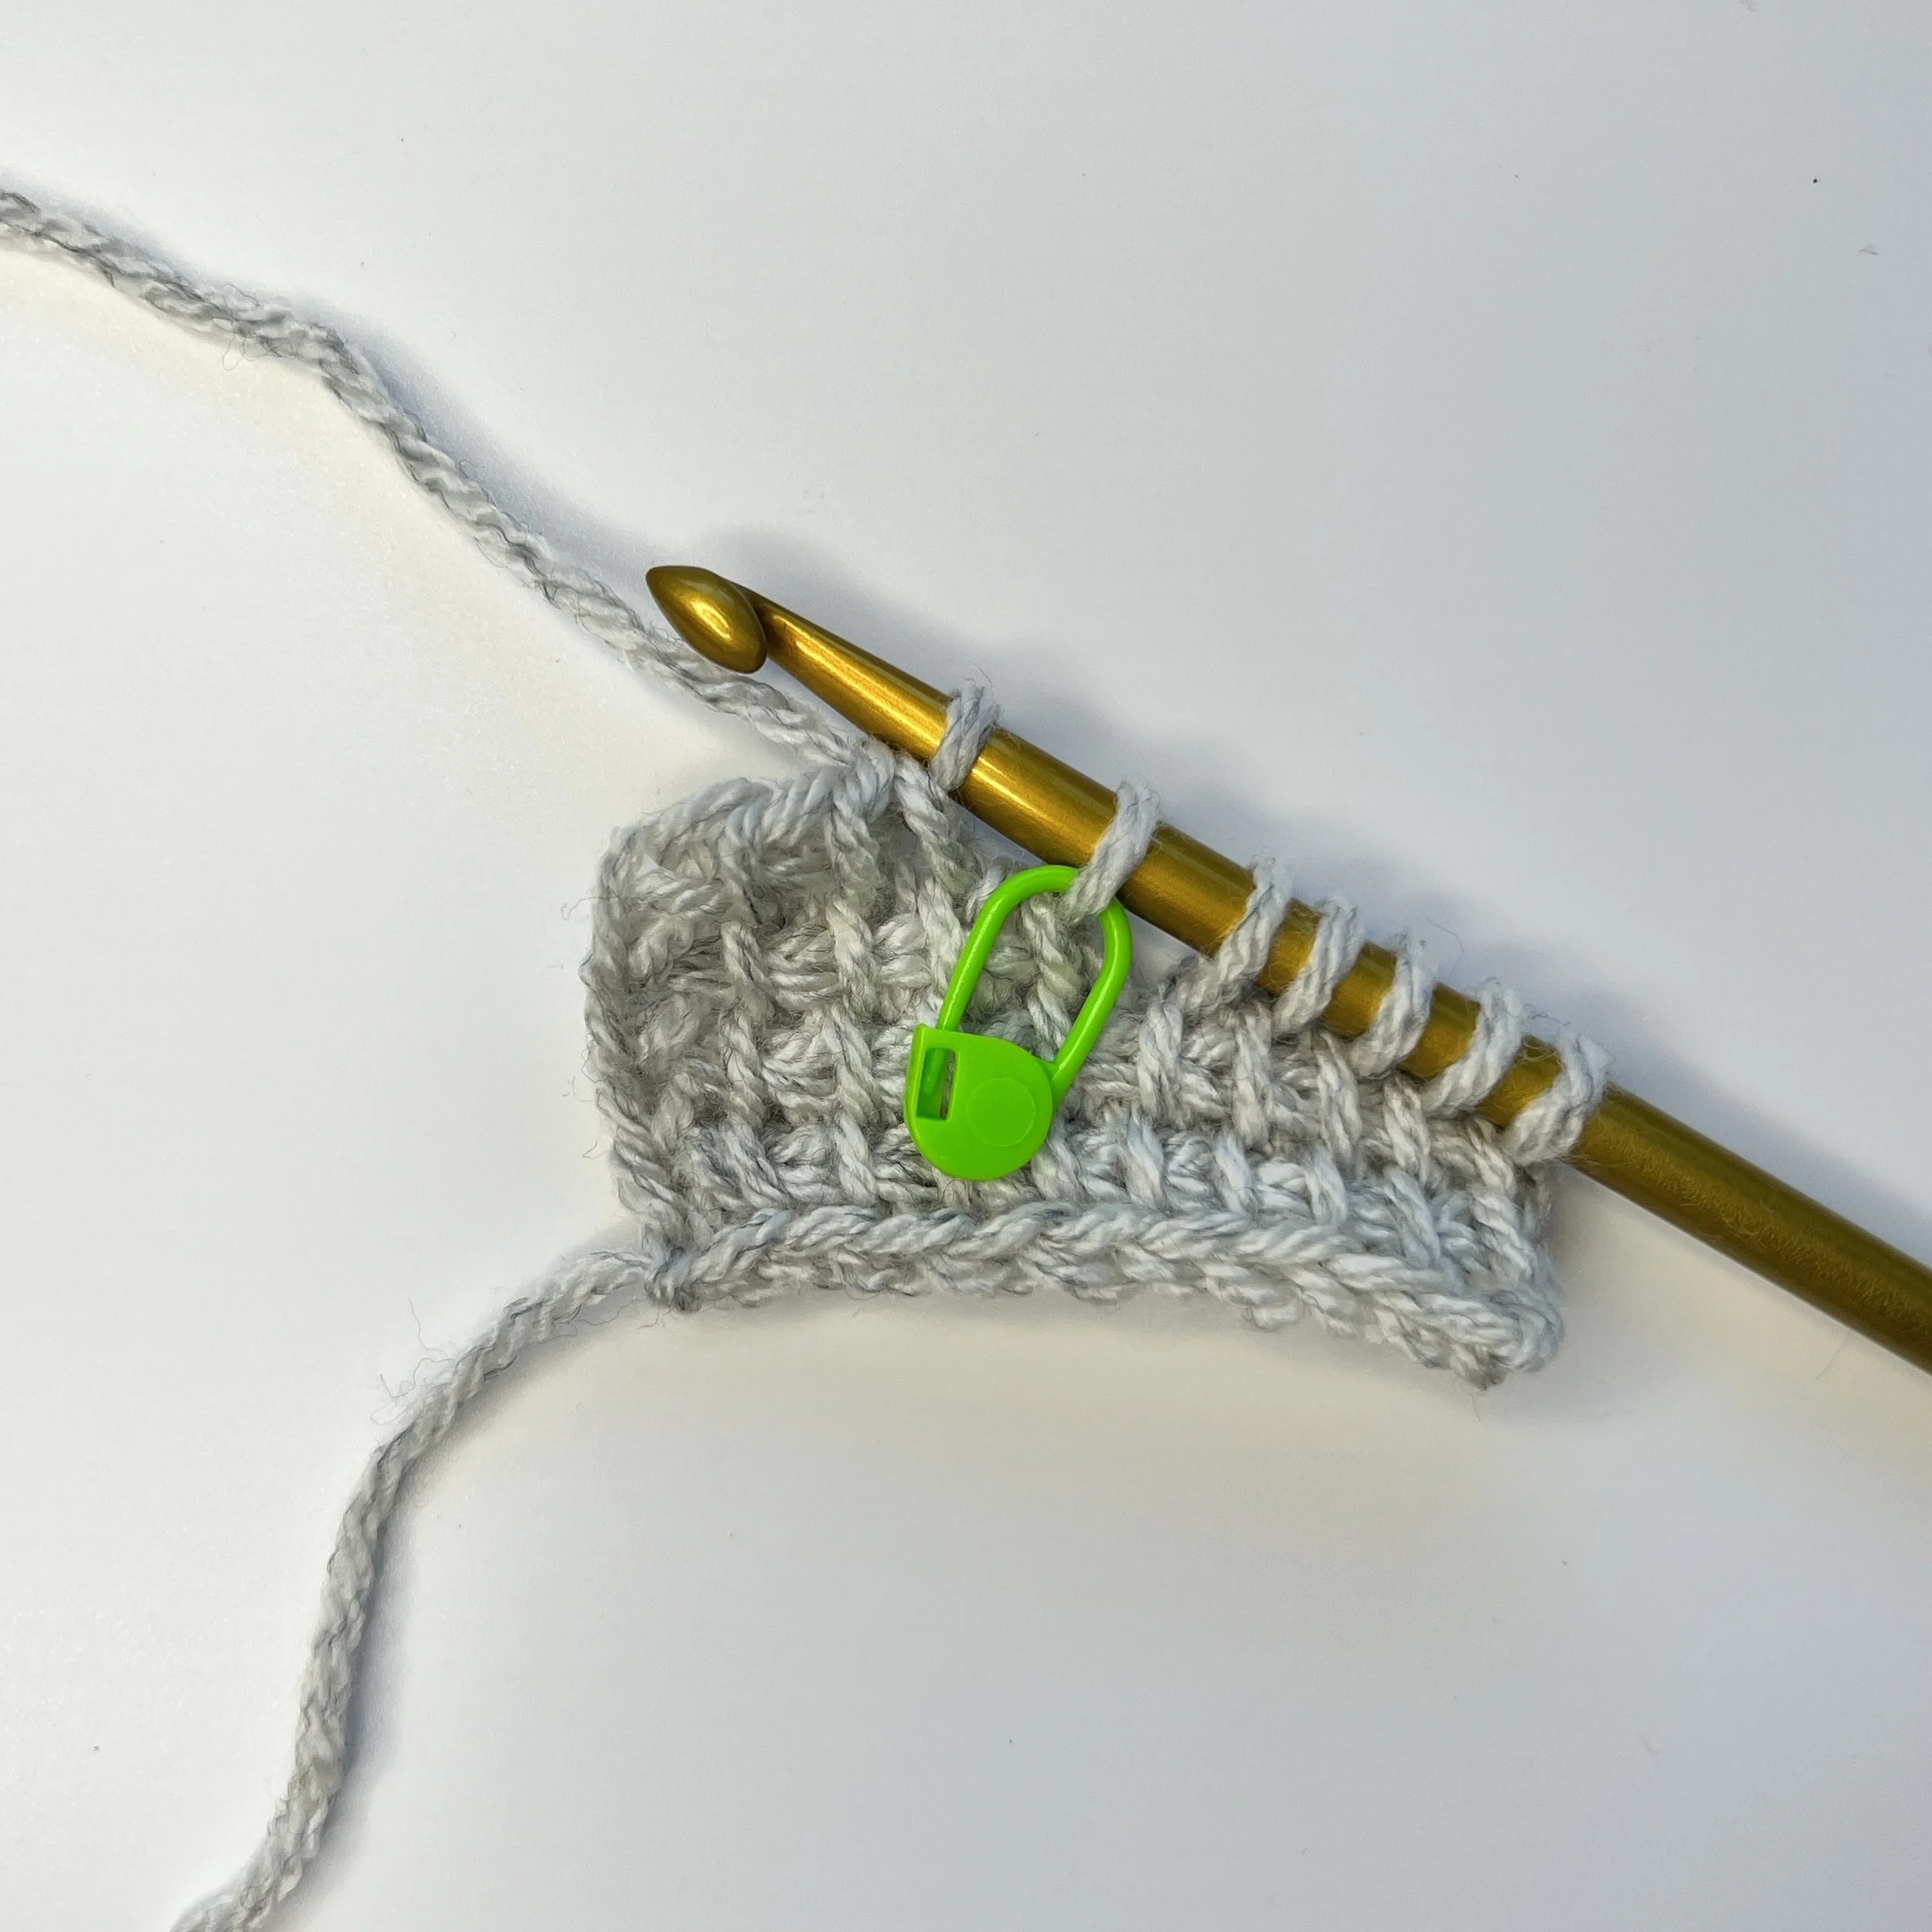
RP: Ch 1, *yarn over, pull through 2 loops* until you reach the marked st.
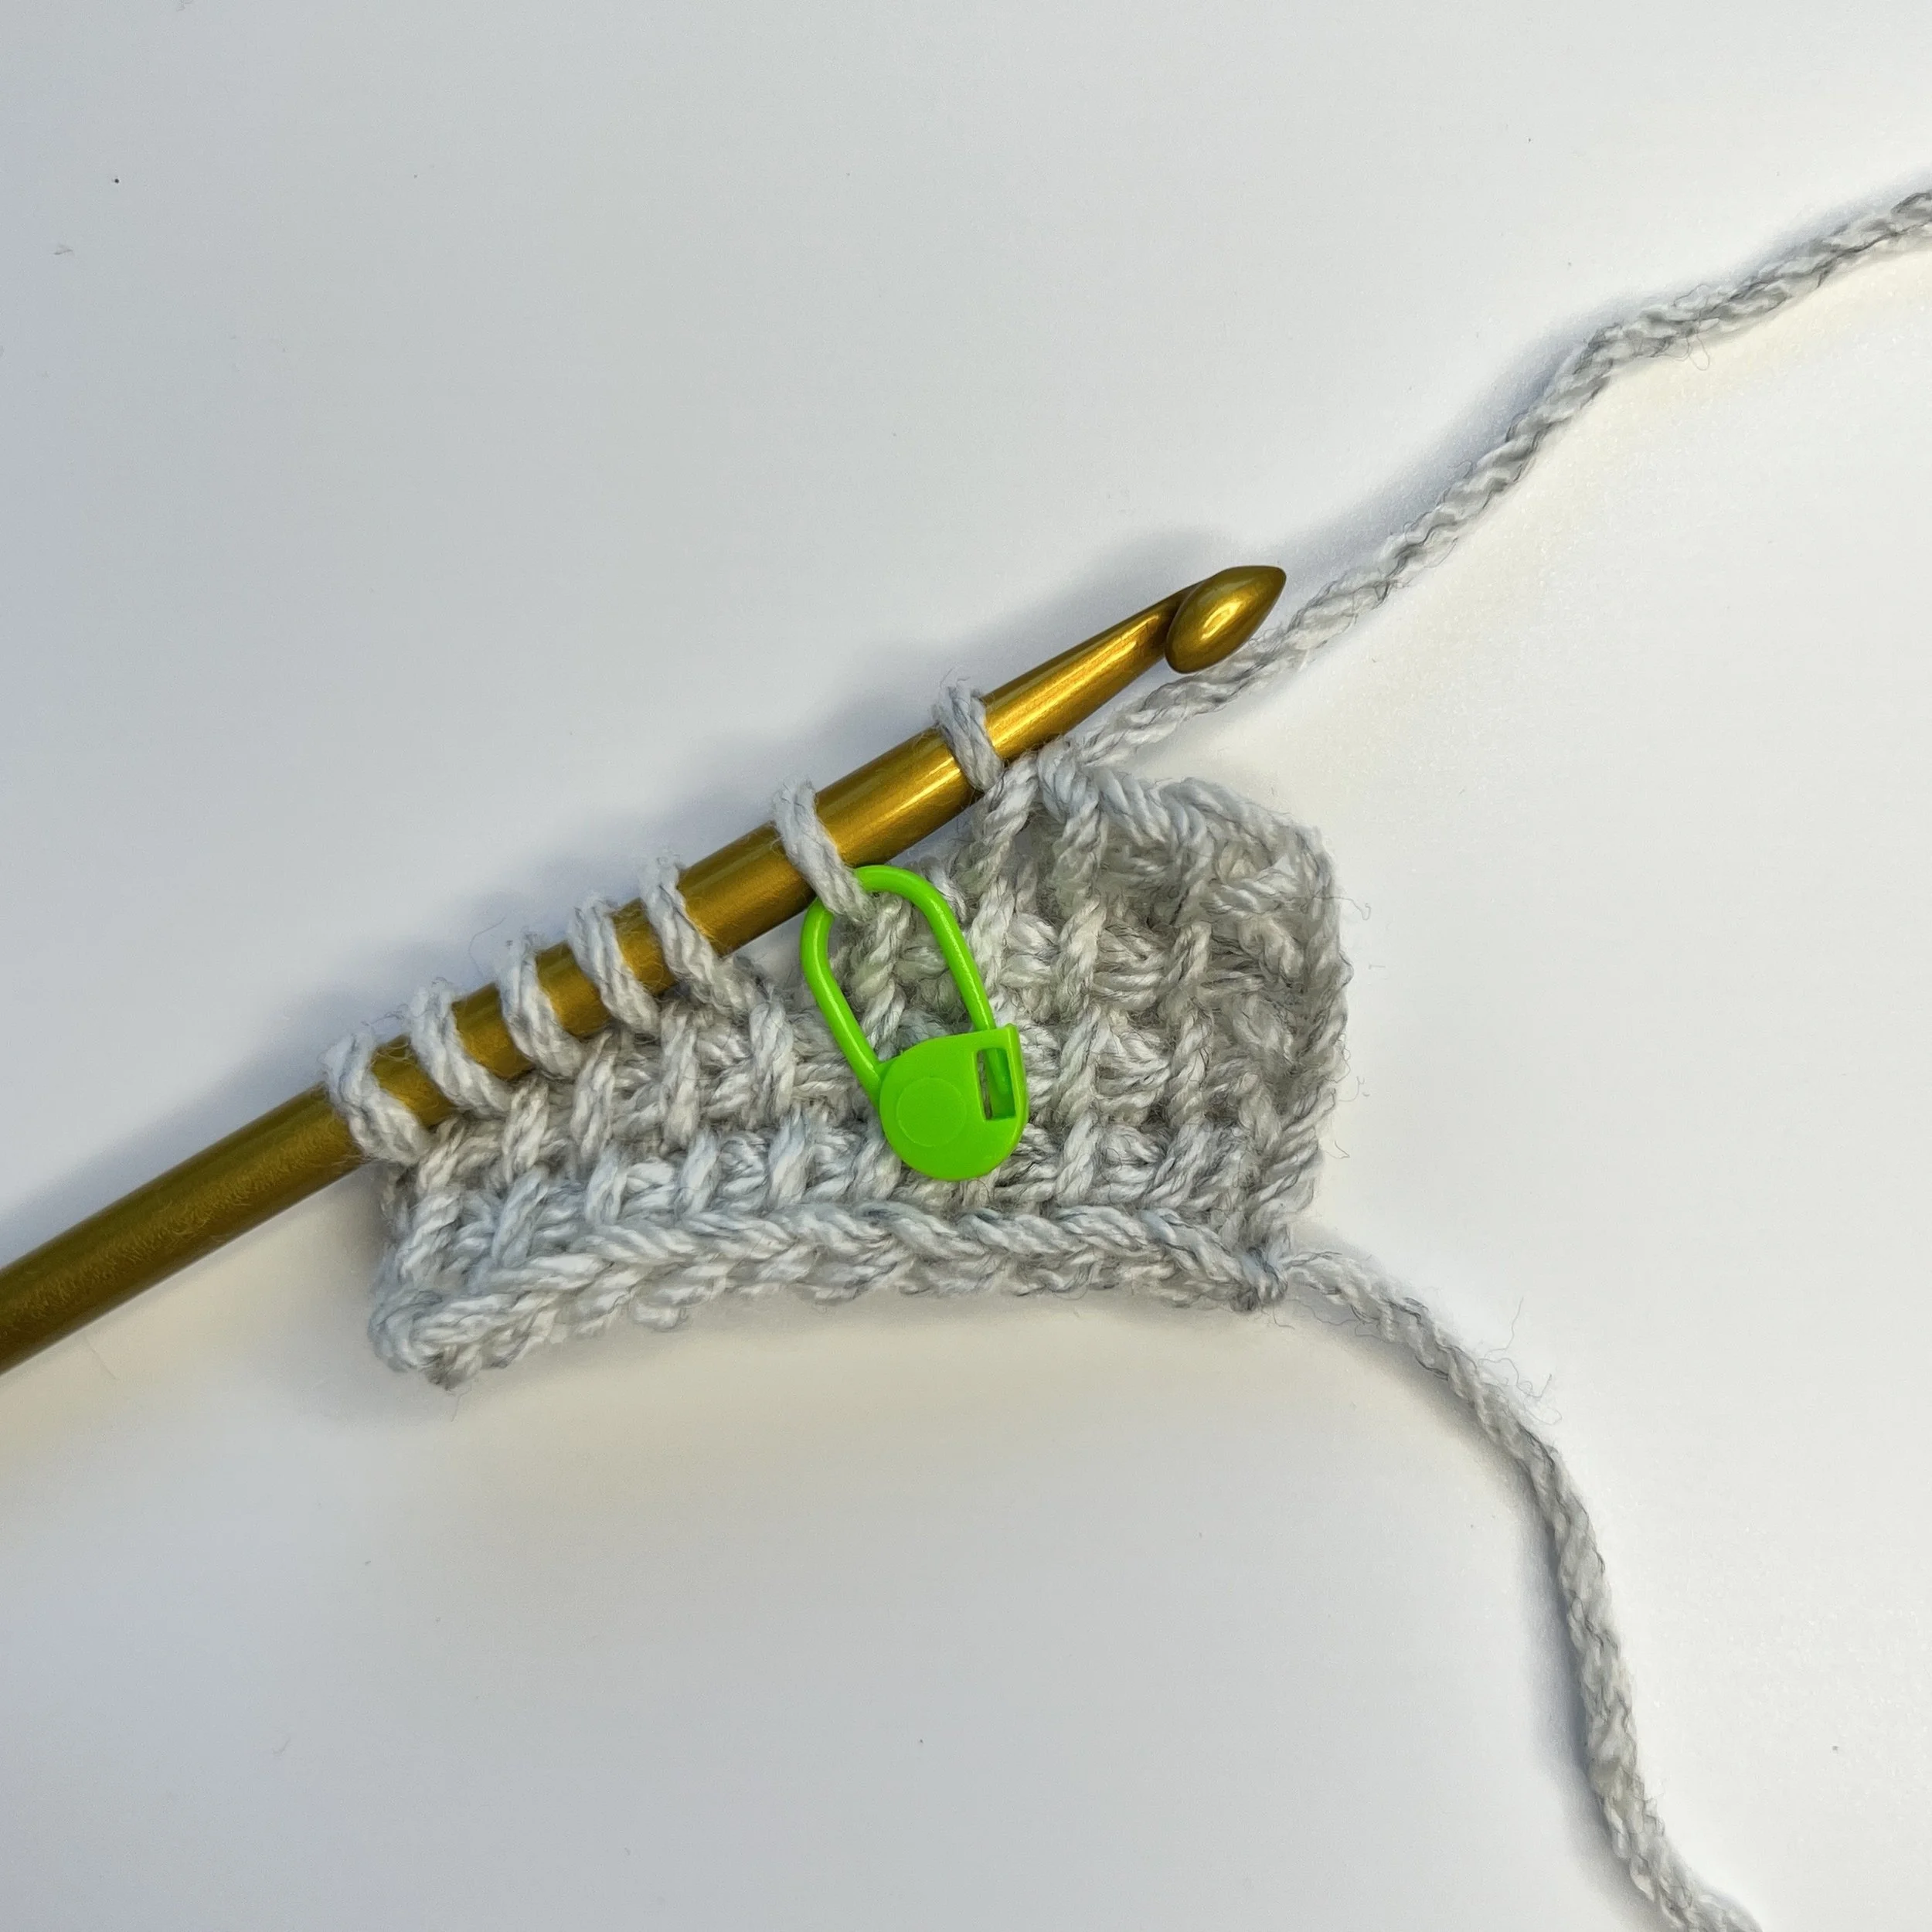
Left handed view.
![(Remove hook from live loop [blue], insert hook into vertical bar [pink] below the marked st [green], reinsert the hook into the live loop (blue), yarn over, pull through three loops), *yarn over, pull through 2 loops* until 1 loop remains on hook.
T](https://images.squarespace-cdn.com/content/v1/69c72aa8f76ed04f7e0bc938/2f1ac000-bd97-41a0-9773-4abf36e7fc47/5.Loops+for+twisted+st.JPG)
(Remove hook from live loop [blue], insert hook into vertical bar [pink] below the marked st [green], reinsert the hook into the live loop (blue), yarn over, pull through three loops), *yarn over, pull through 2 loops* until 1 loop remains on hook. The instructions within the (brackets) above create a kind of twisted or crossed stitch.
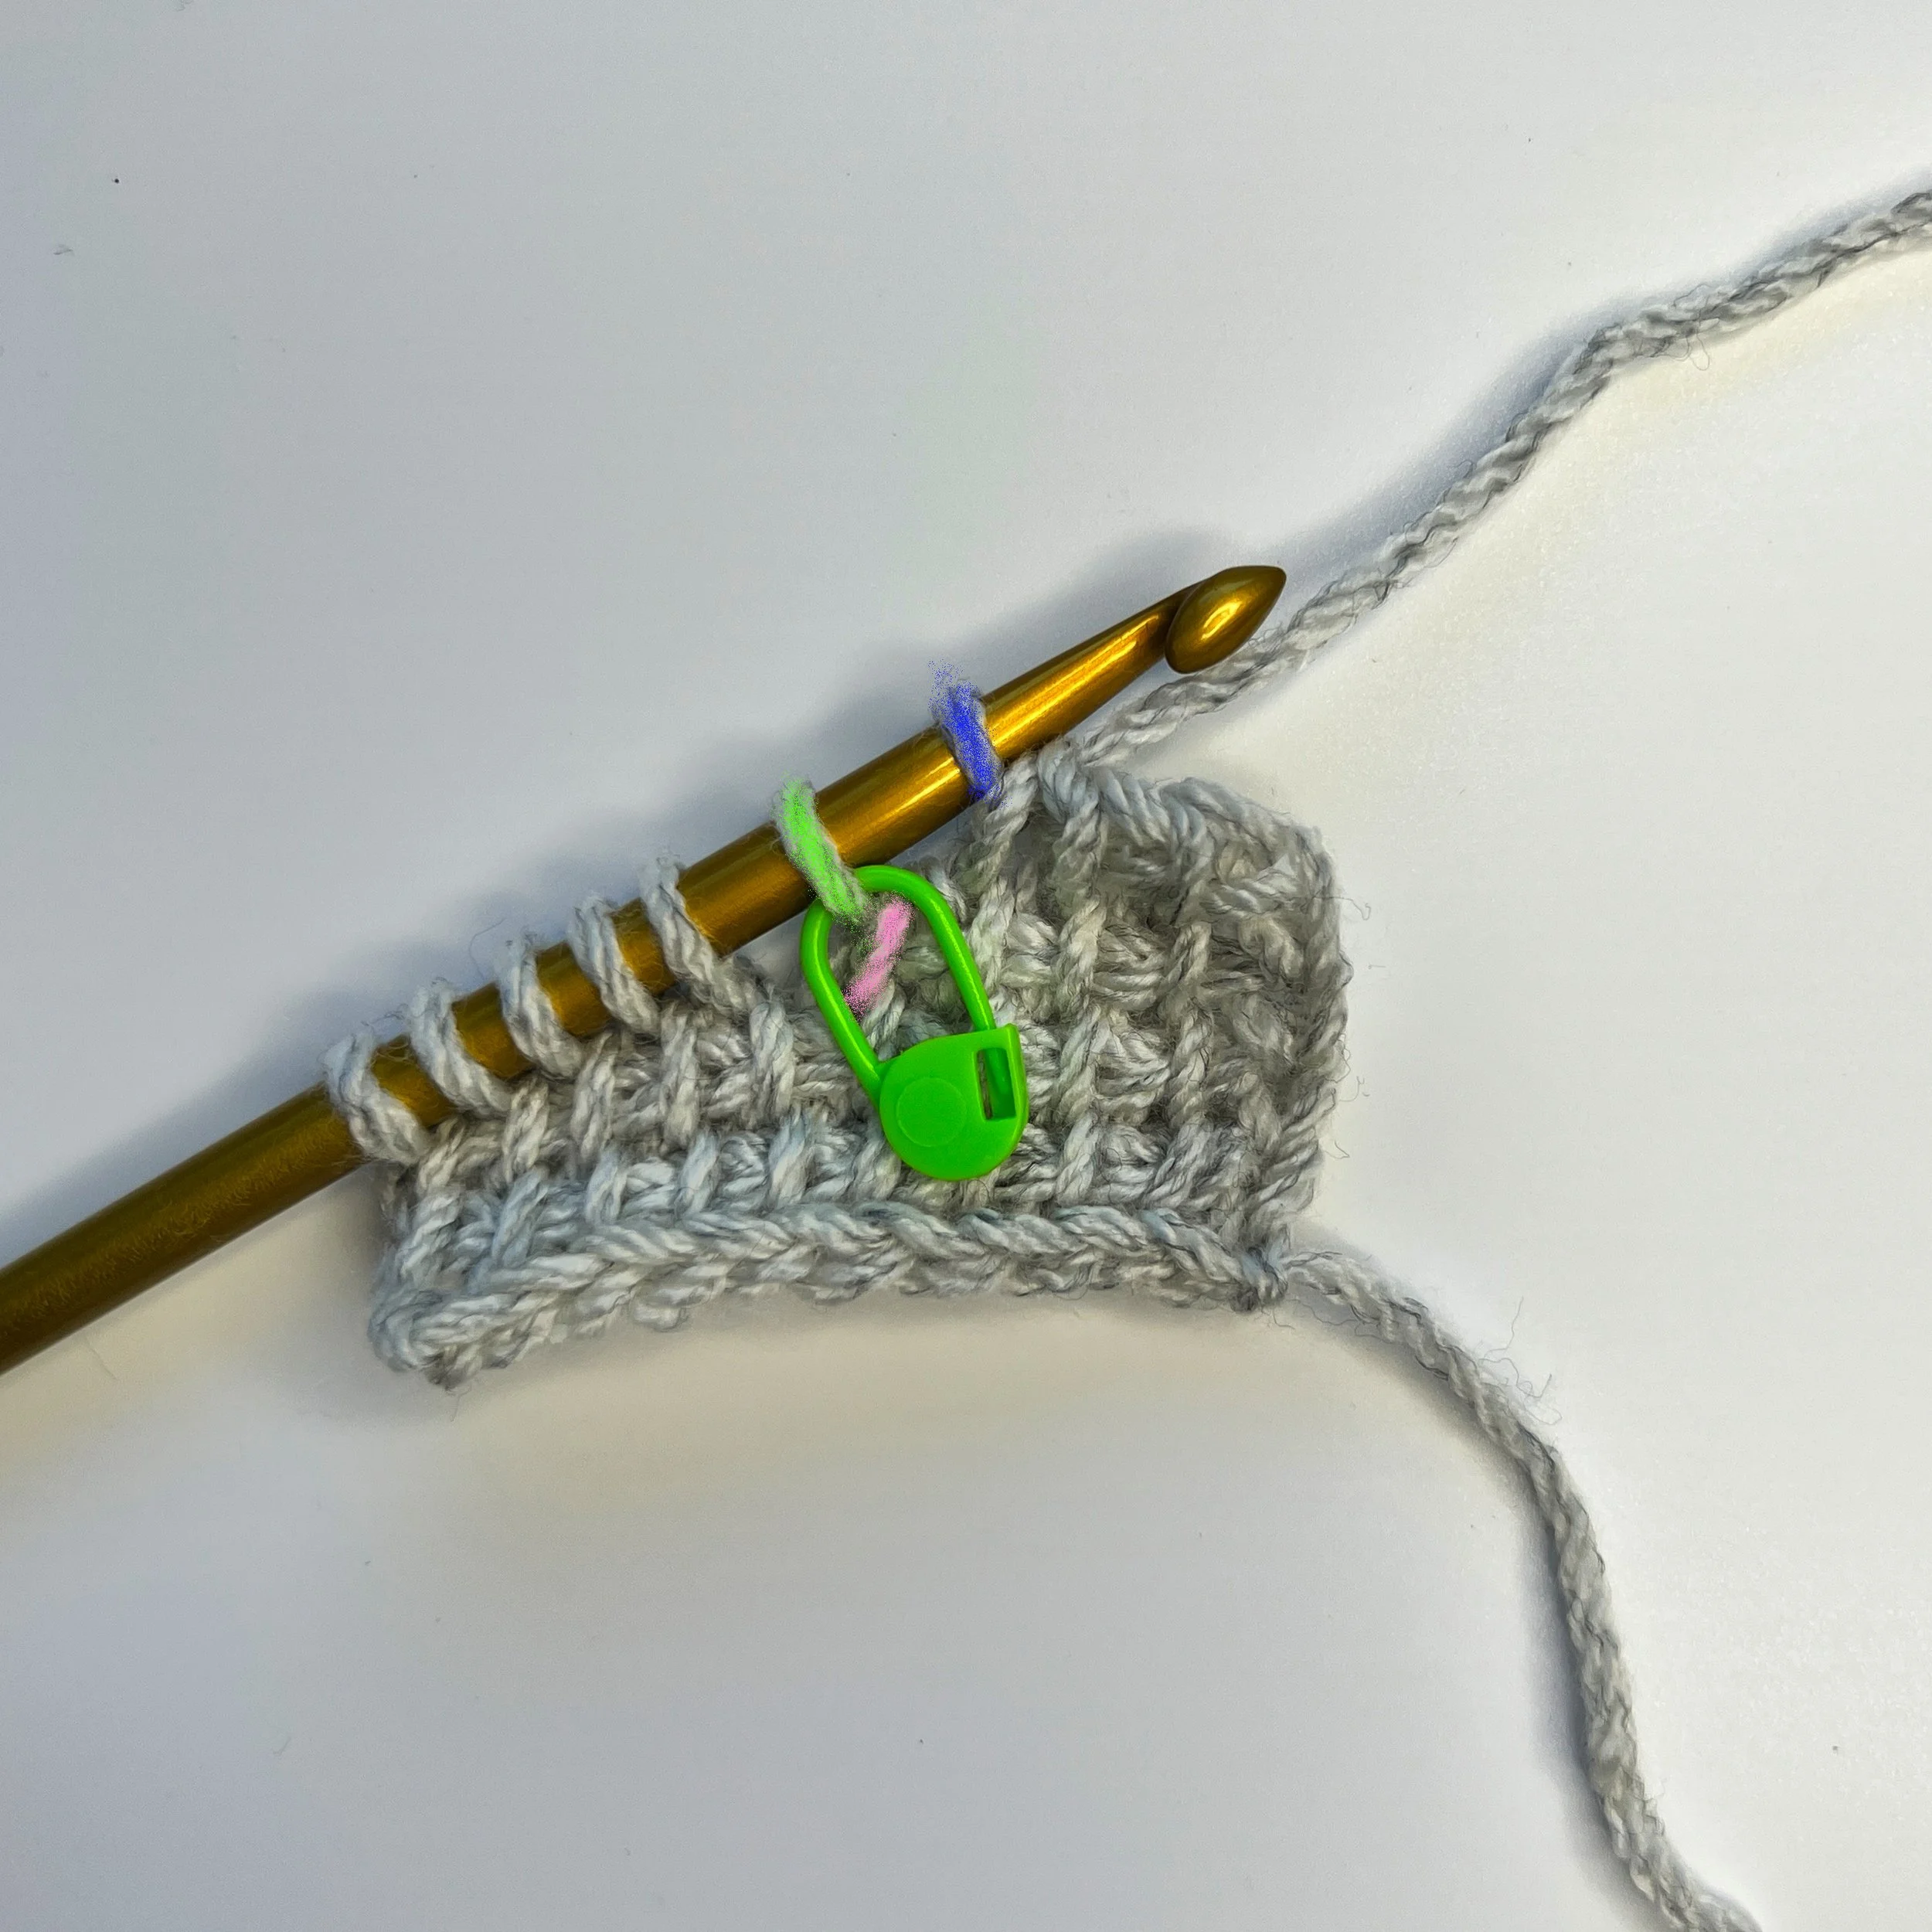
Left handed view.
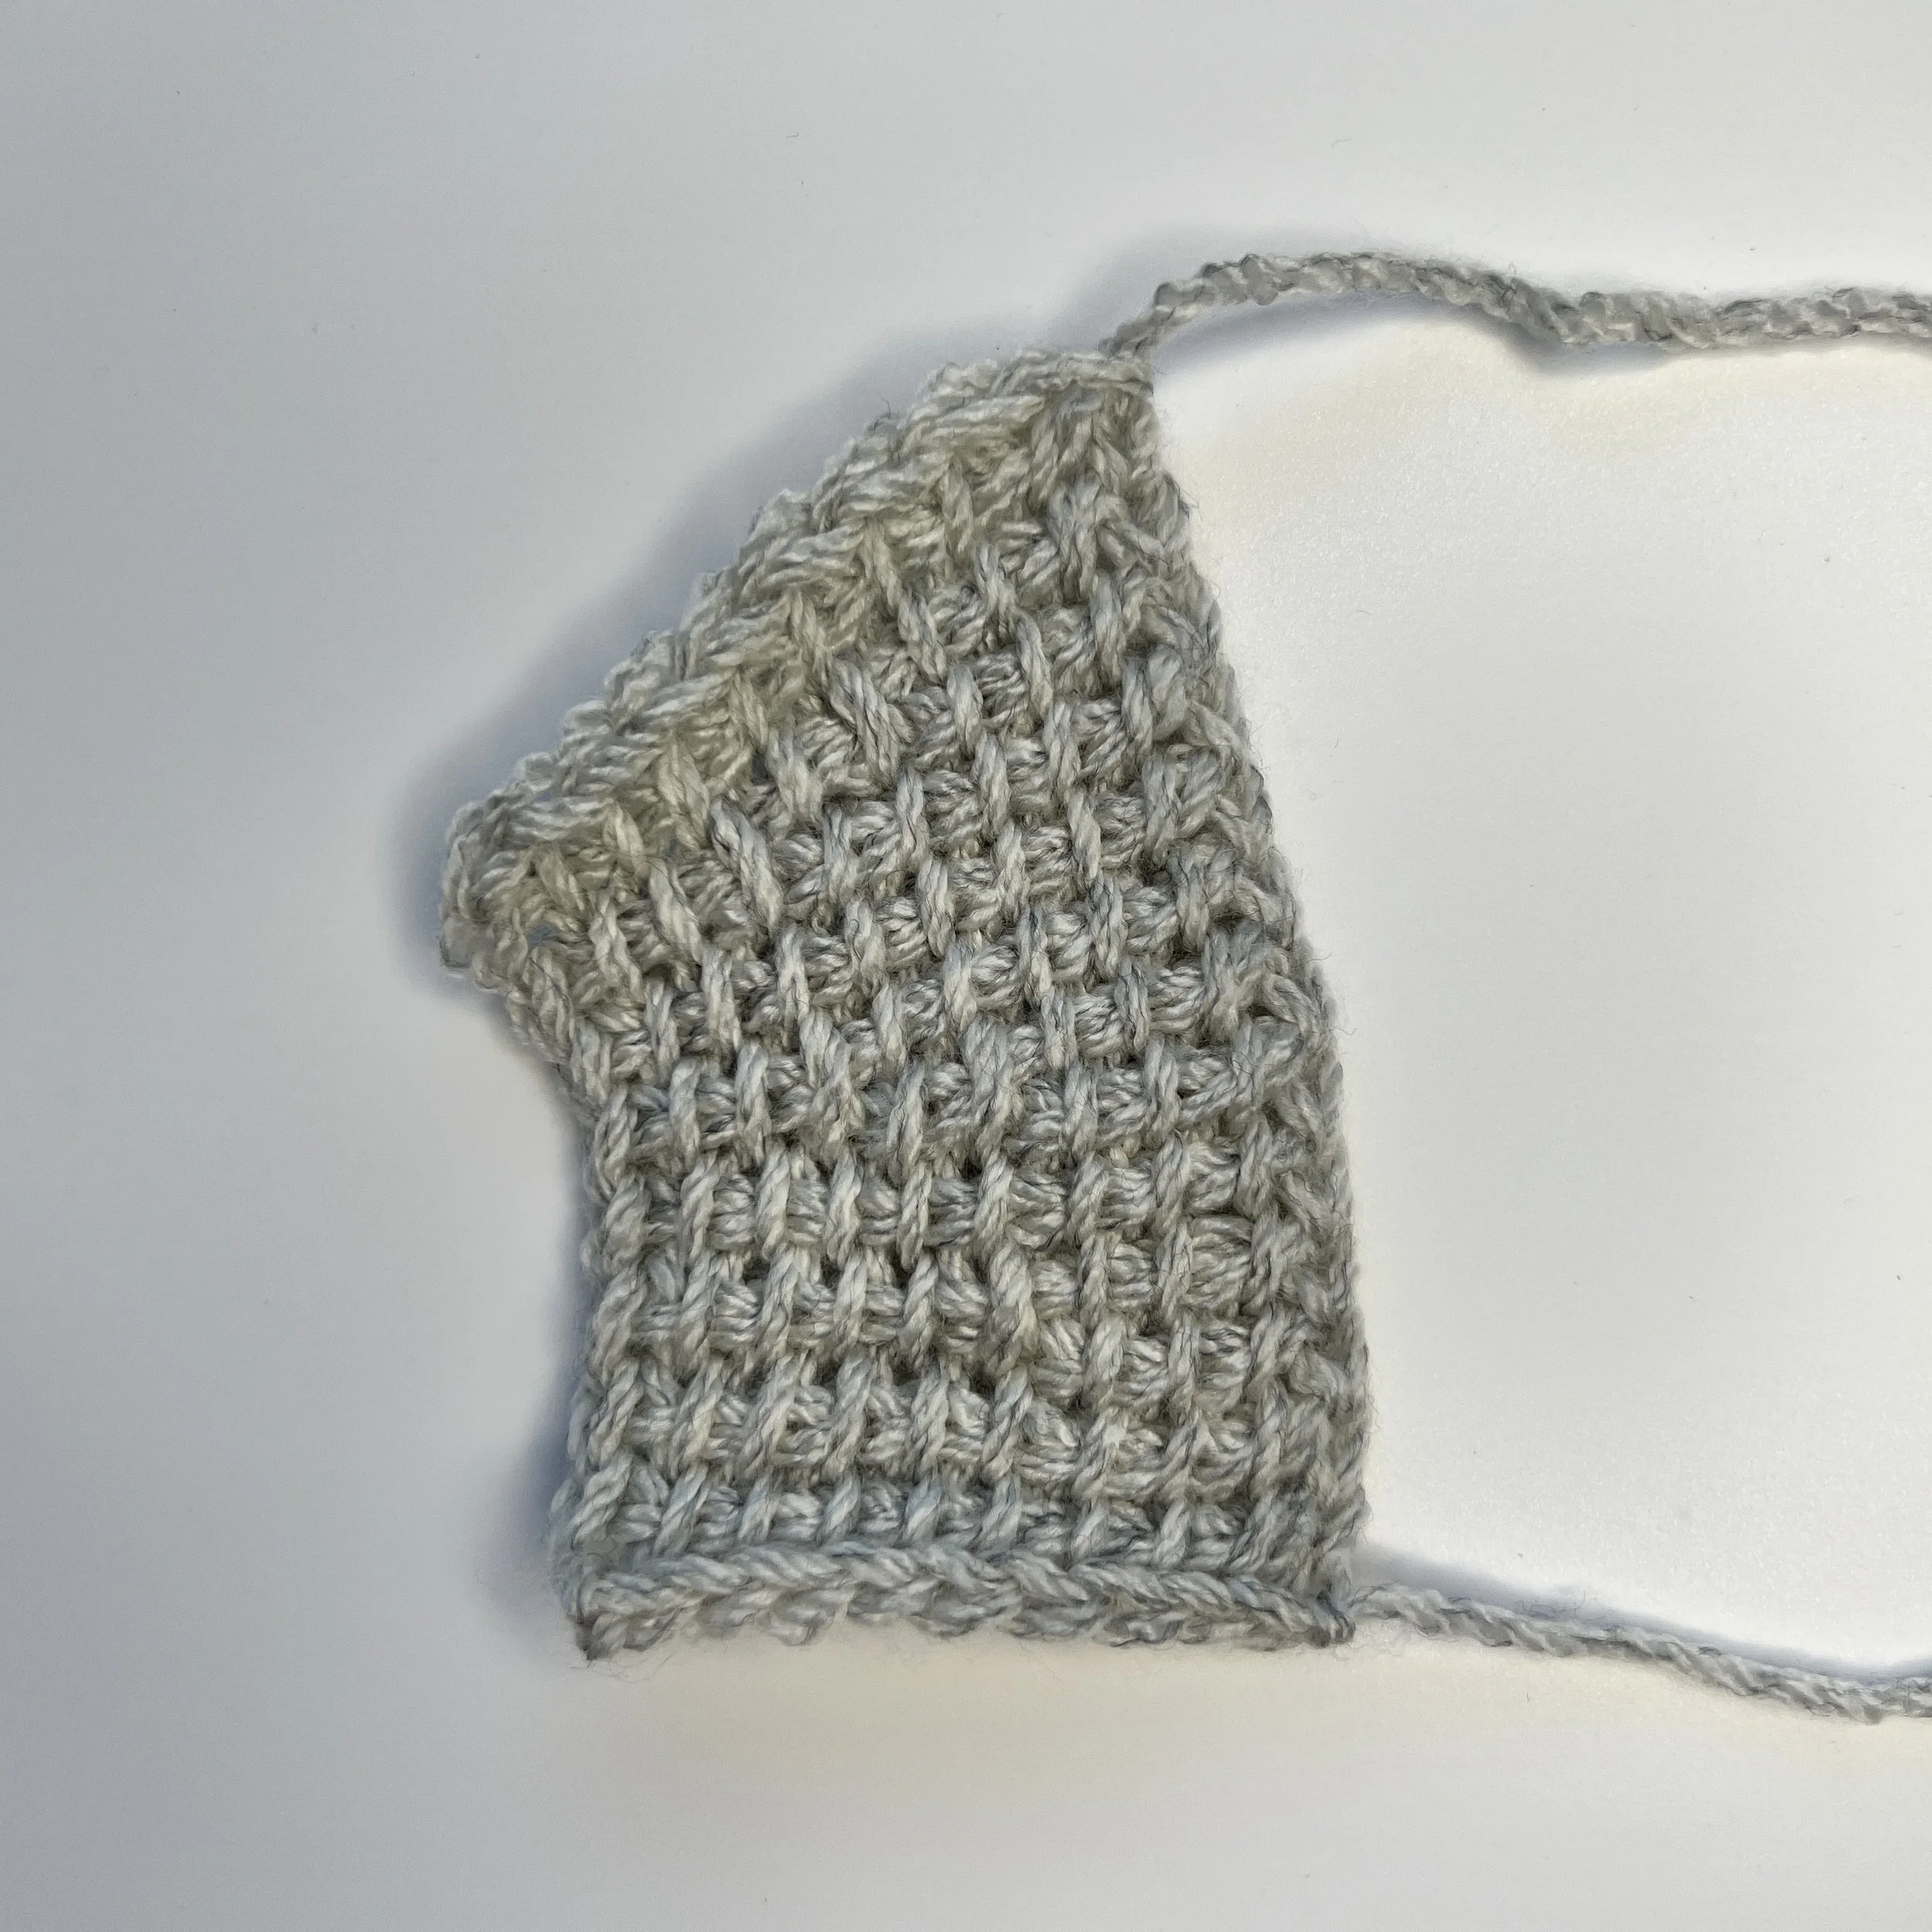
2nd row above short row: Worked as a row of tss except when you get to the twisted/crossed stitch, insert the hook under both loops of that stitch and treat those loops as one tss.
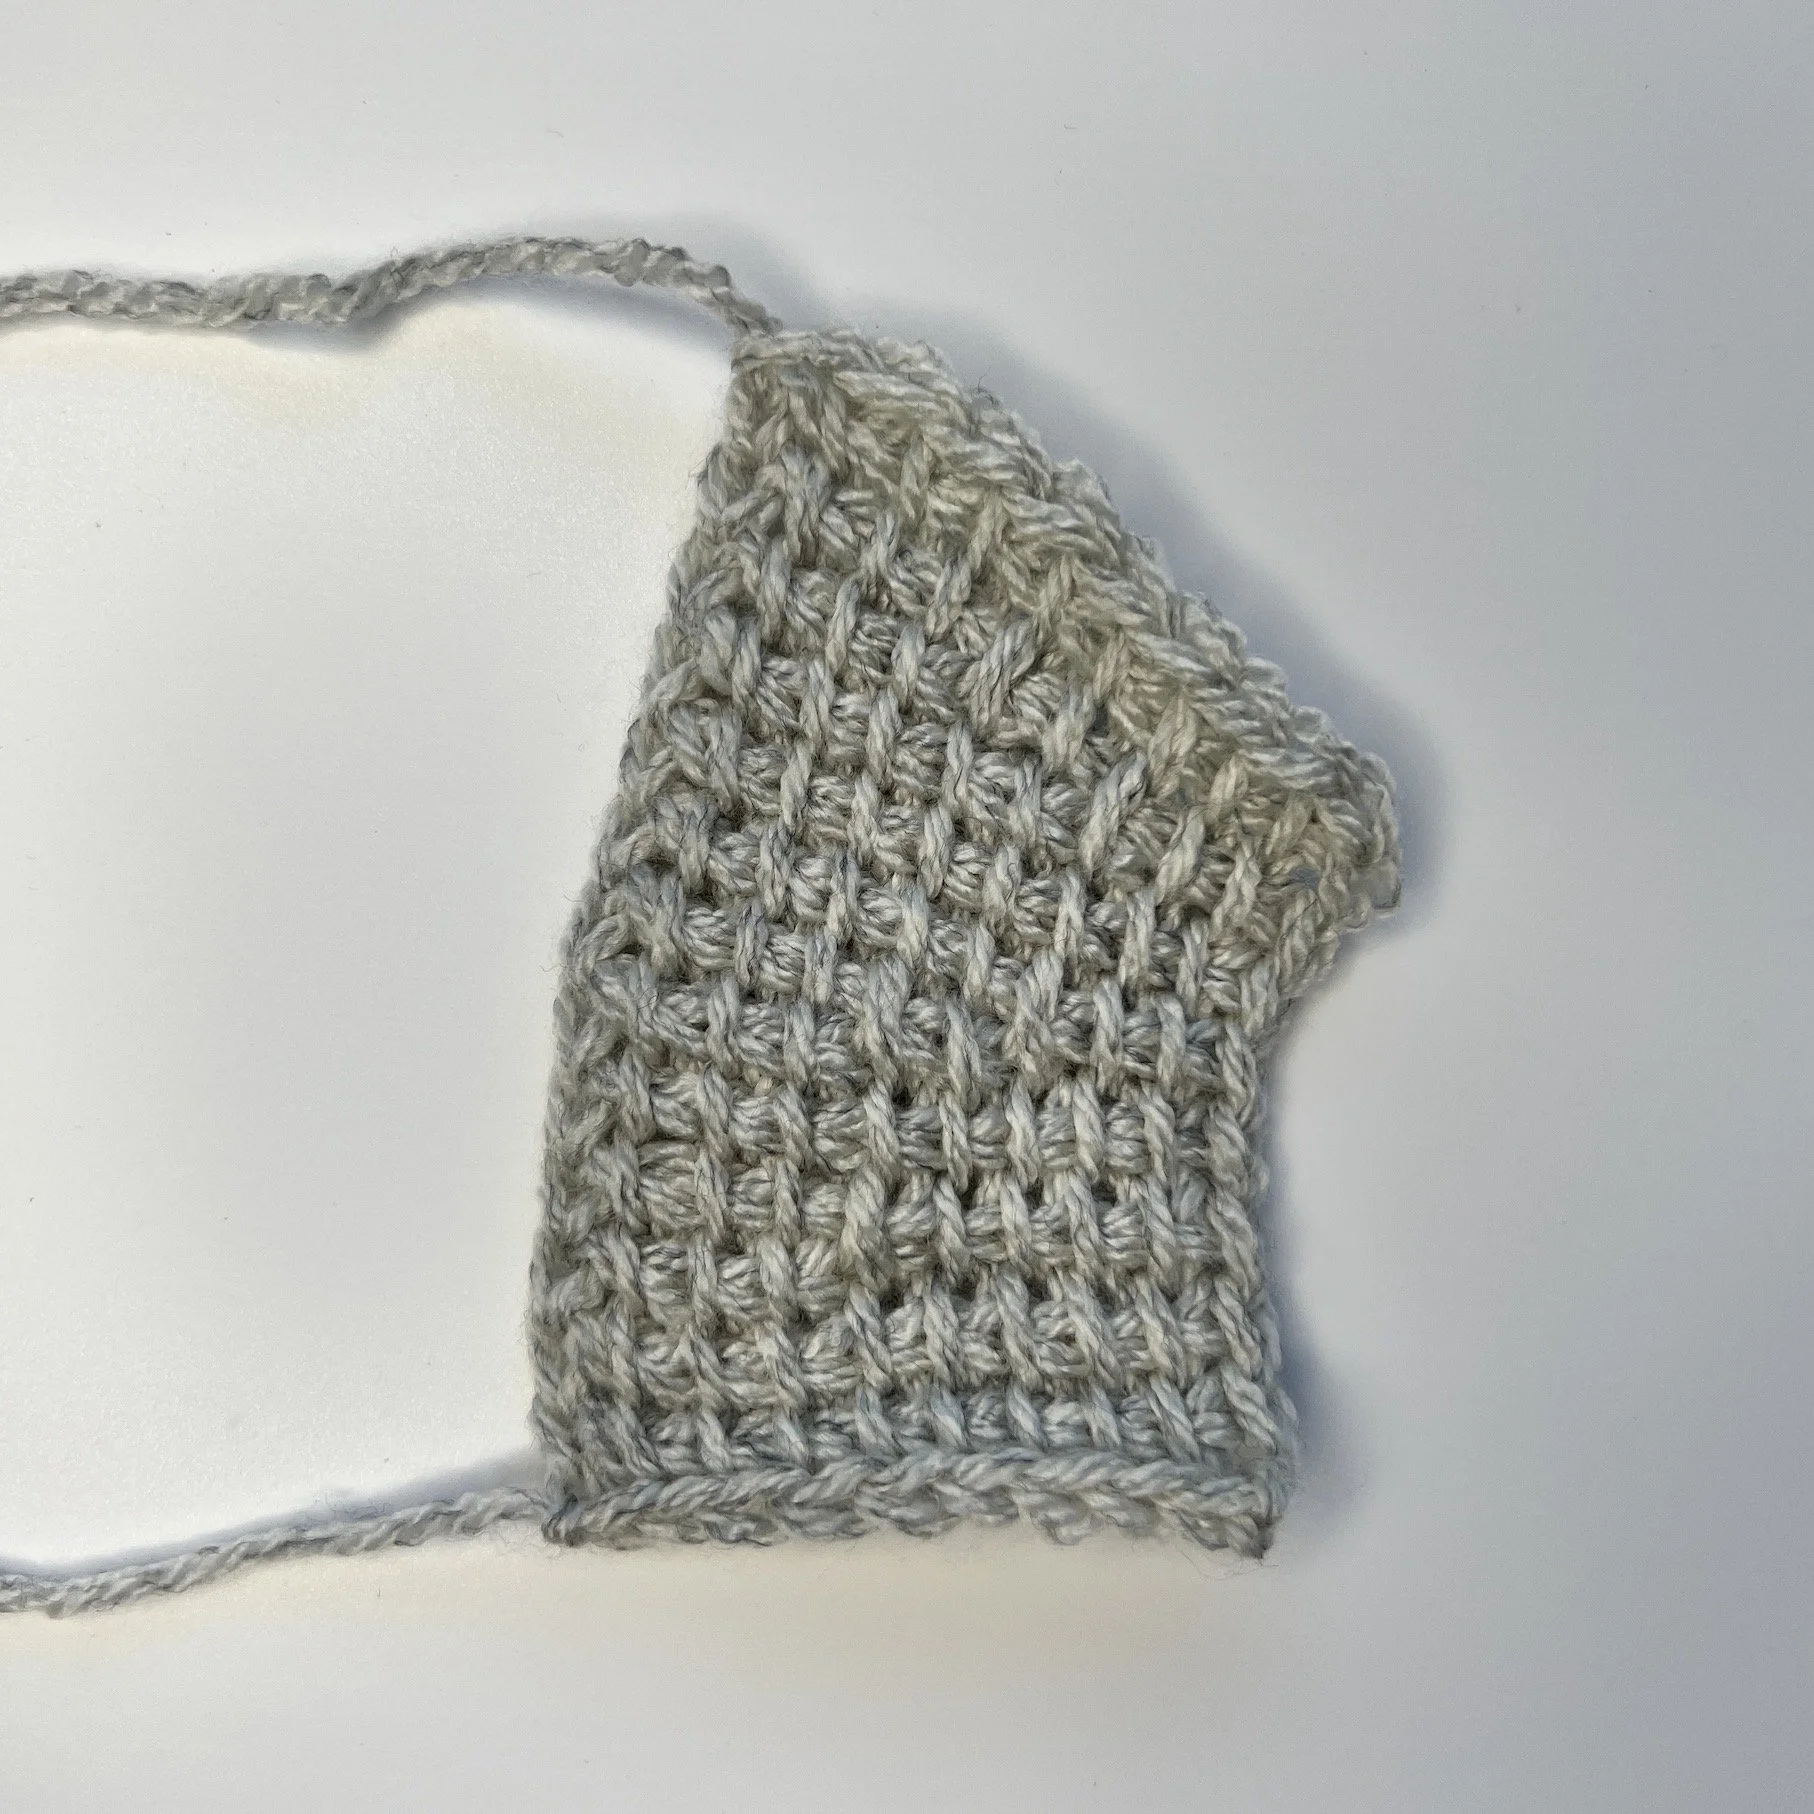
Left handed view.
Centre Short Rows
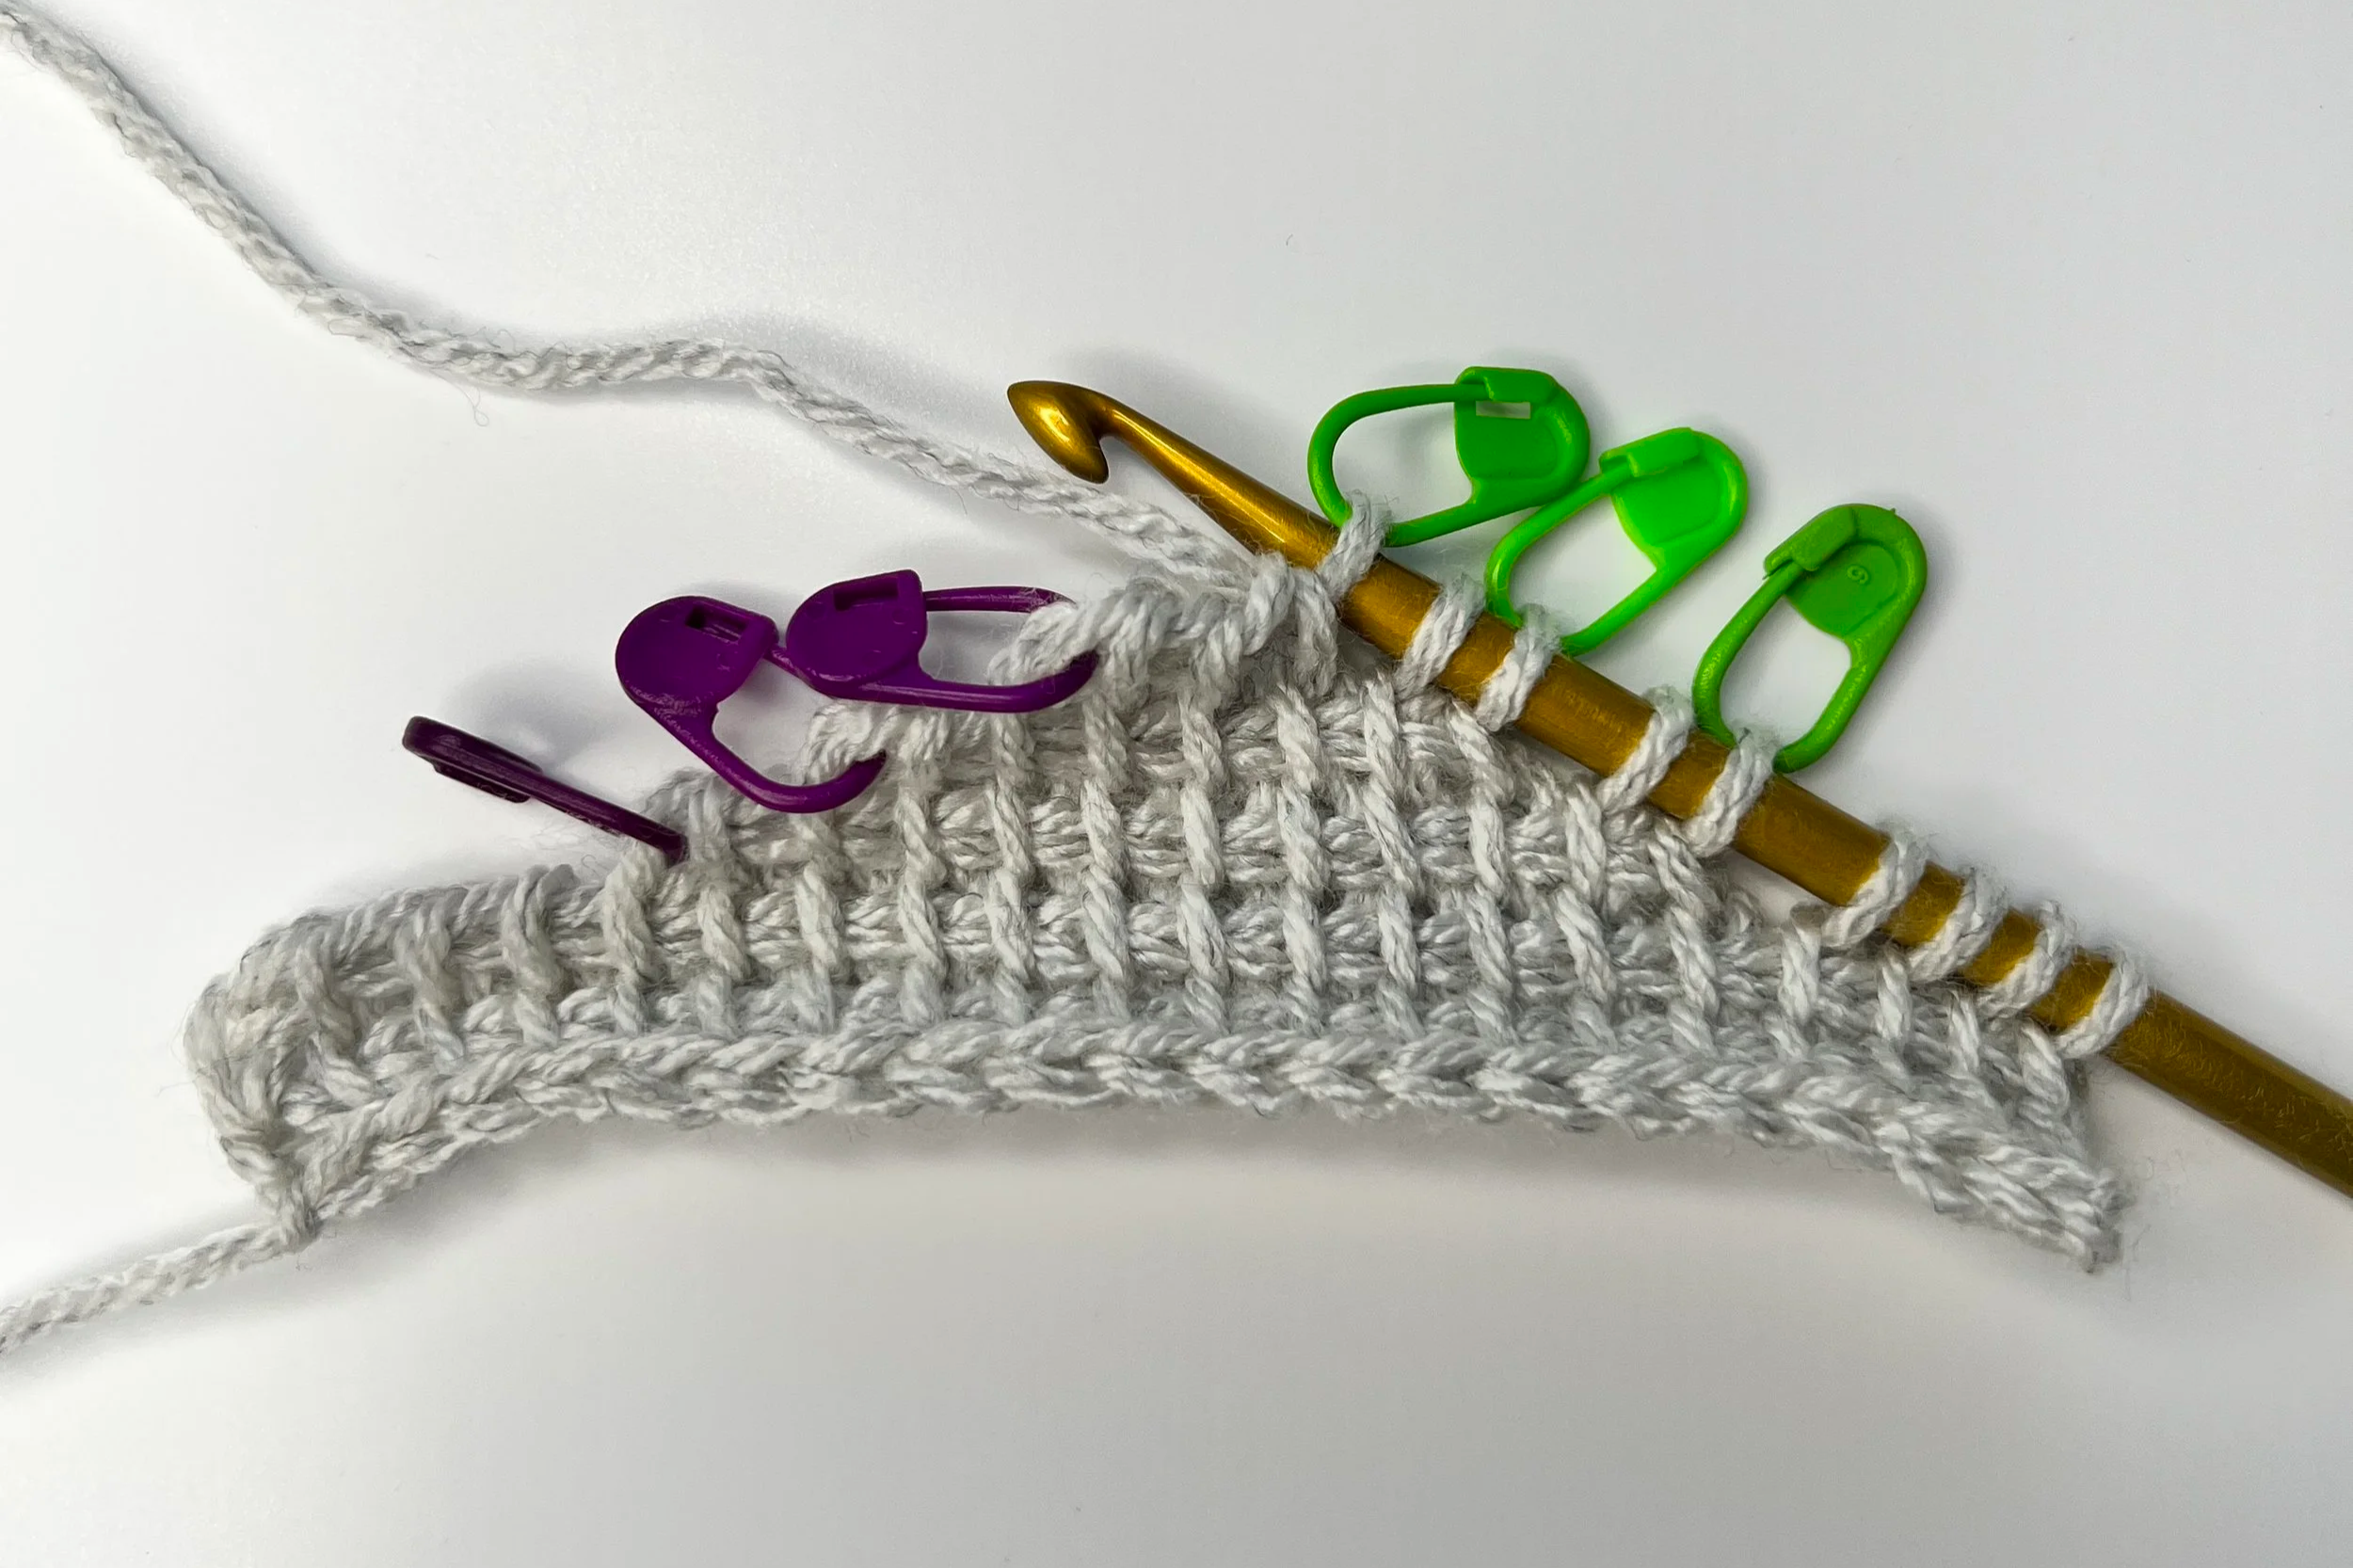
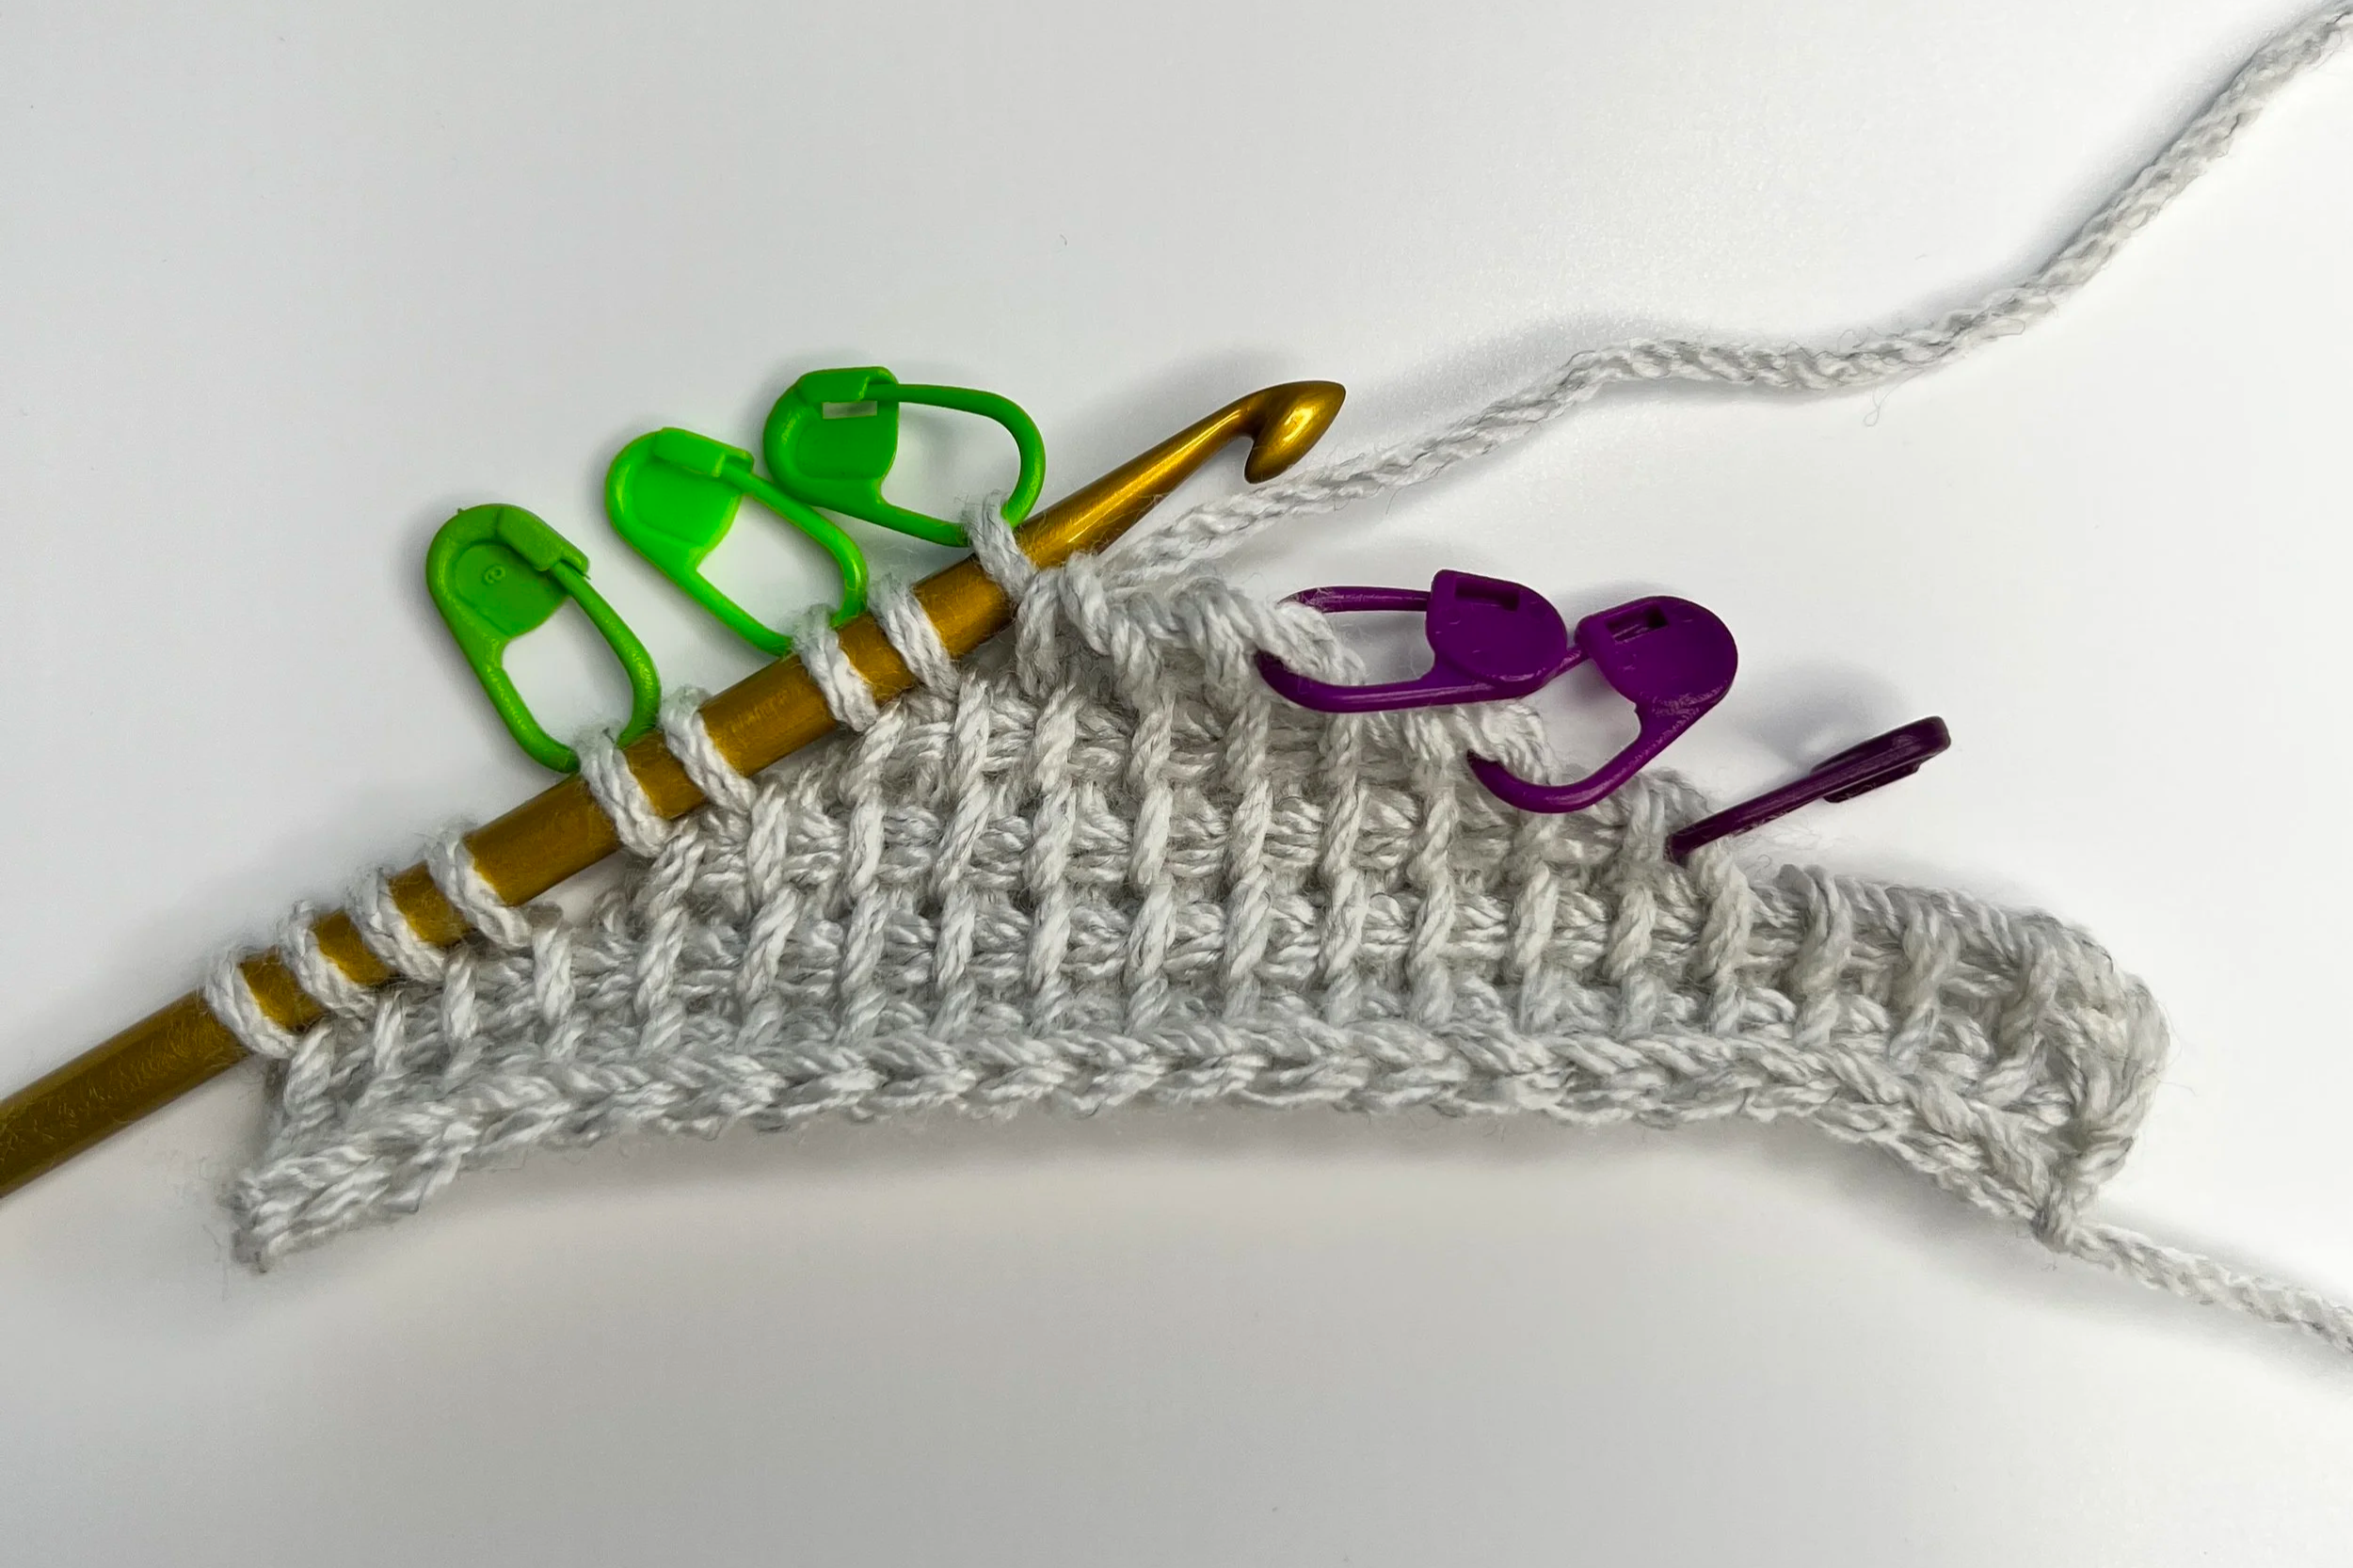
Centre short rows are used to make the middle of a piece of crochet taller than the edges. Before trying centre short rows, I recommend you practice the techniques used in both forward and return pass short rows first.
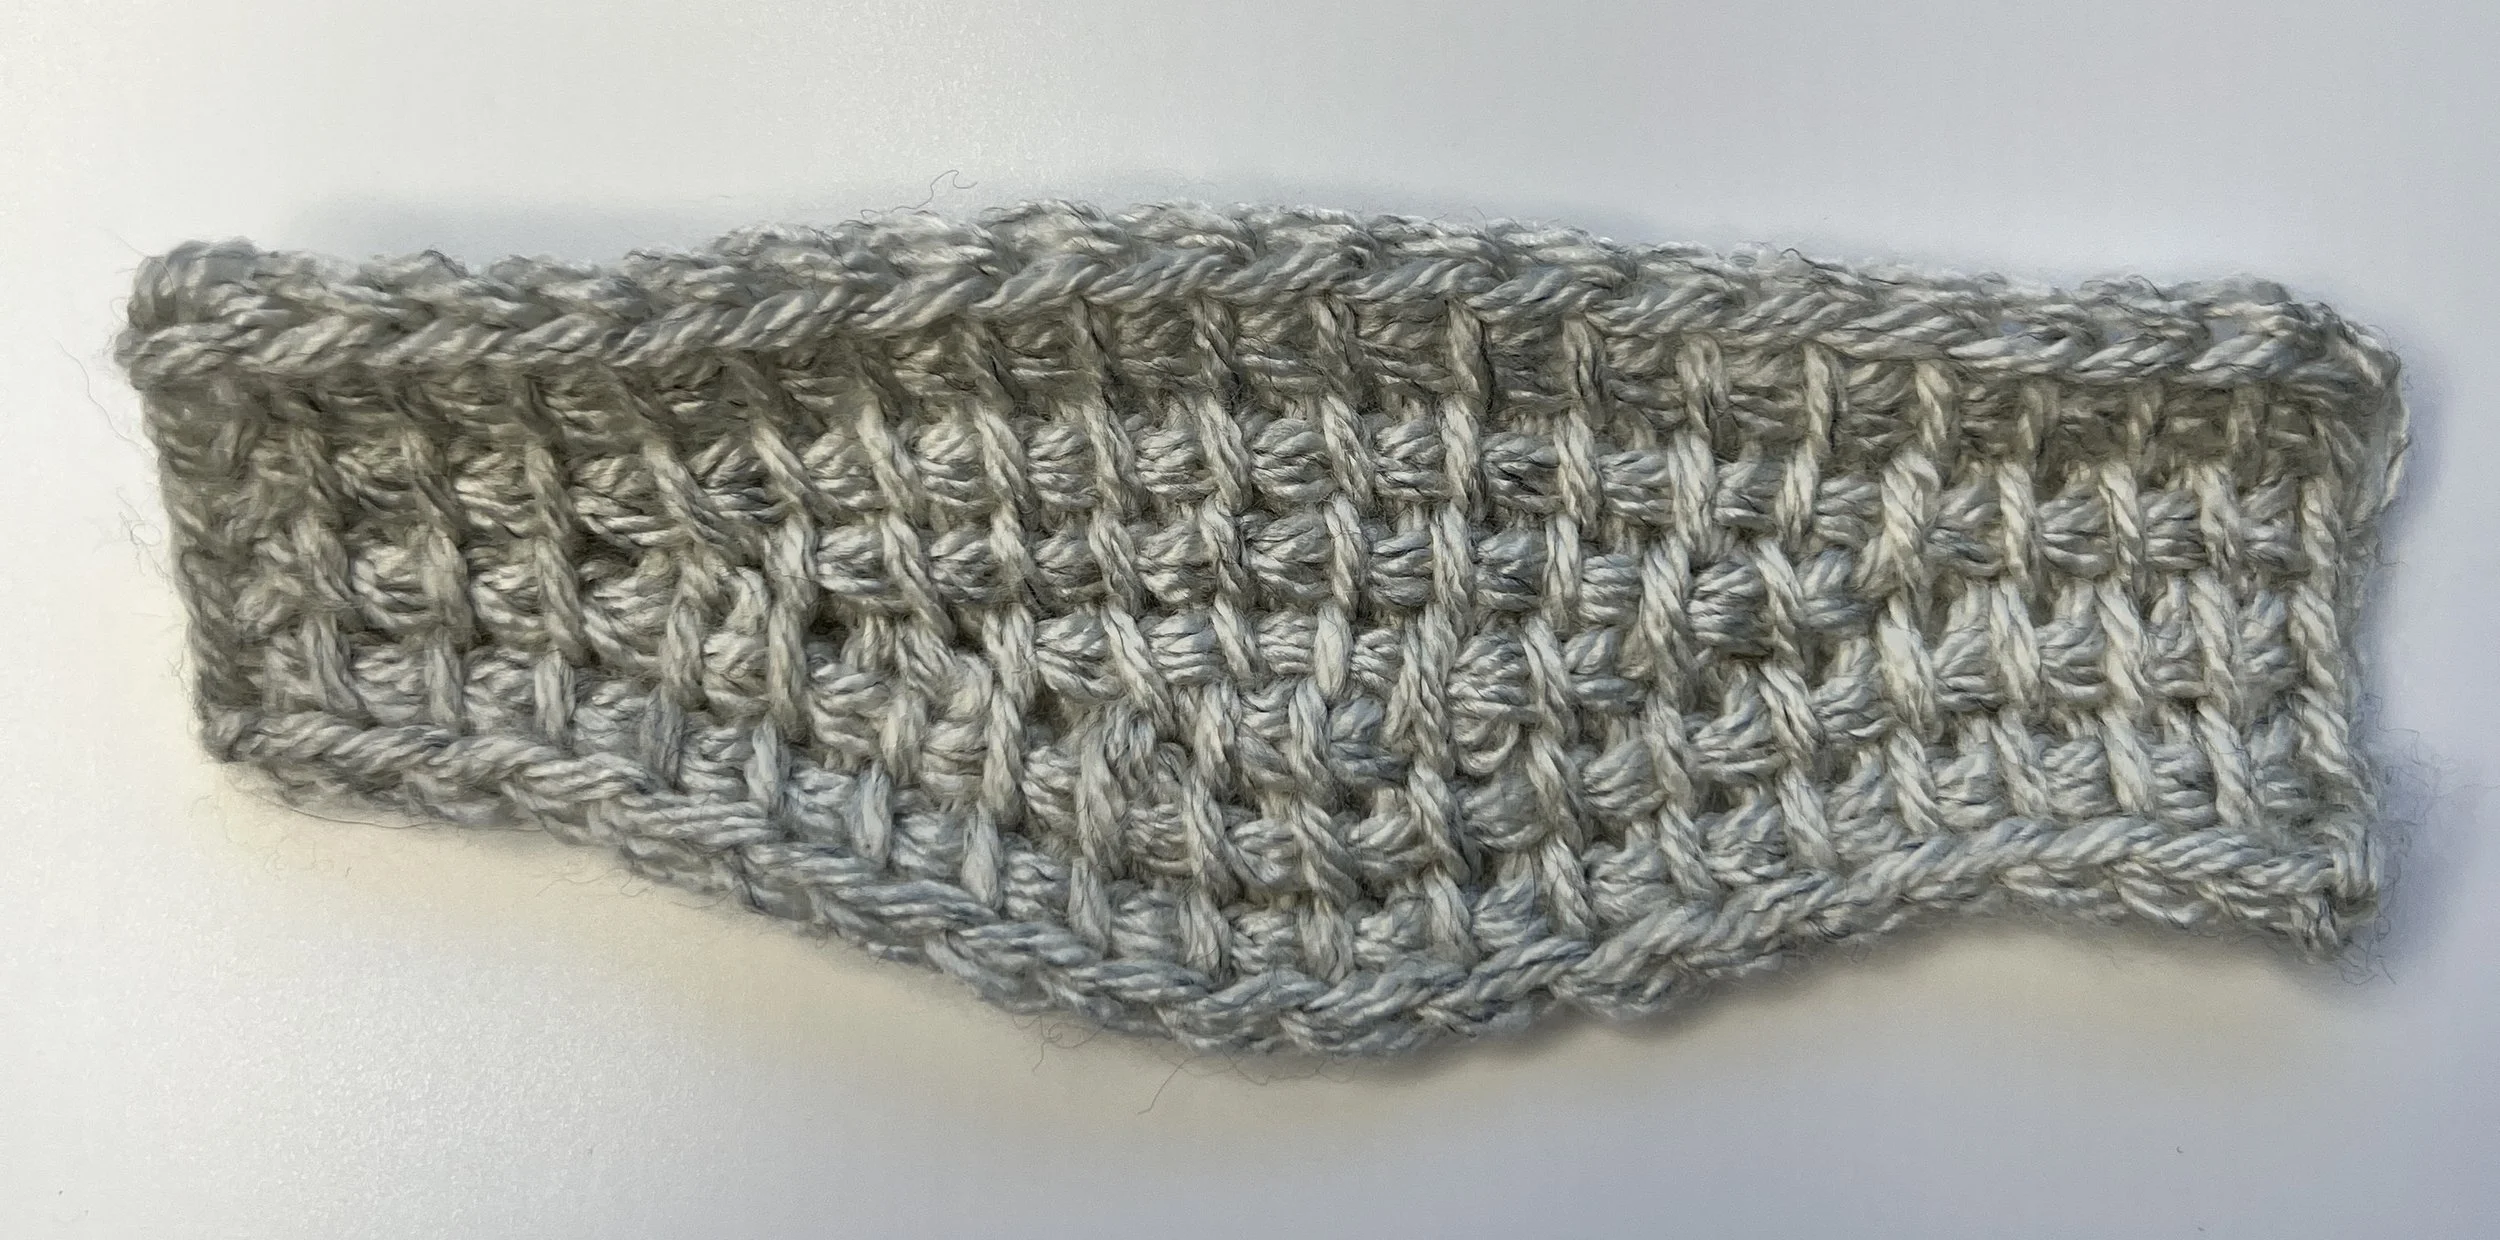
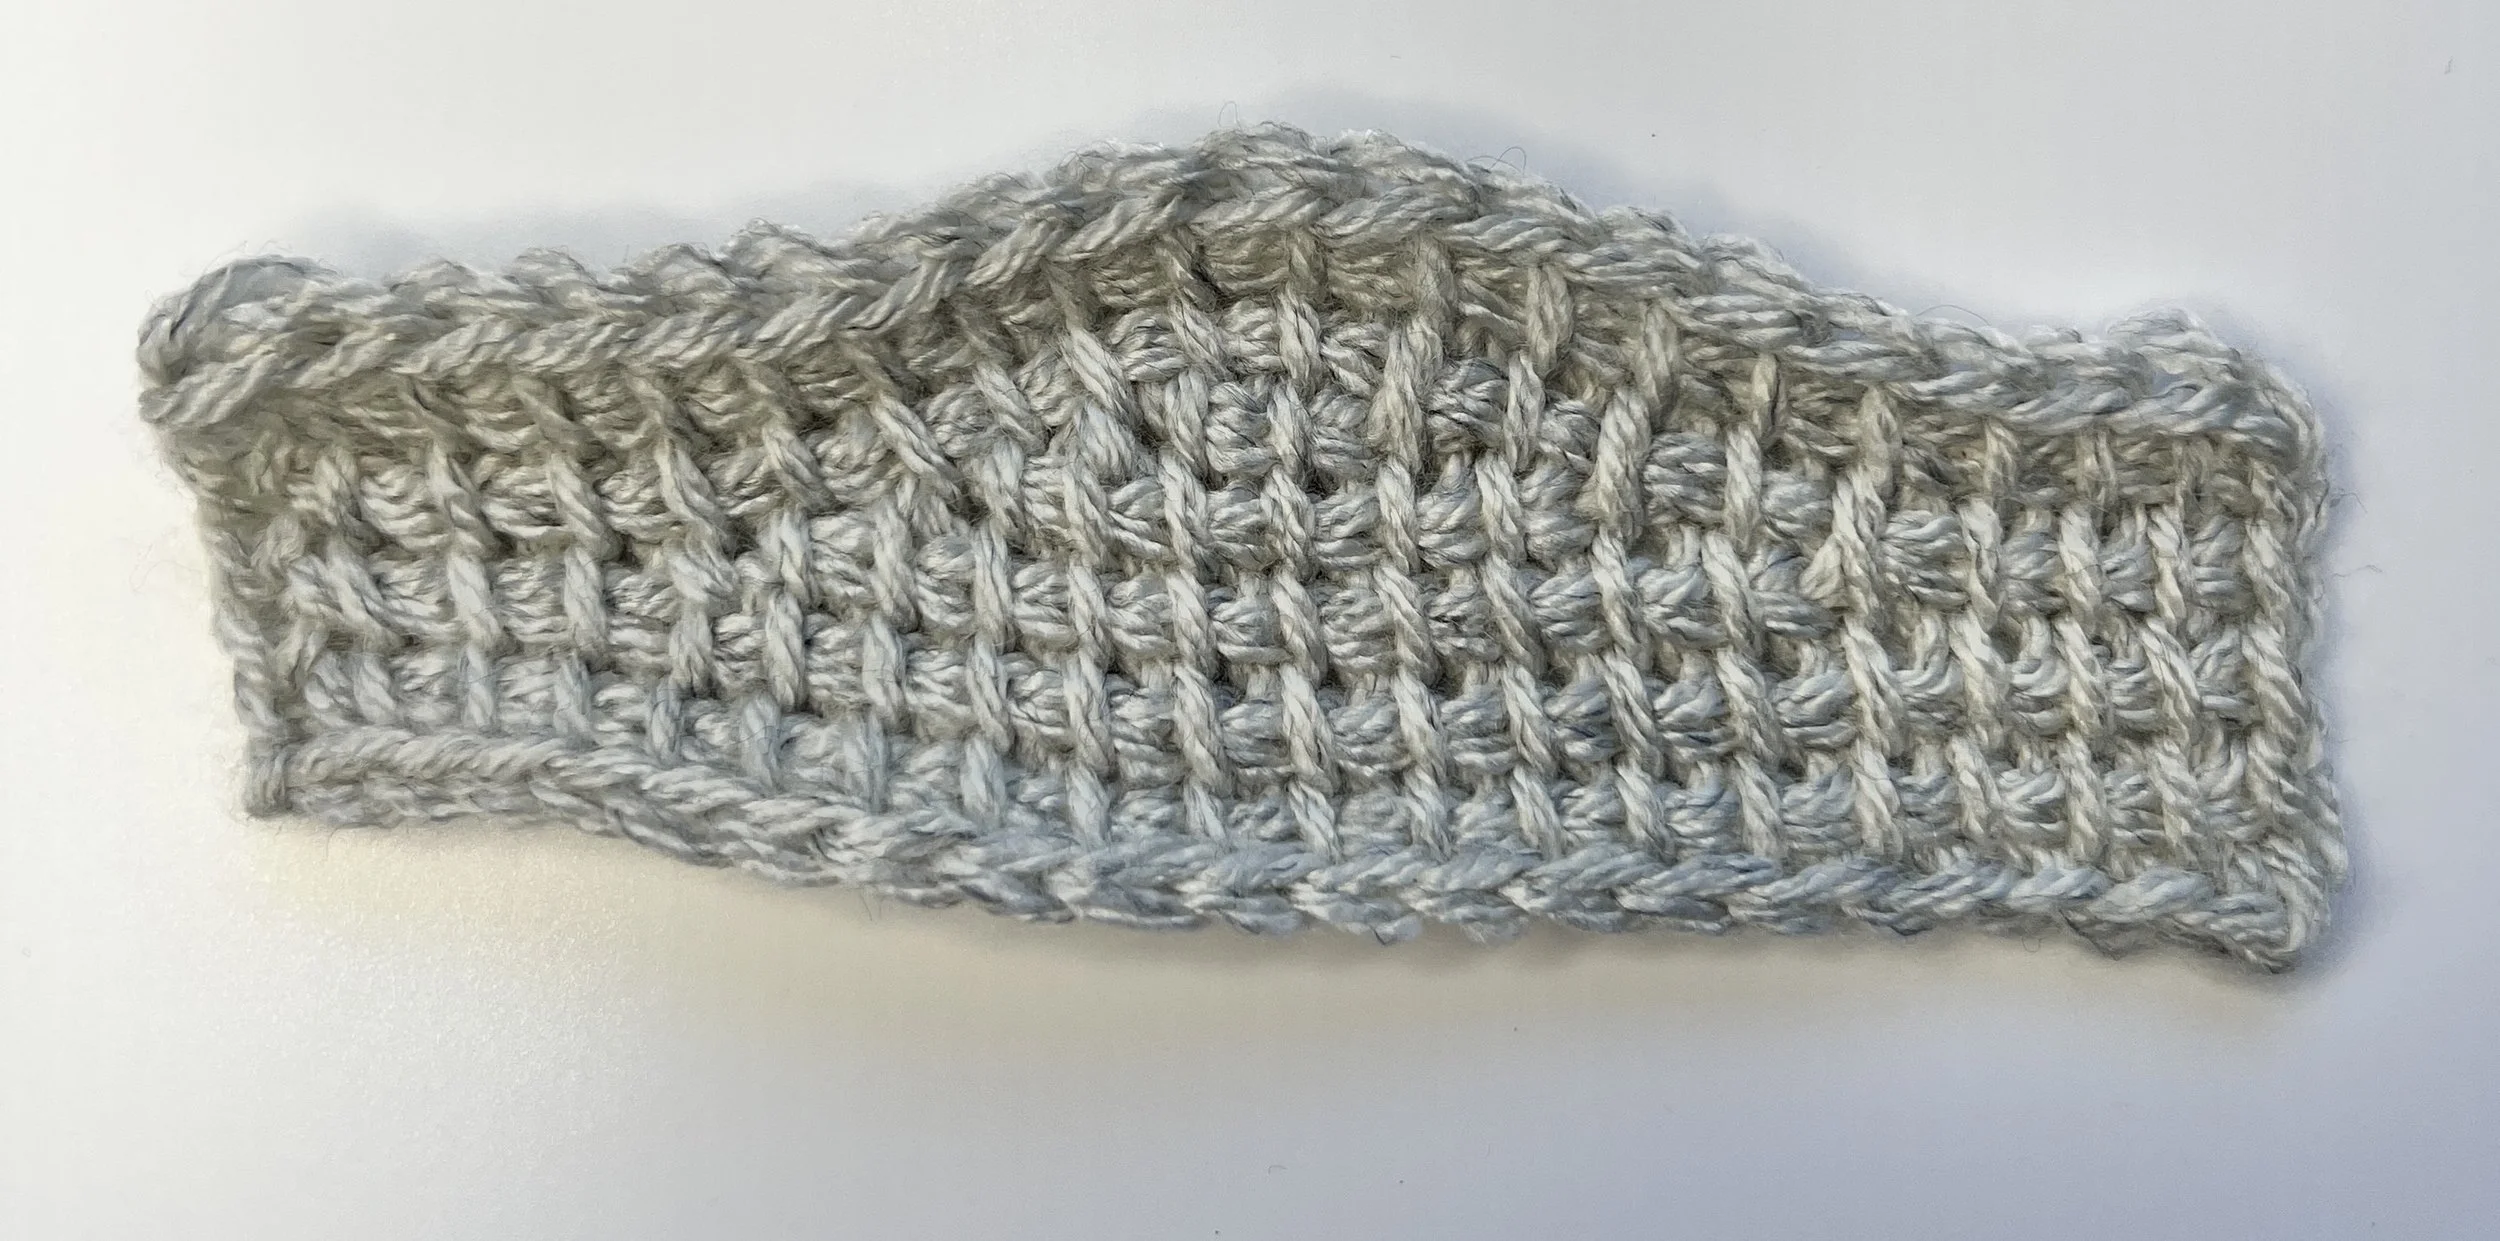
There are two main variations to making centre short rows. First method is when the first short row is the narrowest and each short row gets wider (bottom swatch on below image). I prefer this technique on a drop shoulder sweater or for raising the back of a yoke at the neck. This is because the piece curves along the foundation row edge.
The second method is when the first short row is the widest and each short row becomes narrower (top swatch on below image). I prefer this technique on a curved bottom of a tool-down sweater. This is because the piece curves along the bind off row edge.
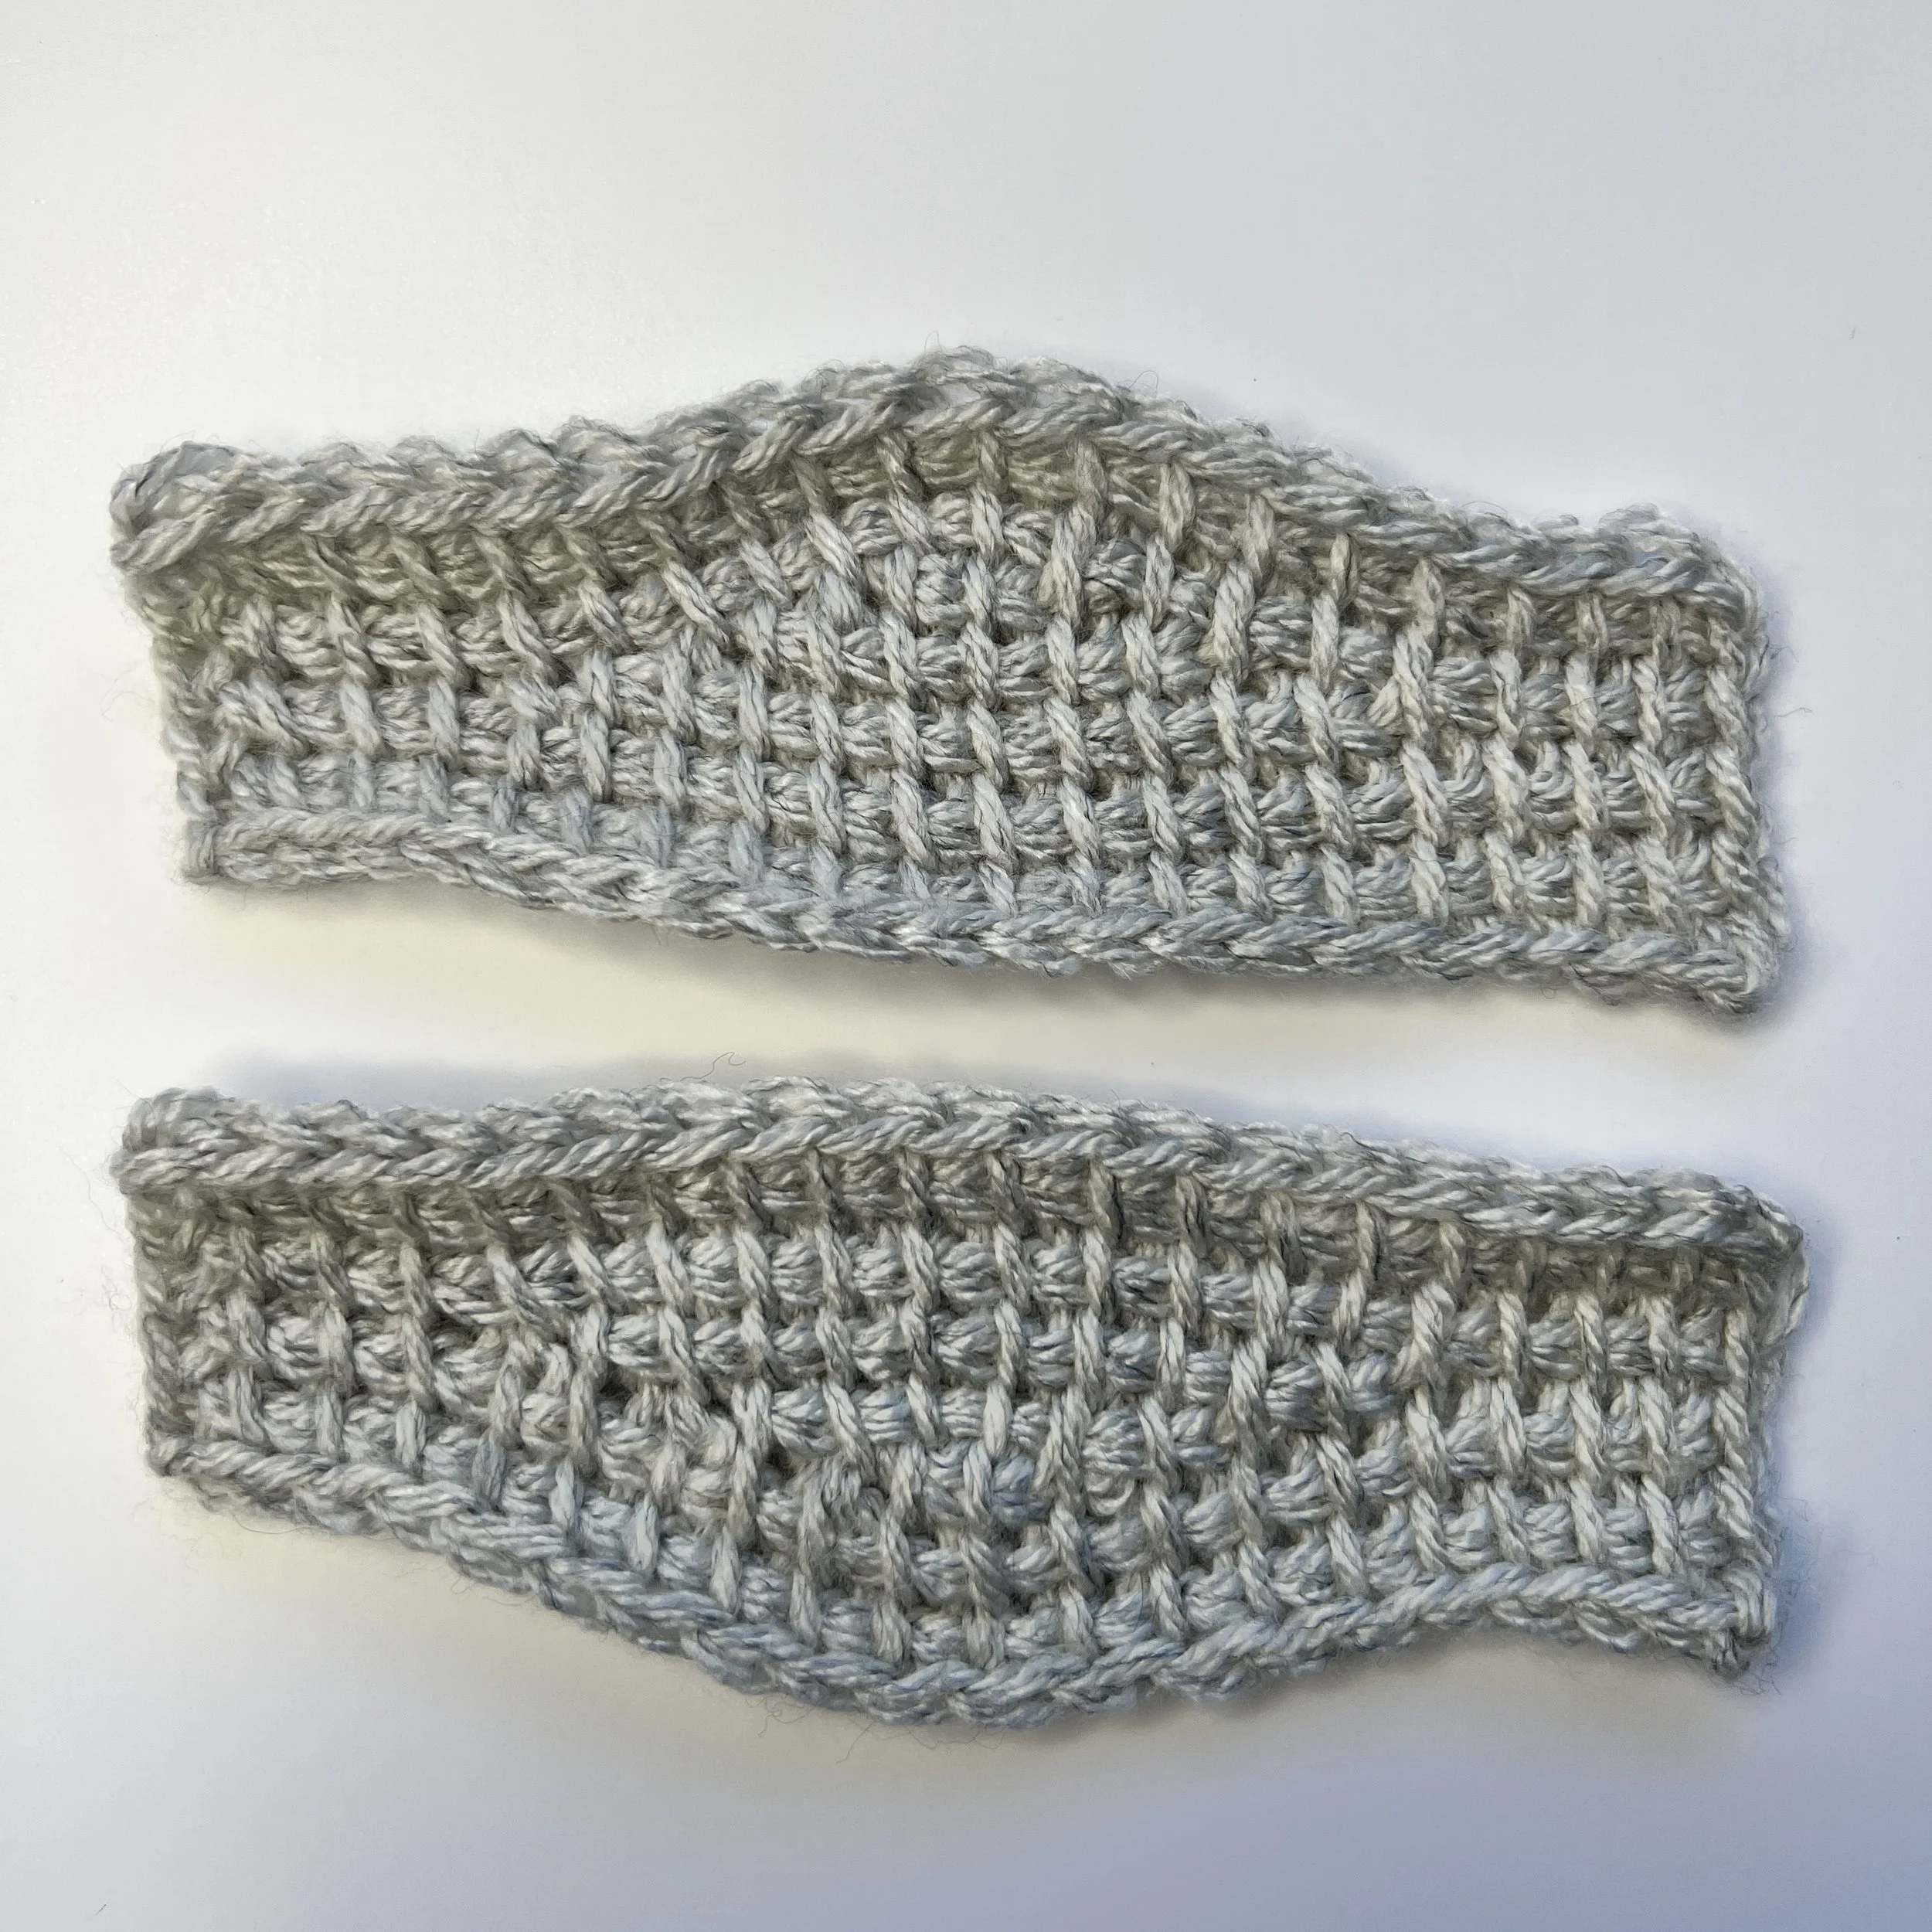
The techniques used for both methods are identical but are worked in a different order. The curving effect you can make with the two variations changes the look of the fabric and the method you use will depend on where you want your curved edge to be - closer to the foundation row or the bind off row.
There can be a lot of counting involved in making centre short rows. A good designer will give you all the different counts required to check the accuracy of your work, but you can avoid all the counting by using markers and understanding how much wider or narrower each short row will be.
In the swatches for this lesson, each short row becomes either narrower or wider by 2 stitches on each side: 4 sts wider or narrower per centre short row.
You can experiment with different shaped curves by making short rows wider or narrower by larger numbers. For example, if you make short rows wider by 5 sts on each FwdP and RetP (10 sts wider per short row), your curve will be more subtle than the one in this lesson.
Narrow to wide short rows
You will need two markers to make this swatch.
Row 1 FwdP: Ch 20, starting with the second loop from hook, pick up a loop in the back bump of each ch – 20 loops on hook.
Row 1 RetP: Ch 1, *yarn over, pull through 2 loops* until 1 loop remains on hook.
Row 2 FwdP: Tss to end, pick up a loop in edge st –20 loops on hook.
Row 2 RetP: As per Row 1 RetP.
Row 3 FwdP: 11 tss – 12 loops on hook, 8 sts are not worked. PM in front and back loops of last st worked. The 1st FwdP short row is complete.
Row 3 RetP: *Yarn over, pull through 2 loops* 3 times – 9 loops remain on hook. PM in live loop. The 1st RetP short row is complete.
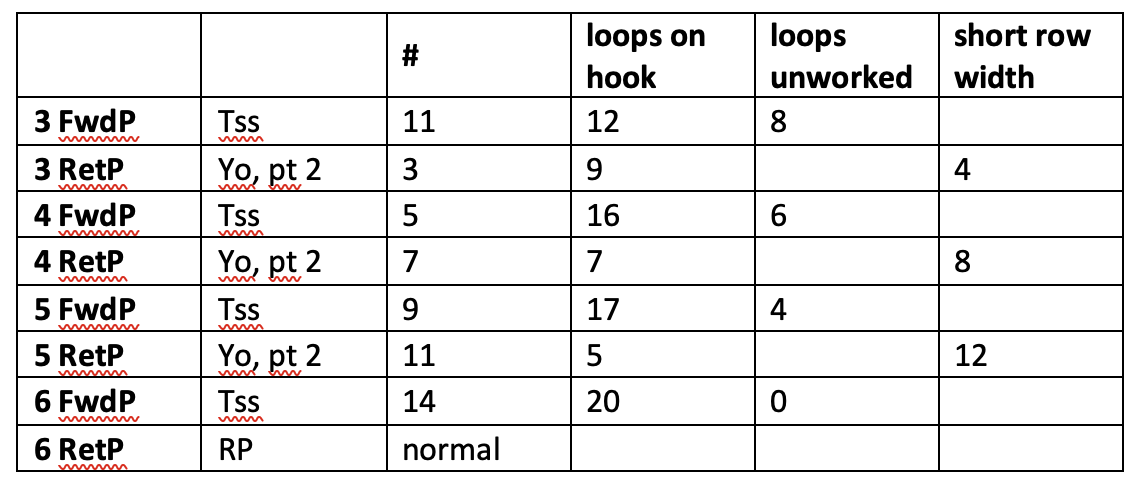
The next instructions are written generically. Refer to the table below for the appropriate stitch counts. The point of writing the instructions this way is to get used to using markers. Each FwdP and each RetP is 2 sts wider than the row before it.
Row 4-5 FwdP: Tss up to the marked st, tss using both front and back loops of marked st, 2 tss. Move marker up to front and back loops of last st worked.
Row 4-5 RetP: *Yarn over, pull through 2 loops* to the marked st, work the twisted/crossed RetP stitch as demonstrated in Return Pass Short Rows tutorial, *yarn over, pull through 2 loops* twice more.
Row 6 FwdP: Tss to end, pick up a loop in edge st – 20 loops on hook.
Row 6-7 RetP: As per Row 1 RetP.
Row 7 FwdP: Tss to end, pick up a loop in edge st – 20 loops on hook.
Bind off: Sl st bo in each st, fasten off and cut yarn.
Wide to narrow short rows
You will need 6 markers to make this swatch.
Row 1 FwdP: Ch 20, starting with the second loop from hook, pick up a loop in the back bump of each ch – 20 loops on hook.
Row 1 RetP: Ch 1, *yarn over, pull through 2 loops* until 1 loop remains on hook.
Row 2 FwdP: Tss to end, pick up a loop in edge st –20 loops on hook.
Row 2 RetP: As per Row 1 RetP.
Row 3 FwdP: 15 tss – 16 loops on hook, 4 sts are not worked. PM in front and back loops of last st worked. The 1st FwdP short row is complete.
Row 3 RetP: *Yarn over, pull through 2 loops* 11 times – 5 loops remain on hook. PM in live loop. The 1st RetP short row is complete.
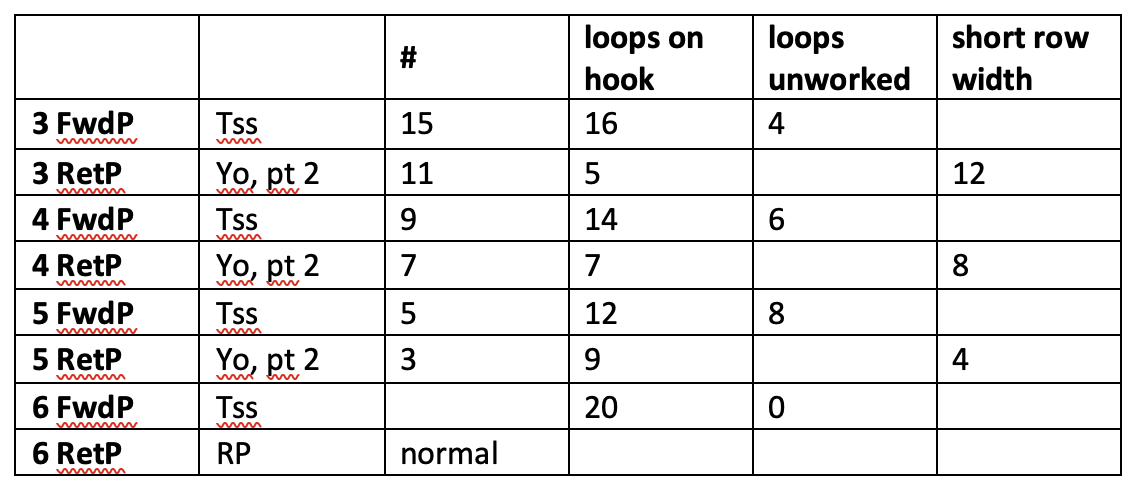
The next instructions are written generically. Refer to the table for the appropriate stitch counts. The point of writing the instructions this way is to get used to using markers. Each FwdP and each RetP is 2 sts narrower than the row before it.
Row 4-5 FwdP: Tss up to 2 sts before the marked st (1 tss and the marked edge st are unworked from row before). PM in front and back loops of last st worked.
Row 4-5 RetP: *Yarn over, pull through 2 loops* to 2 sts before the marked st. PM in live loop.
Row 6 FwdP: *Tss up to marked st, tss using both front and back loops of marked st* 3 times, tss to end, pick up a loop in edge st – 20 loops on hook.
Row 6 RetP: Ch 1, *yarn over, pull through 2 loops up to the marked st, work the twisted/crossed RetP stitch as demonstrated in Return Pass Short Rows tutorial* 3 times, *yarn over, pull through 2 loops* until 1 loop remains on hook.
Row 7 FwdP: Tss to end (inserting hook under both loops of the 3 twisted/crossed sts), pick up a loop in edge st – 20 loops on hook.
Row 7 RetP: As per Row 1 RetP.
Bind off: Sl st bo in each st, fasten off and cut yarn.
Patterns with short rows
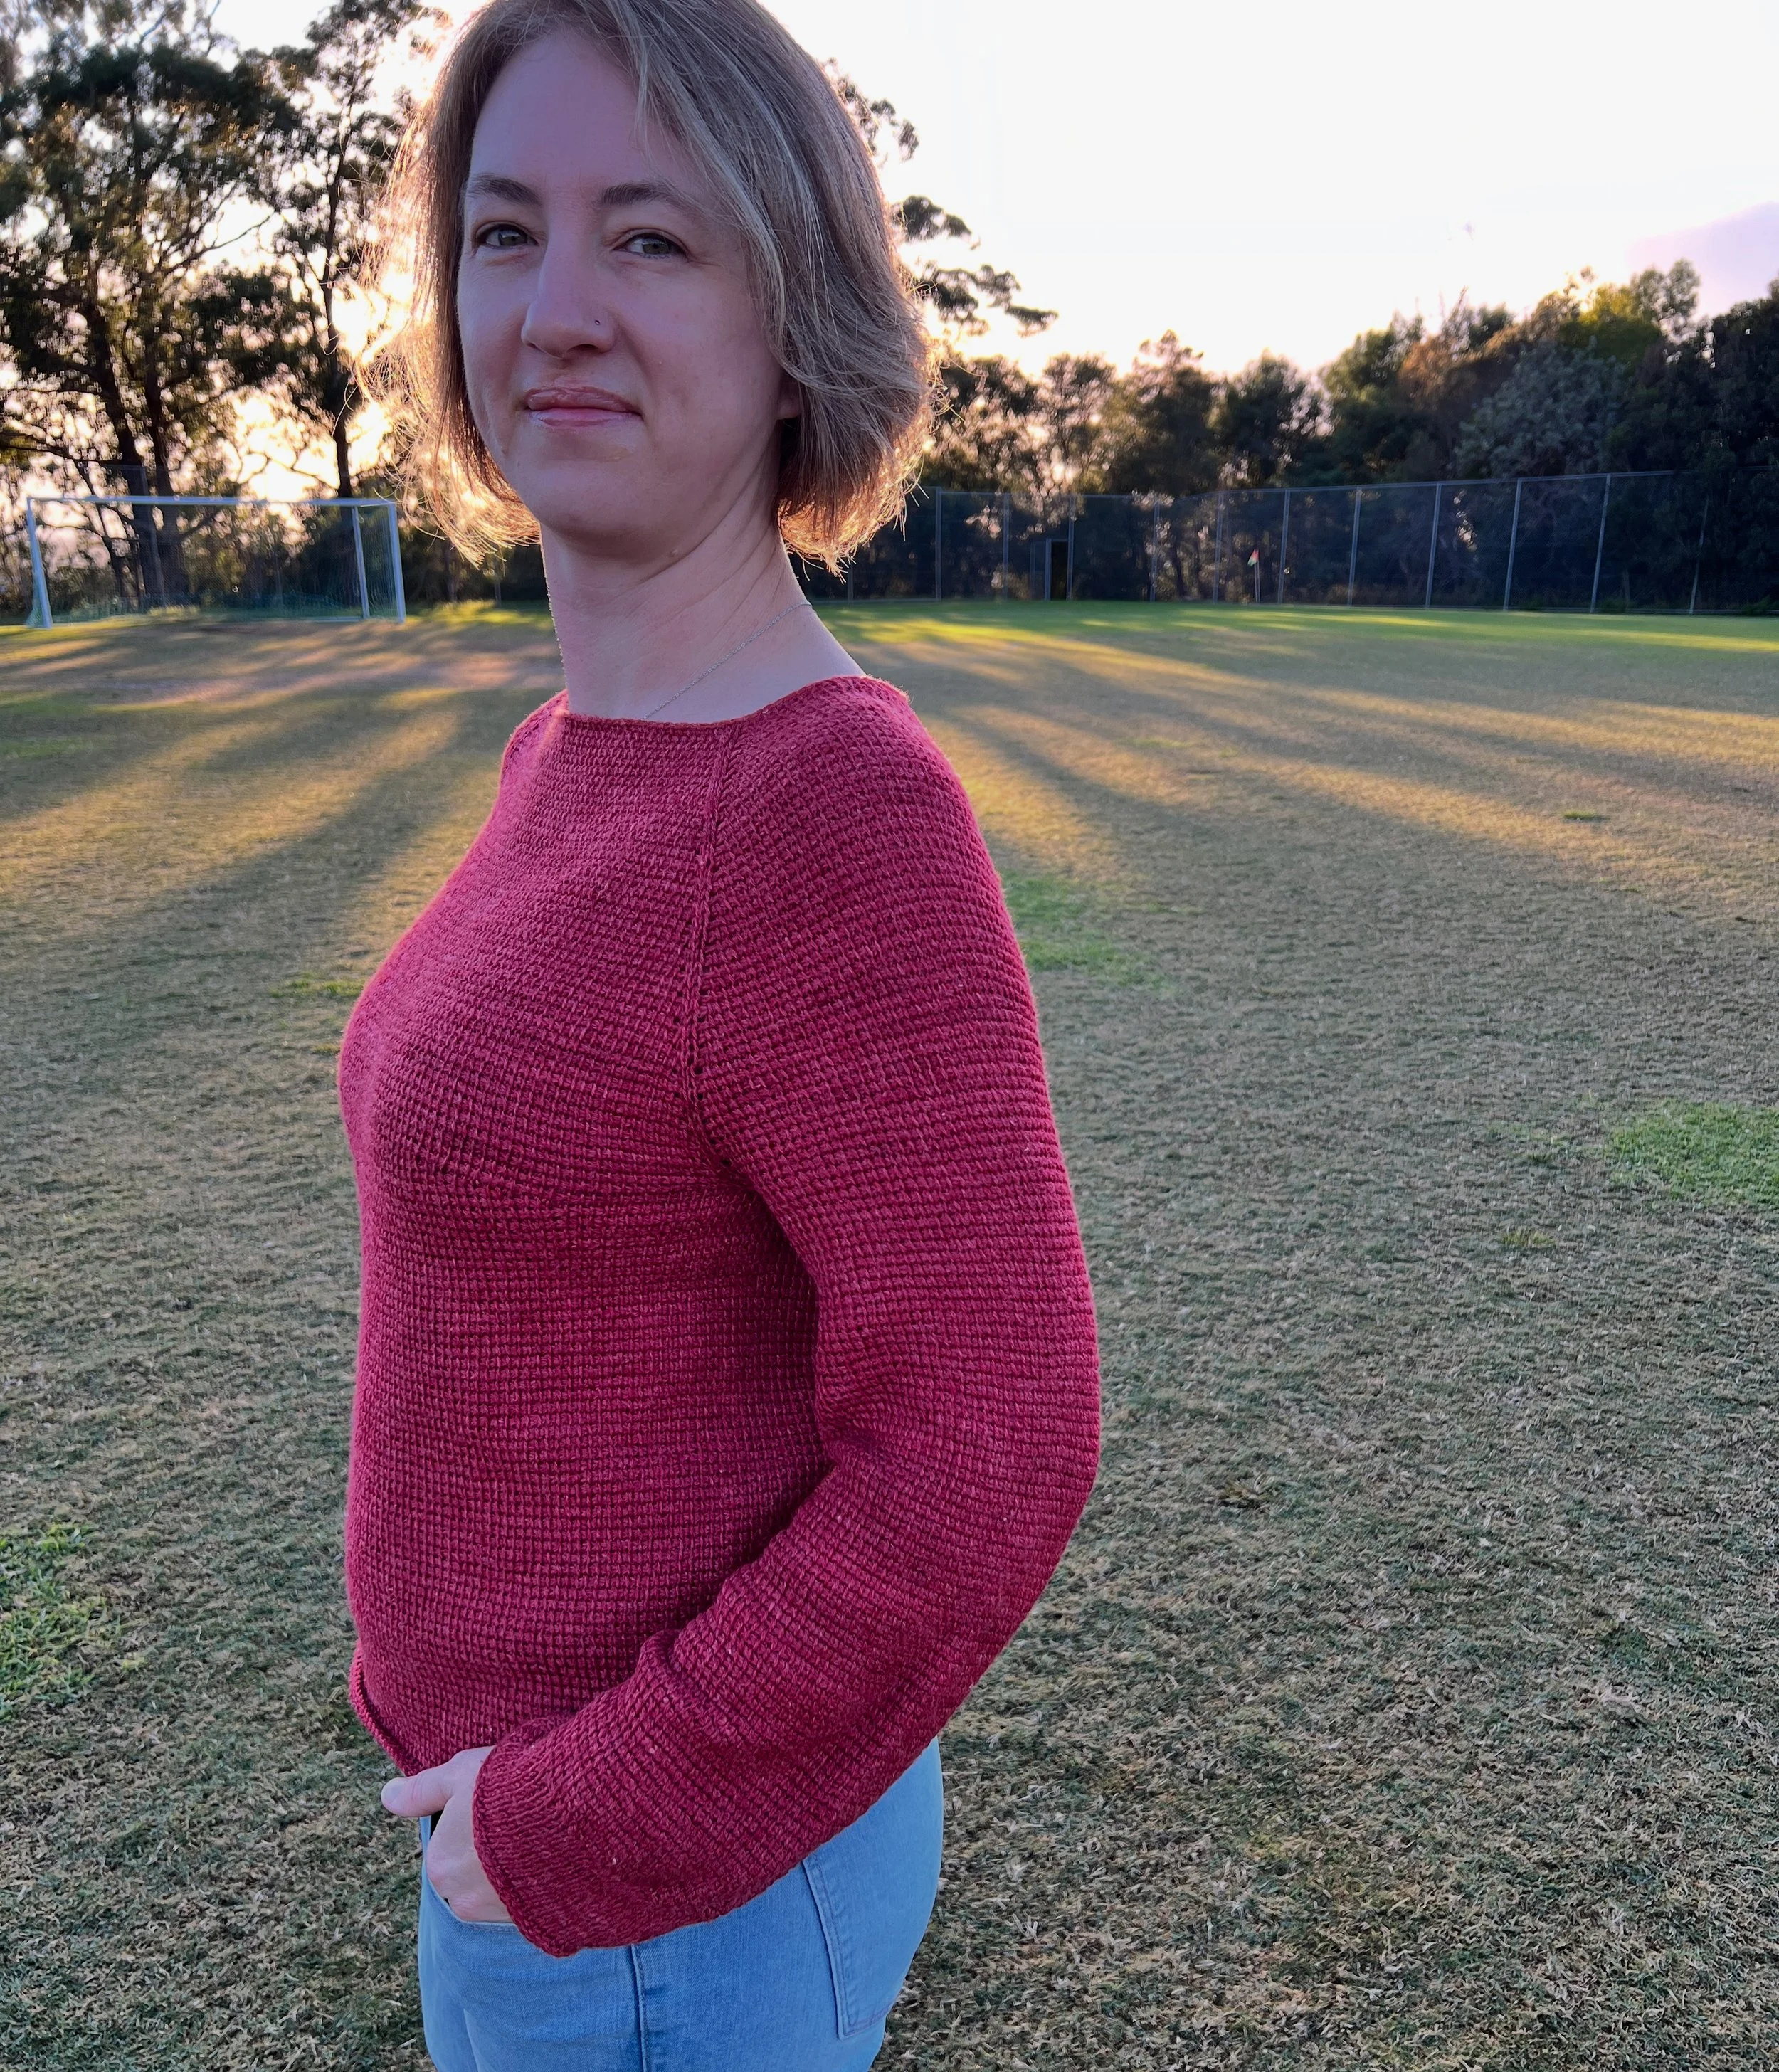
The Andy Jumper is named after my dearly departed Grandfather Andy (Andrew). Andy was a no fuss kind of man. He was practical, he was simple and steadfast. I started making my first sample of this jumper just before he passed and I was thinking of him as I was making it. Naming it after him after he left us just seemed fitting.
The Andy Jumper is a top-down raglan style jumper. It includes short rows to raise the back of the neck. 10cm/4in positive ease is recommended on the widest part of the torso.
Optional centre short rows can be added to include bust darts and/or to create a curved base.
I recommend following my free short row tutorials before you tackle this project, all the variations will be used in this project.
Skills
Tunisian simple stitch
Work in the round with a cabled hook (connecting stitch)
Tunisian knit stitch
Increases and decreases
Slip stitch cast on
Tunisian simple stitch short rows
Yarn
Raxor Yarns, raw bamboo sock, fingering weight (Australian 4 ply), 100g/400m, 80% superwash merino, 20% raw bamboo. This is my red sample. Unfortunately, this yarn is no longer available, please use any yarn you can achieve correct gauge with.
My white sample was made using Fibre Arts Shed merino/Donegal nepp yarn. This sample used a different gauge to the red sample and fits differently to the published pattern.
Yarn Quantities
Yarn quantities are calculated based on number of sts in the entire jumper. This includes long sleeves and 60 torso rounds. A 10% contingency is included in these yarn estimates to incorporate optional bust darts and a curved base. If planning on a shorter or longer torso or sleeve, adjust yarn estimates to accommodate this.
348 (392, 452, 496) (560, 602, 660) (694, 770, 800) g
1392 (1568, 1808, 1984) (2240, 2408, 2640) (2776, 3080, 3200) m
1522 (1715, 1977, 2170) (2450, 2633, 2887) (3036, 3368, 3500) y.
This estimate is generous. For example, my size 3 sample weighs 410g and includes bust darts but not a curved base. I had 4 skeins of yarn, and they were all slightly more than 100g each, so I did not need a 5th skein.
Sizes & Measurements
Sizes are expressed in this pattern as
1 (2, 3, 4) (5, 6, 7) (8, 9, 10).
A - neck circumference: 58 (65.5, 67.5, 71.5) (76, 73.5, 78) (80, 82, 82) cm, 22.75 (25.75, 26.5,
28.25) (30, 29, 30.75) (31.5, 32.25, 32.25) in.
B - yoke depth (neck to armpit): 18 (20, 22, 22) (24, 24, 26) (26, 28, 28) cm, 7 (7.75, 8.75, 8.75) (9.5,
9.5, 10.25) (10.25, 11, 11) in.
C - upper arm circumference: 33.5 (34, 38.5, 41.5) (44.5, 51, 54) (56.5, 62, 66.5) cm, 13.25 (13.5,
15.25, 16.25) (17.5, 20, 21.25) (22.25, 24.5, 26.25) in.
D - bust circumference: 87.5 (98, 108.5, 119) (129.5, 140, 150.5) (161, 172.5, 181) cm, 34.5 (38.5,
42.75, 46.75) (51, 55, 59.25) (63.5, 68, 71.25) in. Include a minimum of 10cm/4in positive ease.
E – torso length (armpit to base): 37cm / 14.5in
F – sleeve length (armpit to cuff): 44.5cm / 17.5in

Wirambi is the Dharag word for ‘bat’ . Dharag is the language of the Dharawal people who come from a large area south of Sydney, Australia. The Dharawal people are the traditional custodians of the land upon which I live. I thought calling this sweater ‘bat wing’ was boring but apt, so I decided to call upon Australia’s ancient history for its name. Our house backs onto bushland. The soft tones of green surround our home and I see flashes of bird life all day. At night, we hear the little fruit bats as they whizz past our bedroom, often feasting on insects they find in the trees in our native garden, especially in the summertime.
Wirambi is made in two pieces from the top down, which are then seamed. The pieces start with a very long chain and some very long rows. A series of short rows are made which creates a subtle shoulder drop that achieves perfect drape on the arms.
Supplies
5mm interchangeable Tunisian crochet hook with detachable cable.
Detachable cable at least 80cm long for making the first part of the sweater. Change to a shorter cable for the torso if desired.
2 stitch markers
Darning needle
Yarn & Quantity
Stitchcraft & Wizardry fingering weight “House Elf Liberty” base of 85% superwash, extra fine merino and 15% nylon. Australian 4 ply, 100g/400m.
325 (400, 425, 450, 475)(500, 525, 550, 575) grams
1300 (1600, 1700, 1800, 1900)(2000, 2100, 2200, 2300) metres
1422 (1750, 1859, 1968, 2078)(2187, 2297, 2406, 2515) yards
Sample is made in size 3 and used a 5 x 100g fade set called ‘Care Bears’.
Sizes & Measurements
Sizes available are 1 (2, 3, 4, 5)(6, 7, 8, 9).
Refer to attached schematic for measuring points as listed below.
a) Neck opening width: 21 (23, 23, 23, 23)(23, 25, 25, 25)cm / 8.25 (9, 9, 9, 9)(9, 9.75, 9.75, 9.75)”
b) Sleeve from neck opening to cuff: 42 (43.5, 45.5, 48, 50.5)(53, 54.5, 54.5, 56.5) cm / 16.5 (17, 18, 19, 19.75)(20.75, 21.25, 21.25, 22.25)”
c) Width from cuff to cuff: 105 (109.5, 114.5, 119, 124)(128.5, 133.5, 133.5, 138)cm / 41.25 (43, 45, 46.75, 48.75)(50.5, 52.5, 52.5, 54.25)”
d) Sleeve from armpit to cuff: 19 (19, 19, 19, 19)(19, 19, 16.5, 16.5)cm / 7.5 (7.5, 7.5, 7.5, 7.5)(7.5, 7.5, 6.5, 6.5)”
e) Upper torso width (outer armpit): 66.5 (71.5, 76, 81, 85.5)(90.5, 95, 100, 105)cm / 26.25 (28, 30, 31.75, 33.75)(35.5, 37.5, 39.25, 41.25)”
f) Lower torso width: 43 (47.5, 52.5, 57, 62)(66.5, 71.5, 76, 81)cm / 16.75 (18.75, 20.5, 22.5, 24.25)(26.25, 28, 30, 31.75)”
g) Lower torso circumference: 85.5 (95, 105, 114.5, 124)(133.5, 143, 152.5, 162)cm / 33.75 (37.5, 41.25, 45, 48.75)(52.5, 56.25, 60, 63.75)”
h) Shoulder drop from neck to end of short rows: 15cm / 6”
i) Cuff circumference: 24 (24, 28.5, 28.5, 31.5)(31.5, 36, 36, 40)cm / 9.5 (9.5, 11.25, 11.25, 12.5)(12.5, 14, 14, 15.75)”
j) Lower torso height: 16 (16, 16, 16, 16)(16, 16, 16, 16)cm / 6.25 (6.25, 6.25, 6.25, 6.25)(6.25, 6.25, 6.25, 6.25)”
k) Total height at middle: 56.5 (56.5, 58.5, 58.5, 60)(60, 62, 62, 64)cm / 22.25 (22.25, 23, 23, 23.5)(23.5, 24.5, 24.5, 25.25)”
Skills required to make Wirambi
The entire sweater is made from Tunisian simple stitch (tss). Some of the rows are very long.
Short rows are incorporated for 30 rows at the start of both sides of the sweater. Video tutorials and an informative blog accompanies this pattern which explains in full how to make short rows that don’t result in holes in the fabric. It is highly recommended to make swatches in a thicker yarn prior to making the sweater to have a good understanding of how to make centre short rows properly.
Three different seaming videos are provided which give the best examples on how to seam Tunisian simple stitch in different circumstances.
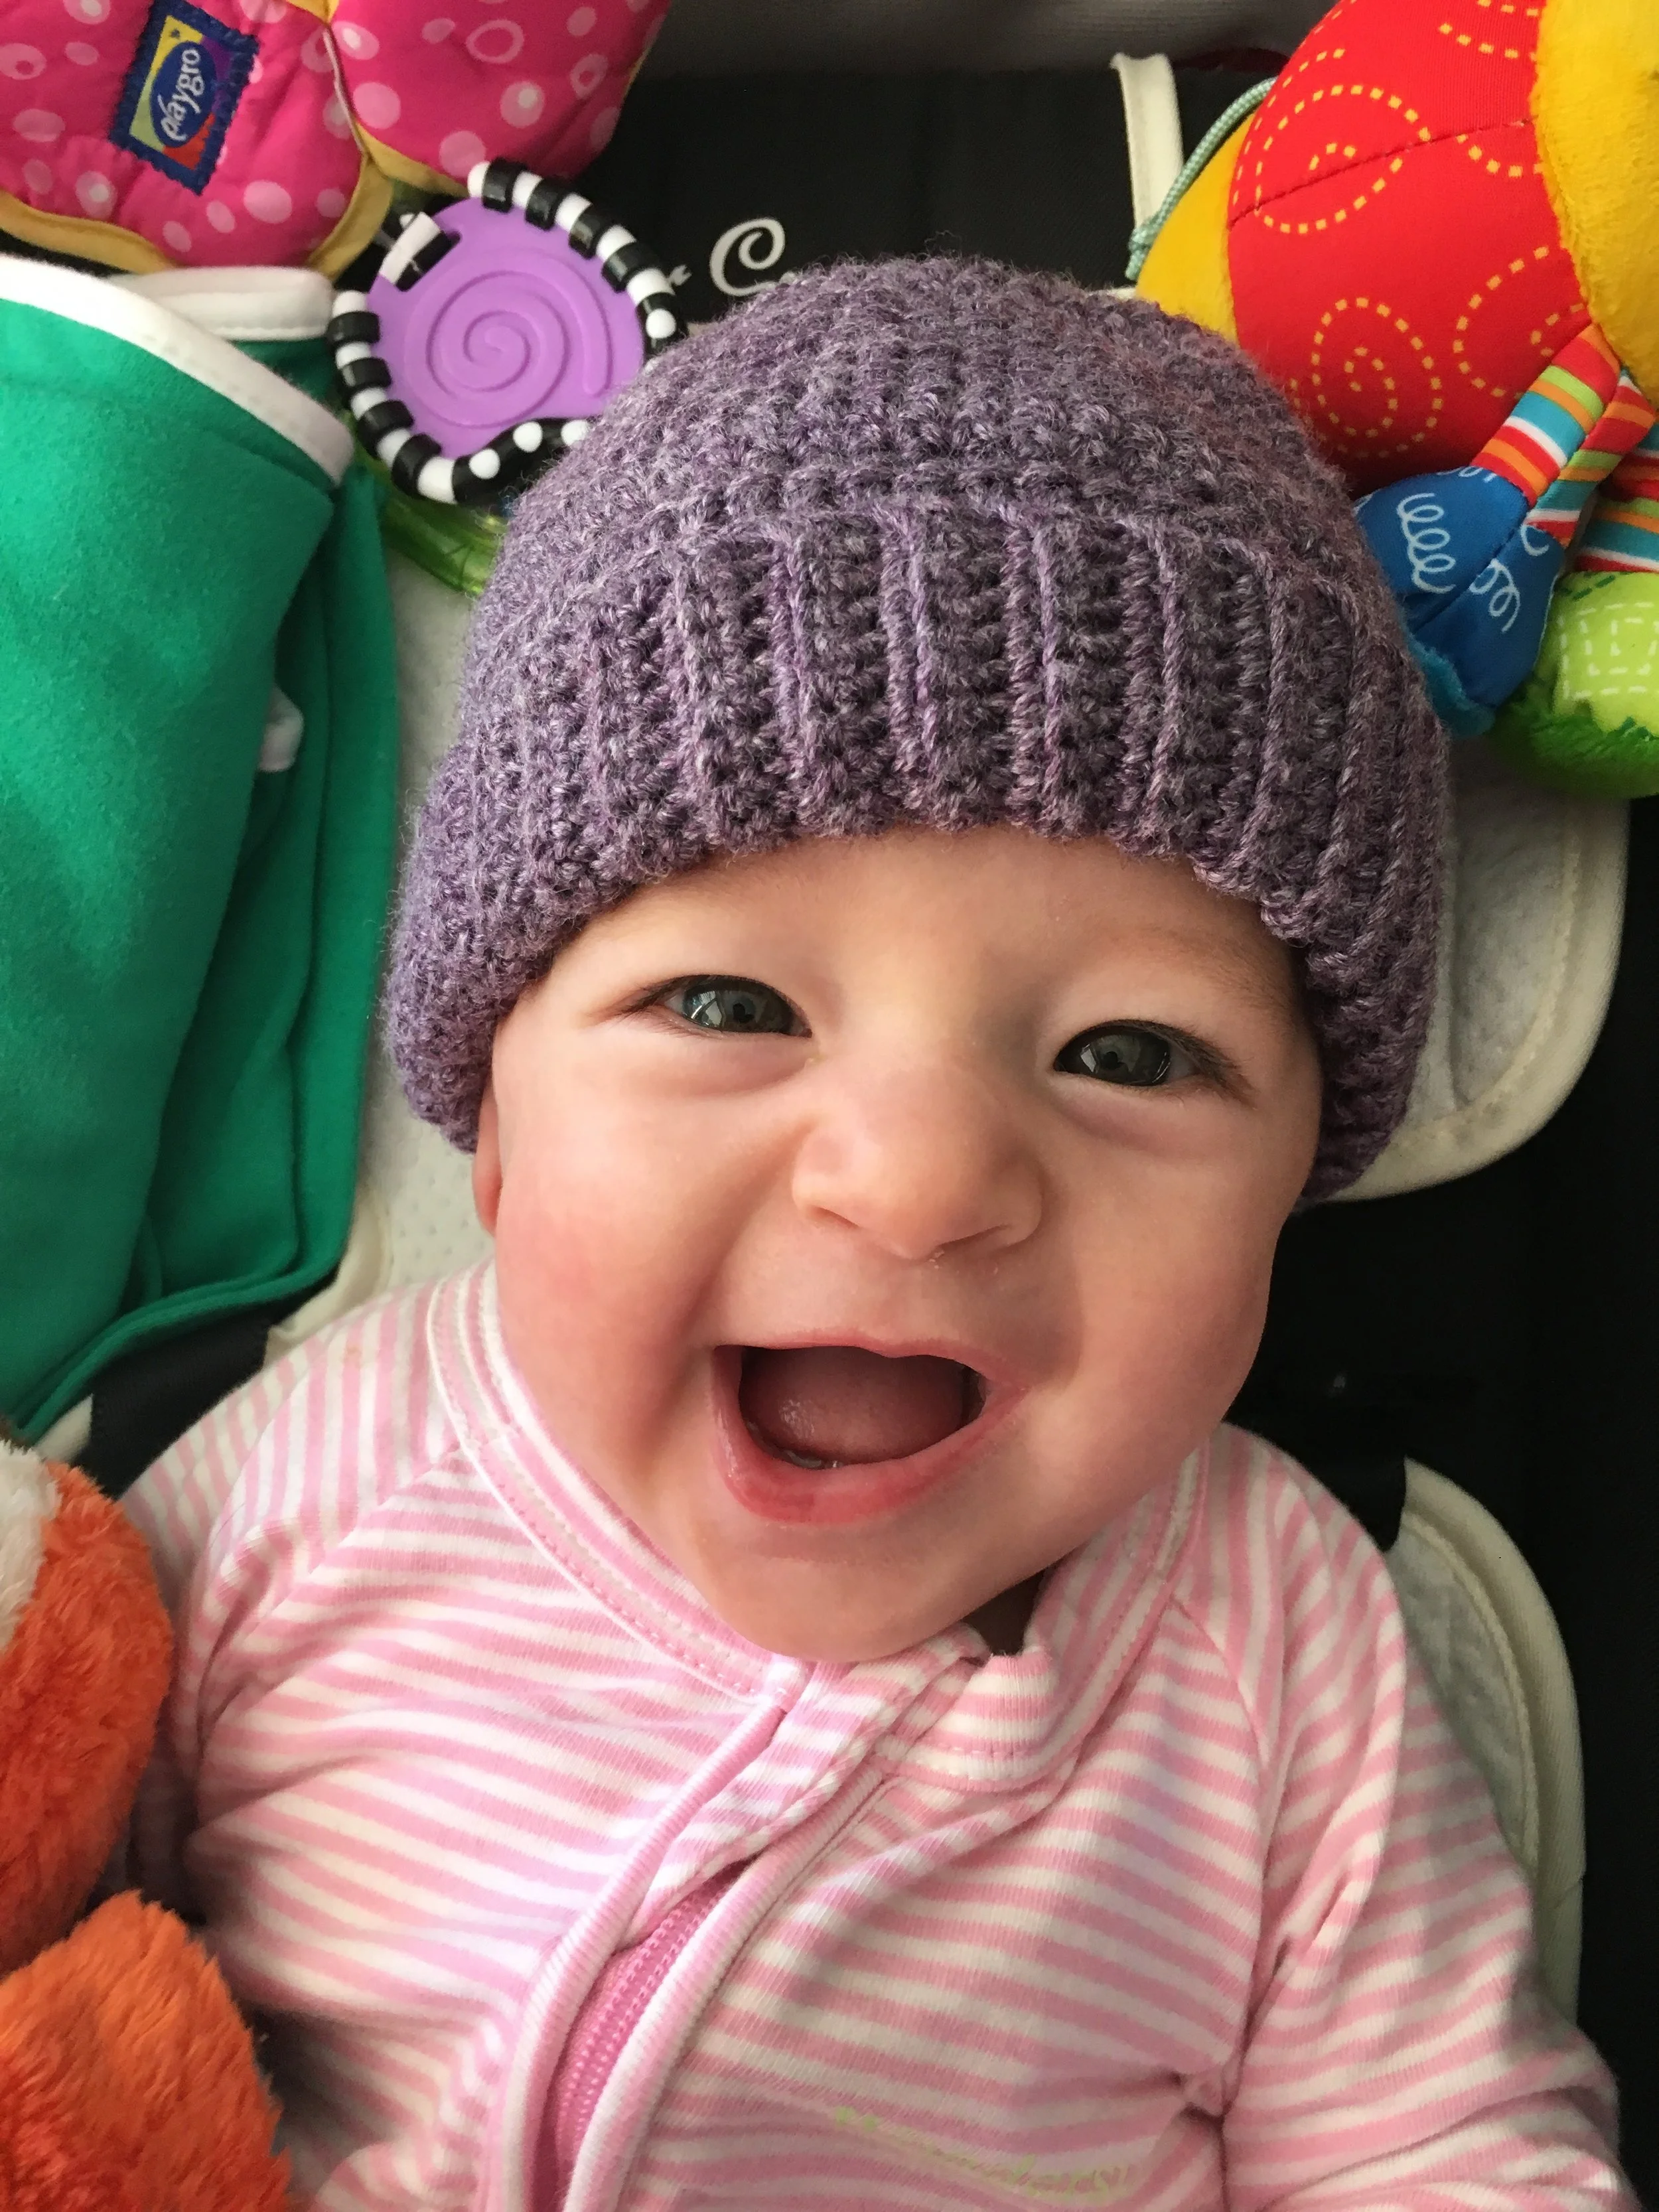
A baby beanie designed for winter. It has a stretchy crocheted brim and is predominantly Tunisian crocheted throughout.
3 sizes are provided in this pattern.
The hat is worked flat in panels of Tunisian simple stitch which are ‘joined as you go’ and seamed at the end.
Tunisian short row shaping can be a little daunting if not tackled before, however once you’ve got the hang of it, you’ll want to use it all the time to create structure and shape to your tunisian crochet projects.
Supplies:
8 ply Stellar from Bendigo Woolen Mills
3.5mm crochet hook for ribbed brim
6mm crochet hook for remainder
A special Tunisian crochet hook is not required.